
I can remember getting my first two slings, a L. parahybana and a C. cyaneopubescens, several years ago. Although I had kept adult tarantulas before, these tiny little gals just seemed so tiny and fragile. I had spent hours researching the care, and had even spoken to a couple of keepers about them. I thought I had the correct setups, and my temperatures seemed okay, but I couldn’t shake the feeling that something with my husbandry was amiss and that I would inevitably end up with two dead slings.
Even folks who have kept larger specimens for years tend to experience more than their fair share of anxiety when they keep their first slings. Part of the problem is that much of what you read about sling care can conflict with what you read about their adult counterparts. For example, good husbandry information will tell you that the Brachypelma smithi is an arid species that requires dry substrate to be content. However, look up the care of a B. smithi sling, and you may find folks keeping them on damp substrate. Or, let’s consider the husbandry requirements for some arboreal species. Look up how to set up a Poeciotheria regalis, and you’ll be told a tall enclosure with a couple of inches of substrate and piece of cork bark flat for climbing. Pokie slings, however, will often burrow and stay beneath the ground until the reach the “juvenile” stage, so more substrate and less height might be prudent.
This conflicting, sometimes confusing, information can prove stressful to those new to the hobby (or even those used to Ts but raising slings for the first time). In the past several years, I’ve been contacted by many hobbyists new to keeping slings about my thoughts on their care. More than a few said that they wished there was a “standard of care” guide for those interested in raising slings for the first time.
Well, I definitely wouldn’t be presumptuous enough to label this attempt at a guide as the “standard”, but I will say that I’ve used the techniques, tricks, and information presented here to successfully raise healthy slings for years. I would definitely recommend that anyone attempting to raise a sling first look up the specific husbandry for the species they will be getting, and to use this FAQ as a springboard for further research. With that out of the way, let’s begin our rather lengthy tutorial on tarantula spiderlings.
Selecting the size of your sling
We’ve all been there. While shopping around for the tarantula species you’ve been eyeing, you find someone who has it for an impossibly good price. You can barely contain your excitement as you click on the photo to read the product description more closely to determine if there is a catch. As your eyes move from word to word, you find the little detail that makes your heart sink.
It’s not just a sling, it’s a small one. Really small.
1/4″ of spider.
Still the price is so good, you’re tempted to add it to your cart and pull the trigger. After all, there isn’t much difference between a 1″ sling and a 1/4″ sling, right?
Well, yes and no.
Baby tarantulas come with their own unique set of challenges, and the tiniest ones can be more challenging still. I usually encourage folks who are buying their first sling to try to get one at least .75″ or so, with spiderlings around 1″ being ideal. Slings of this size are usually better established and a bit more hardy than smaller ones, and it won’t be long until they reach the much less risky juvenile stage. As there will always be some anxiety involved when it comes to raising one’s first sling, a large specimen will bring a bit more piece of mind.
Besides being more fragile and susceptible to husbandry mistakes, spiders 1/4″ or less can be very difficult to see, as they often blend too well with the grains of the substrate. Factor in that many slings burrow, and you will likely spend several months staring at what seems like a plastic container of dirt. This can lead to the keeper constantly worrying that the animal has escaped or died. Also, slings of this size often must scavenge feed, or eat off of larger, previously-killed prey because most prey items offered on the market will be too large for them to take down. However, due to their minuscule size, it’s often impossible to tell whether they are feeding or not as even prey items that were fed upon may appear untouched. Finally, their tiny stature can make recognizing premolt more difficult.
Again, more stress.
Another important aspect to consider is the growth rate of the species. Many of the popular Grammostola, Brachypelma, and Aphonopelma species are very slow growers, especially as small slings. Not only can they take several months between molts, but the growth between molts, especially early on, can be negligible at best. Some of these species are also notorious for fasting, This means that if you purchase that the 1/4″ B. smithi sling you’re eyeing, it will likely be many years before you have an animal that looks like a big, hairy spider. If you’re the impatient sort, the wait can can be more than a bit frustrating.
Does this mean that someone shouldn’t attempt to raise a smaller sling as their first? Absolutely not. An informed hobbyist who is aware of the challenges they may face with a tiny sling may have no problem at all. Obviously, plenty of hobbyists have succeeded in raising the smallest of slings successfully. However, before you hit that buy button, you should be aware of some of the challenges you may face.
Tip: Occasionally, a dealer will indicate the “age” of the spider by using the term “instars”. An instar is the period between each of a tarantula’s molts, and it can be used to identify how far along a sling is in its life cycle. For example, a sling that has molted out of its “eggs with legs” stage (they essentially look like yellow spider eggs with legs when first “hatched”) would be considered “1st instar”. After its next molt, it would be “2nd instar” … and so on. Therefore, a “4th instar” specimen would be a fairly well-establish sling.
Your sling is on its way…now, what to put it in?
When you hit your local pet store to buy a new animal, you likely don’t have any issues finding an appropriate enclosure for it. After all, many of the creatures offered in the pet trade have been staples for years, and several companies have jumped into the lucrative pet industry with specialized enclosures. Buy a hamster? Get a hamster cage. Want some fish? Grab up that aquarium. Picking up that bearded dragon you’ve always wanted? Shell out for that awesome beardie set up kit.
Buy a baby tarantula on the other hand? Good luck.
The fact is, tarantulas are just starting to gain some mainstream popularity in the pet industry, and no one in the mainstream pet trade has, to my knowledge, produced an enclosure specifically for tarantulas, never mind a spiderling. And, as most pet store employees are woefully uneducated on proper tarantulas husbandry, if you do buy a cage from a pet store, you’re likely to come home with something that is inappropriate.
Tip: The popular all-purpose Critter Keeper cages are not appropriate for smaller slings. Although they make them in mini sizes that offer good dimensions for a baby spider, the vent slats in the lids are wide enough to permit a spiderling to escape.
So, what do you do?
The good news is, you may have the perfect sling enclosure in your home right now.
Most serious keepers agree that part of the fun of the hobby is finding new and interesting containers to use as cages. I’ve personally experimented with dozens of plastic bins, containers, and such as my collection has grown, and I can’t walk into the container section of Walmart without scouring the assortment of canisters for something that might work with my Ts.
The most commonly used and appropriate sling enclosure options are quite inexpensive and easily acquired at the local grocery store or online. Just a couple of dollars and ten minutes of time can yield you the perfect sling housing. Let’s take a look at the most widely used containers.
Plastic snap cap or “dram” bottles: Keepers have used these for years, and they are particularly handy for folks who find themselves with huge quantities of slings. They are transparent, secure, and come in an assortment of convenient sizes. To ventilate, use a thumb tack or needle to poke several small holes in the top (I usually put a couple dozen). The only downside is that they are very difficult to vent anywhere other than the top, which means no cross-ventilation. They are also not stackable, which can be a bit inconvenient for those with several slings who want to conserve space.

Plastic dram vials used to house small slings.
Plastic spice jars: These are becoming more popular due to their convenient sizing (small jars are great for the tiny slings) and availability. They come in the same general sizes as the dram bottles, but the softer plastic used makes them much easier to ventilate on the sides. Just heat up a needle on the stove top or use a thumb tack to make a few rings of holes around the top half-inch or so. Many folks have these already in their cabinets, so one can be emptied, cleaned thoroughly, and used in a pinch. They are also readily available online from places like Amazon. Even better, many have little hatches in the lids that make feeding very convenient; just pop the little tab, drop the feeder in, and close it back up. Done.
Tip: Spiders are escape artist and can slip through holes and crevices that seem impossibly small. When making your vent holes, always make sure that they are smaller than the carapace of the T. If you slip up and make a hole that you think might be too large, stick a piece of clear tape over it.

Plastic spice jars make wonderful sling enclosures.
Deli cups: Deli cups are an especially popular enclosure used by hobbyists to house their young spiders. They are very readily available, cheap, stackable, usually quite clear, and easily ventilated. Many keepers get them for free or for less than $1, and I’ve heard of more than a few stories of folks hitting the local deli for some soup or potato salad mostly for the cup. For those with large collections, you can buy them in batches of 50 for about $20. For those looking to house terrestrial slings, the 16 oz size is perfect, offering plenty of substrate depth for burrowers. As for arboreal or fossorial slings, the 32 oz version offers the extra height for climbers and substrate depth for diggers respectively.
Venting these is simple, as they are quite thin and the plastic easily perforated. Just heat up a nail on the stove top, grip it with pliers, and use it to make two or three rings of ventilation holes around the top. I usually space mine about 3/4″ inch apart in a 3/4-1″ band.

A couple of simple deli cups.
Tip: For tiny slings, try using the 2 oz plastic souffle cups. These are usually crystal clear, secure, and much smaller than their 16 oz counterparts. They can also be bought or procured from delis or restaurants.
Amac boxes: These have become very popular in the past couple years, especially for folks who are handy and have some tools. They are crystal clear, very secure, come in a number of sizes, and are easily found at stores like the Hobby Lobby or online at the Container Store. For slings the 2 5/16″ x 2 5/16″ x 4 3/16 size is perfect. The plastic is quite thick on these, so burning holes in can be a bit of an issue. Most folks choose to either drill a series of vent holes with a drill or use a dremel tool to cut a large round hole and add an aluminum mesh vent.

Amac boxes, if modified and vented, can make good sling enclosures.
These boxes can be a bit pricier than the other options, and the ventilation is a bit more difficult to accomplish. That said, they look gorgeous on a shelf. For an excellent tutorial into how to turn Amac boxes into tarantula habitats, click this link. Hobbyist Casey Peter does a great job of walking folks through it with step-by-step instructions.
Tip: If you’re using a new Amac box, try opening and closing it several times before you set if up for the spider. The tops can fit on quite tightly until they are loosened up a bit. This will make it much easier to open when you have your tarantula in it.
And for those who don’t feel handy enough to make their own, Jamie’s Tarantulas sells pre-made ones with all of the fixings. It cost a bit more, but they work great and are ready to use right out of the box.

Three sling enclosures from Jamie’s tarantulas. I have a dozen of these, and I love them.
Setting up the enclosure
Now that you’ve got your enclosure ventilated and ready to go, how do you set it up? What other materials do you need? Personally, I find setting up enclosures to be one of the most enjoyable aspects of the hobby. That said, it’s important to remember that when slings are involved, the correct setup is paramount to the aesthetic of it. Let’s look at what you’ll need.
Substrate – There are many types of materials you can use for substrate, including coco coir, peat, and plain top soil. For a detailed description of the pros and cons of each, click the link to read “Choosing the Right Substrate for Your Tarantula“. Any of these, or a combination of them, work just fine, although the coco coir is quite popular with many hobbyists.
Water dish – For slings 1/2″ or larger, I strongly encourage the use of a water dish if one will fit (more on this in a bit). For deli cup enclosures, the small bottle caps from bottled water work great. If using a smaller enclosure, spraying or drizzling water on the substrate is always an option. Still some folks have gotten quite creative by using things like small single block Legos and golf Ts for water dishes. Don’t be afraid to experiment.
Cork bark – Spiderlings are nervous and reclusive creatures. After all, you have to figure that in the wild, the more they are seen, the better the chance they are preyed upon and eaten. Therefore, it’s always good to give them a place to hide. A small piece of cork bark can provide them with much appreciated cover and security.
Sphagnum moss – Sphagnum moss not only looks pretty in an enclosure, but it serves a couple valuable purposes. First, it holds moisture, so a keeper using spraying or dribbling to keep his pet hydrated will soak down the sphagnum to give the T a drink. Second, if cork bark isn’t available, it can serve as a makeshift hide for the slings, as many will crawl under it for cover.
Plastic/silk plant leaf – Again, another accessory that has more purpose than just the aesthetic. A plastic leaf can provide security for the tarantula as well as moisture. If you want to water your T but don’t have a water dish, spraying the plastic foliage is a great way to give your sling the opportunity to drink. For smaller enclosures, you can just lay the leaf on the substrate. For larger enclosures, most folks like to use hot glue to affix the leaves to the cork bark.

A piece of cork bark with a leaf hot glued onto it.
Now, unfortunately, some of the components will have to be purchased in “bulk”, as sphagnum moss is sold in bags and plastic leaves are usually plucked off of much larger plastic plants and vines. That said, this hobby is incredibly addictive, so just think of that bag and that plastic vine as a future investment.
Now that you have all of the components, here’s what you’ll need to do:
- Make sure that you have enough ventilation in your enclosure. You can’t drill or burn holes once the tarantula is inside, so if you think you might need more, add them now. If possible, make sure you have good cross-ventilation by putting the vent holes on the sides and not the top.
- Add the substrate. If housing a terrestrial sling, you’ll want to fill at least two-thirds of the enclosure with packed down substrate. Although slings are lighter and less prone to injury from falling, you want to makes sure the height from the substrate to the top of the enclosure isn’t too high. A fall from too high, especially onto something hard like cork bark or a dish, can be fatal to a T. Also, notice the key phrase “packed down”. There is no need to leave the soil loose and fluffy; they can easily dig through it if they want. For an arboreal species, you don’t have to use quite as much substrate, but you still want to include enough to allow for burrowing (an inch or so is usually sufficient).
- Add a starter burrow or cork bark hide. Personally, I like to use a utility knife to trim the cork bark a bit so that it fits neatly into a corner. For terrestrials, I will also use the handle of a paint brush to create a starter burrow beneath it. Most slings will scramble beneath to hide once being housed. For arboreals, I lean piece against the side of the enclosure at an angle. Fossorial, or burrowing species, will usually only need a starter burrow down the side of the enclosure. I use a pencil or the back of a paintbrush to make the tunnel straight down, then I pack the substrate good and tight around it. When I slip the brush or pencil out, the hole that remains is perfect for a shy little sling.
- If the leaf is not attached to the cork bark, add it now. In smaller setups, I’ve seen the leaf just planted in the substrate. This is fine, although if your little guy/gal is a digger, the fake foliage won’t stay up for long.
- Place a few pinches of sphagnum moss around the den. Again, if you’re not able to include a hide, this is a great way to provide some security for your sling. If you go this route, create a starter burrow down the side of the enclosure for the sling.
- Finally, add and fill the water dish. Nothing to this step; just push it down into a corner and fill it up with water. Viola…you’re done!

Tip: If using coco coir, especially damp, be sure to pack it down as tightly as you can. When it dries. coco fiber loses a lot of its volume. An enclosure with four inches of moist substrate to start will likely have only a couple of inches or so by the time it dries and settles.
Receiving and unpacking your sling
When slings arrive, they are usually safely cocooned in moist paper towel or tissue inside a plastic vial or, for the tiny ones, inside a piece of straw with paper plugs in each end. Because slings are very fragile and tiny, and it can be very difficult getting the paper towel lining out, extreme caution is needed when attempting to get the sling out of its travel packing and into its new home.
To remove the slings from the straws, simply pull the plug from both ends and set the straw in the enclosure. You can either let the sling come out on its own, or gently blow in one end to get it to come out.
For removing slings from the travel vials, I recommend using tweezers or tongs. Startled slings will sometimes bolt out, and you want to keep your finger away from them. Next, it’s time to carefully extract the packing material with the spider inside.
- First, pull the paper plug covering the hole if there is one (sometimes folks just fold over the paper towel to cover the opening.
- Next, get a grip on the edge of the towel while being very careful not to catch the spider or its legs.
- Once you have a really good grip, you want to very carefully pull out the entire cylinder of lining material at the same time. If the towel doesn’t come out in one chunk but instead starts to form a cone-like shape as the layers stretch out STOP IMMEDIATELY. If you continue to pull the towel you can constrict the tarantula, crushing it. It’s best to stop trying to extract it and instead let it come out on its own at this point.
- Once the paper towel or toilet paper is out, place it on the substrate and find the edge of the towel (it’s usually a flat piece rolled into a cylinder). Now, slowly start rolling it open. The unrolled paper towel can become quite long and cumbersome, so I will sometimes use scissors to carefully snip away sections of it as I unroll.
- When the spider is exposed, use a paintbrush to carefully guide it off the towel, or leave the small piece of towel it’s standing on behind and remove it later when the sling is exploring. Either works.
The video below shows the process many times (skip to 4:15 for the actually rehousings). Again, the key is to take your time and work very carefully around the fragile T.
If it’s too difficult to safely remove the packing and the sling, and if the enclosure offers enough room, your best bet is to place the opened vial inside and to let the animal come out on its own. Most will venture out if left in over night. Some vendors actually recommend that you use this method to rehouse the sling.
Tip: If your sling’s legs are curled or if it looks lethargic when you receive it, try putting it in a small container with some moistened paper towel and setting it aside in a warm corner of your home. Travel can be very stressful for Ts, and if they were not properly hydrated before their trip and the weather is warm (or, if it was too close to a heat pack), they can become dehydrated. Sometimes a good drink is all they need to spruce back up. Also, after being shipped in very cold or very warm temps, I like to unpack mine and let them adjust to my home’s temps for an hour or so before rehousing.
How long should you wait to try feeding it?
A lot of vendors will ask that you wait to feed your new slings for a couple of days or so after receiving them to let them acclimate and settle in. That’s actually a very prudent practice. After spending hours being bounced around on planes and trucks, they are suddenly deposited into brand new and alien environments. One would think they might need some time to calm down and adjust.
I have to admit, however, that I try feeding most of mine the same night to get a small meal in them after their shipping ordeal. I’ve found that tarantulas are incredibly resilient, and most will eat that same night.
Keeping your slings hydrated
One of the reasons slings are more susceptible to dehydration is that they lack the waxy coating on their exoskeletons that their juvenile and adult counterparts have. This layer helps the tarantula retain moisture and protects it from drying out. Until this coating develops, usually after several molts, it is much easier for a sling to die from desiccation. Although the so-called arid species are much more resistant to dry conditions, the slings can still run the risk of drying out. This can be a particular danger in the winter time when furnaces and fireplaces are heating homes and severely drying out the air. It’s important that all slings, even those who supposedly thrive in dry conditions, stay hydrated.
But how to do it?
Start by using water dishes. I use water dishes in just about all of my sling enclosures that I can fit them in, and I strongly advocate that others use them as well. Unfortunately, there is a persistent rumor that says that tarantula slings can drown in water dishes. Well, long story short, that’s just not true (for a more in-depth explanation, please check out the article Tarantula Controversies – Should I Give My Tarantula a Water Dish). And the benefit they add by affording a source of drinking water and extra humidity make them invaluable, in my opinion. Many keepers will often overflow the water dishes to also give the spiders a moist spot of substrate as well.
As for what to use for water dishes, the lids for plastic water bottles work fantastically well. They are small, blend into the enclosure well, and can be recycled if they get soiled. For spiders less than .5″, I’ve heard of folks getting quite creative. Some examples are:
- Golf tees – Chop off the spike to length, plant them in the substrate, and fill the top with water.
- Legos – Apparently, the tiny round single-peg pieces make for good dishes!
- Plastic pill capsules – You know those little plastic blister cards that you have to pop your pills out of? Well, some hobbyists carefully trim each of those little recessed disks off and use them as dishes.
The fact is, for a keeper who wants to make sure her slings have water at all times, there are many options.

A 32 oz deli cup arboreal setup with a bottle cap water dish.
Tip: It’s often easier to toss than to clean tiny water bowls, so it’s good to have many on hand, even with smaller collections. A good way to get a bunch quickly is to buy 12 packs of bottled water, either for personal consumption or to use for watering your spiders.
Another common way to provide moisture to slings is by spraying or misting. This is an age-old method that has probably been around as long as the hobby. It’s also fairly simple to do. Open the top, spray a few squirts on the side of the enclosure, the plastic foliage, and the corner of the substrate — done. Those who put sphagnum moss in their enclosures will also want to spray that down as well, as the moss will retain moisture for longer.

A spray bottle with an adjustable nozzle is a handy tool for misting, soaking substrate, and filling water dishes.
It’s important for keepers that use this method to come up with a regular schedule, as sprayed water can evaporate quickly leaving a small window for raised humidity and the availability of drinking water. In the warm summer months or during the winter when the furnace is running non stop, it may be necessary to spray more often. For those who choose this method, the trick is to add some water without saturating the entire enclosure. Enclosures that are too moist and stuffy can be a death trap for slings. It takes experimentation and practice, but it can be an effective water delivery system.
Tip: As an alternative to spraying and misting, some keepers will instead “make it rain”. Instead of just spritzing the inside of the enclosure, some will instead sprinkle water over all or part of the substrate to simulate a rain shower. The water is then allowed to soak into the substrate, keeping it moister and providing humidity for much longer. This can be done by poking holes in the top of a plastic water or juice bottle and using it as a watering jug.
Some keepers choose to keep all of their small slings on moist substrate. The theory here is that all slings, due to their lack of that waxy layer, can benefit from a moist environment. Whether it be a traditional moisture-loving species like H. gigas or an arid species like the G. rosea, keepers who favor this method make sure they all have a moist and warm home. Then, as the more arid species molt toward maturity and develop that protective coating, they allow the cages for those spiders to dry out.
Keeping all or just part of the substrate moist for all species means a more humid environment with less spraying. For keepers who are concerned about their Ts drying out, this leaves a much larger margin for error. If a keeper forgets to spray for a bit, the moisture that is slowly evaporating from the substrate can keep the humidity up so that the spider doesn’t become dehydrated.
My own practices
First off, almost all of my slings get water dishes. I’ve personally seen many of them drink, and I like the extra defense against dehydration they afford me. With most species, I will also overflow the dish, giving them a moist spot of substrate. For the two that don’t currently have them, I keep a portion of the substrate moistened and dribble water on the sphagnum and fake leaves for drinking once a week or so. As soon as these two are rehoused into larger enclosures, they will get dishes.
For my moisture-dependent species like O. violaceopes, H. gigas, T. stirmi, and C. lividum, I provide deep moist substrate, keeping the bottom layers moist at all times. To do this, I start with moist substrate in the enclosure, then I use the “rain” method (using a water bottle modified with several holes in the top to periodically simulate a rain shower) to re-wet it when it starts to dry out. I generally only have to do this a few times during the summer months, and once a month or so during the winter. Ideally, you want the water to filter down the sides and deep into the substrate to keep the bottom levels moist.
I’ve also found a way that works for me to keep the moisture in the enclosure up for arid species while avoiding overly moist enclosures. When I pack the substrate into a new sling enclosure, I start with an inch or two (depending on the depth of the container) of moist sub mixed with a bit of vermiculite. I pack this down well, then fill the cage up the rest of the way with dry sub. Next, I make a starter burrow down the side of the enclosure for the new occupant. This keeps the top level dry, and allows the sling to use its instinctual burrowing behavior to dig down and find the humidity level it needs.
I first tried this technique with an Aphonopelma anax sling that was not settling in well after a couple of months in my care. The poor sling cowered in the corner, did not dig, did not eat, and didn’t seem to be thriving like my other slings. Even when I moistened a corner, the sling didn’t show a preference for it.
One night, I made a little trench down the corner of its enclosure to the bottom and poured water in, allowing it to moisten just the lower 1/2″ of dirt or so. The next day, I was shocked to discover that the sling had dug all the way down to the bottom and constructed a burrow in just a few hours time. Encouraged by this development, I dropped a roach in to see if it would eat. Within five minutes time, it was enjoying the first meal it had eaten in my care.
I’ve used this technique with several slings now, and I’ve had Brachypelma, Grammostola, and Aphonopelma species burrow down to take advantage of a moister burrow. When I add water to the substrate, I use the back of a paint brush to create a series of furrows down the side of the enclosure, then I carefully pour water down the side and allow it to drain through to the bottom. In fact, this is the same technique I use to keep the substrate in my moisture dependent species’ enclosures damp.
Keepers should use their discretion to come up with a system that works for them. Many will employ all three methods — moist substrate, water dishes, and spraying — in various measures to ensure the best possible care. For example, one might give their sling a moist spot of substrate AND a water dish. Or, I’ve heard of folks that keep arboreal species giving them water dishes on the ground and an occasional spritz on the top of the enclosure to let them grab a drink up high. The trick is to make sure that your tarantula remains properly hydrated without creating dank and potentially dangerous conditions.
Tip: In the winter, the furnace and wood stoves can really take the moisture out of the air, leaving humidity levels in your home very low. One way to protect your slings’ enclosures from drying out too quickly is to make a “sling nursery”. To do this, take a large plastic container with a lid and vent it around the sides. Place folded paper towels on the bottom, and then a smaller open container of water inside it. Now, place your sling containers around this water container and put the lid on. The water in the center reservoir will evaporate out, keeping the humidity inside the nursery higher than the outside. This will keep the moisture from evaporating out of your sling cages too quickly, thus protecting your Ts.
An example of a sling nursery.

Temperatures
Many folks like to keep their slings at higher temperatures, whether it be to encourage growth or because they believe that they will suffer health issues if kept cooler. I’ve read many care sheets from hobbyists and dealers alike that indicate that tarantula spiderlings must be kept in the 80s due to their fragility and need for more heat than their adult counterparts.
There are a couple of issues with this. First, most species don’t come from regions where it is always 80° or higher all year round. They come from areas where the temperatures can fluctuate a great deal. Even many of the so-called tropical species experience weather in the 60s. Then, if you factor in their burrowing, which has them underground where temps can be much cooler, and you see how this sweet spot of 80° or higher is likely an arbitrary number.
It’s also important to consider that the higher the temperatures, the more likely the chances of the spiderling dehydrating. Hotter air can mean faster evaporation, which can lead to a desiccated tarantula. In this scenario, the warmer temps would warrant more spraying and more filling of the water bowls. Definitely something to keep in mind if you’re keeping slings at higher temps.
Many keepers new to slings will immediately panic if the temps drop into the 70s and resort to alternative heating methods, like heat mats, to jack up the “dangerously low” temps. Not only is this usually completely unnecessary, but it can be dangerous to the slings as well. It’s very difficult heating a tiny enclosure safely, as heat lamps and mats can quickly overheat and dry out an enclosure.
Here’s the deal; most slings will do just fine at room temperature. I’ve personally raised dozens of slings, and it rarely hits 80 in my tarantula room. Furthermore, in the winter, temperatures usually hover between 70-72° during the nights, with an occasional drop into the high 60s. I’ve had no issues with slings dying from the temps or with my growth rates. Most continue to molt and eat right through the winter, albeit at a slower rate than they do in the warm summer months.
Does this mean it’s wrong to keep them at higher temps? Absolutely not. If a keeper has a way to safely maintain higher and consistent temps with his slings, then he or she can certainly do so. Some folks actually have tarantula rooms that they can heat separately from the rest of their homes, often with a space heater regulated by a thermostat. This is a safe and effective way to elevate temperatures consistently, and these keepers then can enjoy faster spider growth.
However, it is not a necessity.
Plenty of folks keep their slings in a range between 68-75° with no issues or deaths. The majority of species do just fine. The nice thing about sling enclosures is that they are small, so if one room is a bit too chilly, it’s not too difficult to find a warm spot in the house and keep them there.
Although It’s also important to remember that keeping slings at room temperature will not cause adverse affects, it should be mentioned that sustained temperatures in the cooler range can lead to lower metabolisms. So tarantulas consistently kept in low temps may experience the following:
- Slower growth rates
- Decreased appetites
- Seasonal fasting
Of course, all species of tarantulas experience seasonal shifts in the wild, so this would be quite natural for a good majority of them.
My animals are all kept 70-75° in the winter, and 75-80° in the summer months. On occasion, the temps may dip to 68 for a night or two in the winter, or rise to the mid 80s in the summer. However, these two extremes are quite rare. A nighttime drop in temperature is also quite natural and not an issue.
Tip: If the temps in your home are just too low and you need to use an extra heat source, do NOT try to heat sling enclosures individually. If possible, use a space heater to heat the entire room. They’re relatively inexpensive, reliable, and deliver even heat that can be controlled by built-in thermostats. If you can’t use a space heater, anther way to go is to use a heat mat with a rheostat to heat a larger enclosure, like a 10 gallon aquarium, to ensure even heat inside. Then you can just place the sling enclosures inside this larger heated one. Folks who use this method carefully monitor the temps inside and will use a rheostat with a thermometer attachment to make sure the interior temps stays consistent. Those who go this route will often include a large open bowl of water inside as well to keep the air from drying out. As the water in the bowl evaporates, it will keep the humidity inside this “incubator” up. A plastic cover with vent holes, not the common wire mesh ones sold at pet stores, will be needed for the large tank to maintain this micro-climate.
Feeding Tarantula Slings
Now that you have your enclosure all set up and your new little acquisition inside, it’s time for the next major cause of anxiety — feeding. Perhaps your sling is so small that you’re afraid that you can’t find prey small enough. Or, maybe you’re staring at your 1/2″ spider wondering if it can possibly subdue and eat the 1″ cricket you just purchased from the pet store. Or, you could be standing in the reptile aisle at the pet store trying to figure out which of the five varieties of prey insects for sale would be appropriate for your little ward. We’ll now tackle some of the common and stressful questions a new spiderling keeper may have.
What do I feed my sling? The answer to this may seem obvious at first, but there are a lot of feeders available and a lot of misinformation out there about which feeder insect is best for your tarantulas. The fact is, any and all of the commonly available feeder bugs can be an appropriate feeder for your new spider. Commonly used insects include crickets, mealworms, super worms, B. dubia roaches, and B. lateralis (“red runner”) roaches. All of these will make a great meal for your tarantula. (for a more in-depth examination of this topic, check out “Tarantula Feeding — What, When, and How Much to feed”). For those really tiny slings, flightless fruit flies is also an option.
I’ve heard folks argue that certain feeder bugs are more “nutritious” for spiders than others, but I honestly find this a bit silly. I have a hard time believing that scientists actually studied the ideal nutritional requirements of spiders — heck, they haven’t even properly identified most species yet. If you’re worried that your prey item might not be the healthiest alternative for your T, then feel free to mix it up with other bugs and give it a variety of feeders. I like to mix it up myself, using crickets, mealworms, dubias, red runners, and hissers at different times.
What size should I feed them? Let’s start by looking at the size of the sling you are trying to feed. Slings less than 1/3″ can be difficult to find suitable live prey for. One appropriate and readily available option is flightless fruit flies. They are about 1/16″ long and are usually sold in cultures that would feed a few of the tiniest slings for quite a while.
 But what if you can’t find flightless fruit flies? Well, in the wild, most slings will resort to scavenge feeding, meaning they will feed off of larger prey that something else killed. The good new is, they will readily do this in captivity as well, meaning that feeding a tiny sling can be quite simple. Can’t find a small enough prey item? No problem! Just take a small cricket, roach, or meal worm, pre-kill it, and drop it in. If the items are overly large, you can use a knife to cut them up into smaller pieces. For example, a large cricket leg would be a great meal for a 1/3″ sling. Is it gross? Yes. But for smaller slings, it’s an easy and effective way to make sure that they feed (and, it’s a lot easier than dealing with the fruit flies!).
For larger slings, 1/2″ or larger, dubia or red runner nymphs or pinhead crickets work great. Personally, I use small red runners for my smallest slings, as they are quite small and run around, making for a tempting meal.
As how to gauge what size to feed, I’ve heard quite a few “rules of thumb” on how to select a prey item. For most tarantulas, it’s best to feed them items that are shorter than the total length of their bodies. The majority of species will have no problem subduing prey items this size, and you’ll run less of a risk of the animal getting spooked by the size of the prey. It also never hurts to start much smaller, then try increasing the size of the prey if need be. I will often start my slings on very tiny prey to make sure they get a couple of meals in them, then increase the size after a few feedings.
Tip: Are there species that buck this rule? Sure. I’ve noticed that Phormictopus, Pamphobeteus, Theraphosa, Hapalopus, and Poecilotheria species seem to have no difficulty hunting prey larger than their bodies. However, to start out, it’s always best to go smaller. Let the tarantulas get a few meals in them before experimenting with a larger size. Larger prey can spook some species and put them off feeding.
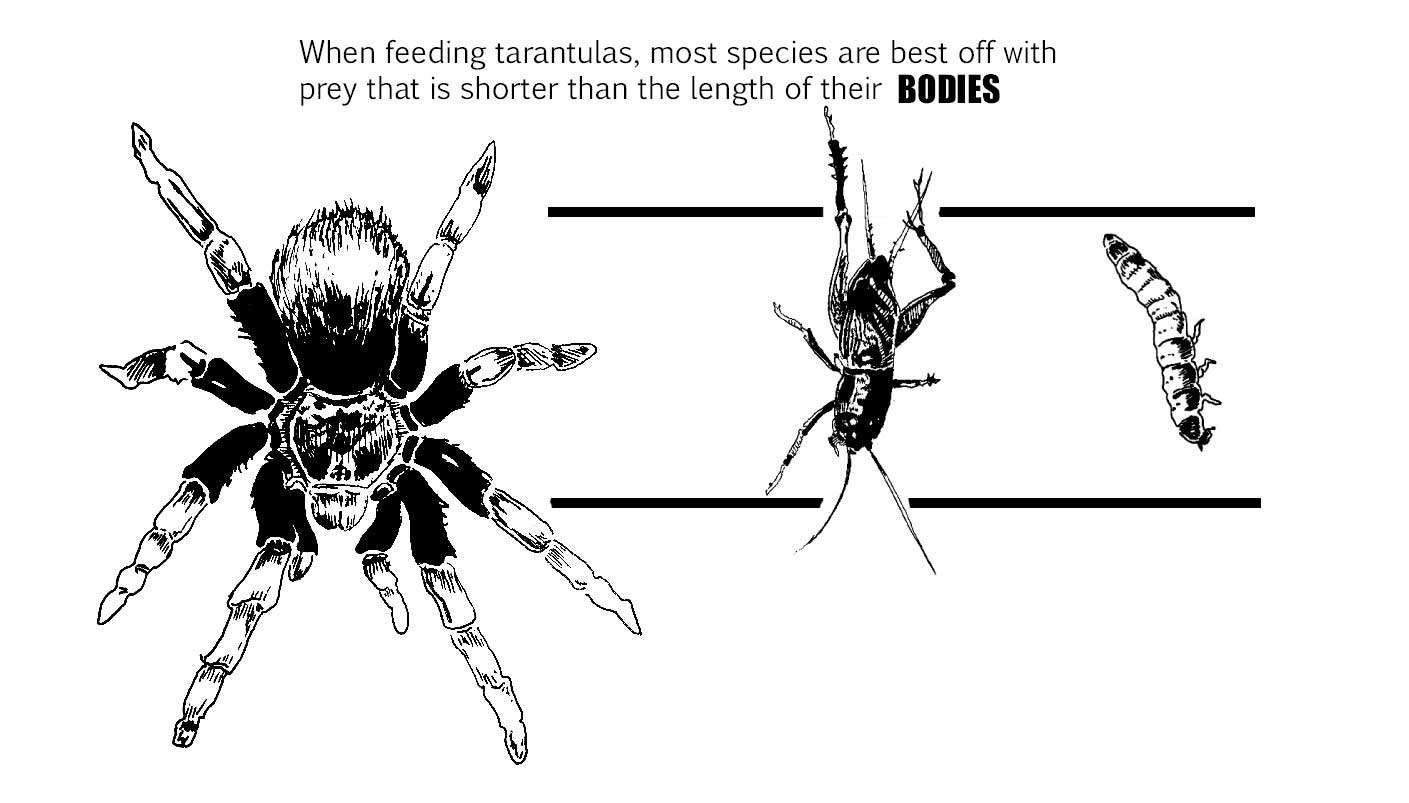 Illustration © 2016 Tom Moran
How much and how often should I feed? A huge debate currently wages on over what constitutes “power feeding” and whether or not it is harmful to the spider. I’m not going to wade into that here, but those interested in hearing my take on it can read the article “Power Feeding Tarantulas”.
In the wild, slings will eat whenever they can. After all, in this tiny stage, they are more vulnerable to weather and predation from other animals, so it behooves them to put on size as quickly as possible. In our homes, a similar situation applies because their fragility makes them more vulnerable to husbandry mistakes. As we’ve already determined that slings are a bit more delicate than their adult counterparts, many keepers choose to get them out of the “sling” stage as quickly as possible. If this is the route you want to take, then feeding them small meals 2 or even 3 times a week is a great way to go. With this schedule, some of the faster-growing species like Lasiodora parahybana, the GBB, Hapalopus sp. Colombia large, and Phormictopus cancerides will be safely in the juvenile stage in no time.
Just keep in mind that if you choose to practice a more ambitious feeding schedule, you’ll want to make sure you have warmer temps to support it. Temps in the low high 60s to low 70s will slow a tarantulas metabolism, often affecting appetite and growth rate. Ideally, you’d want temps in the mid 70s or more for such an aggressive feeding schedule. Also, some species, like those in the genera Grammostola and Brachypelma, might not take that many meals regardless.
Most keepers that feed this often only do so until the tarantula hits about 1.5-2″ or so. At that point, they will shift to a once a week or even a bi-weekly schedule. The idea is to get the spider out of the delicate sling stage quickly, not to rush it to maturity.
Do I have to feed my tarantula that often? The fact is, Ts have evolved to go without food for long stretches without experiencing ill effects. In the wild, some species likely go weeks or even months without food. Now, does that mean you should withhold food from your animal for that duration? No. But it does mean that they do not need to be fed as often as other pets. Many hobbyists feed their slings once a week or bi-weekly, and their animals are quite healthy. Also, if you’re feeding your specimen prey on the larger side, you might want to consider feeding less often. A keeper can use her discretion to come up with a feeding schedule that works for her.
What happens if it doesn’t eat?
Now, on occasion a sling may not eat. Although this may be cause for alarm, it is often a normal behavior. Here are some reasons why a sling might not eat.
It hasn’t settled in. Although most tarantulas will eat soon after a rehousing, some take time to adjust to their new homes. If your sling is cowering in a corner with its legs pulled up over its body, it might be too stressed to eat. Give it time to burrow or web and you’ll likely have better luck.
It’s fasting. Many species, including Aphonopelmas, Brachypelmas, and Grammostolas will fast when their instinct or internal clocks tell them the cooler winter months have begun. When this happens, there is nothing you can do but make sure they have fresh water and try offering them something once a week or so to gauge their appetite.
It’s in premolt. When tarantulas have eaten enough to trigger the beginning of the molting process, most will stop eating. If they’ve been eating great only to suddenly show no interest in food, especially if their abdomens are plump, dark, and/or shiny, then a molt is likely imminent. Make sure that they have water and keep a corner of the substrate moist and wait for the molt. After the molt, be sure to give them several days to a week to harden up before offering food again.
They are intimidated by the size of the prey. Occasionally, small slings can be spooked by the live prey you drop in. When this happens, the tarantula can throw up its first two pairs of walking legs in a threat pose or even run and hide from the prey. If you suspect this is the issue, it’s best to try feeding it something smaller. Or, offer it pre-killed prey to see if it will eat.
They don’t like the particular prey item being offered. Although most tarantulas seem to eat crickets no problem, I’ve had some specimens that wouldn’t touch other prey items like roaches or mealworms. If your T isn’t eating what you’re offering, try switching up the type of feeder you give it.
The conditions aren’t right. If your spiderling is still not eating and you’ve ruled out the other possibilities, then it’s possible that the setup conditions aren’t right for it. You should ask yourself the following:
- Is it too hot? Too cold?
- Does it have a hide?
- Is the setup correct?
- Is it too moist or dry?
If you’re still not sure what the issue is, try asking a more seasoned keeper for a second opinion. Sometimes it just takes a second set of “eyes” to figure out a possible issue.
Maintenance for Slings
Because they are so small, maintenance for slings is usually quite simple. Here’s the simple routine I practice and recommend. For each feeding, do a quick spot check that includes the following:
Check for boluses — These are the little white, jagged, crusty remnants of the tarantula’s last meal; the compacted, desiccated remains of its prey. For slings, boluses can be quite tiny and difficult to spot. However, many specimens will stack all of their boluses in a particular corner or in their water dishes. When you can find them, use a pair of tongs or plastic spoon to remove them. They are relatively harmless in most cases, but if they get wet, they can be a source of mold and can attract gnats.

Two boluses – look for the little whitish and crusty balls left behind after a T eats.
Clean and fill the water dish — Tarantulas are notorious for sullying their water dishes, so although filling them with clean water might be easy, keeping them clean is another story. Some use them as toilets and some seem to think that they are dumpsters. Others just appear to enjoy heaping mounds of substrate in an on top of them. When dropping in a feeder, make sure that the bowl is full and, if need be, pluck it out to clean or replace it.
Remove any molts (only if possible) — If your spider has molted recently, and you have easy access to the molt, you can carefully pluck it out. Be careful removing it, however, as they are often caught up and webbing and can pull a lot of substrate and webbing out with them. DO NOT try to pull it out if the freshly-molted spider is still sitting on it; this will disturb and possibly injure the animal. Also, if the molt is in a burrow or stuck in the webbing, as might be the case with an Avicularia species, leave it for the time being. Contrary to popular belief, there is no rush in getting the shed out. In fact, some fossorial species work the pieces of their molts into the walls of their dens. In these instances, you may never see a molt. Don’t worry; they pose no danger to the spider, and they will not rot or mold.
Premolt and Molting
In order to grow, tarantulas must periodically shed their old exoskeletons. Once the molting process is triggered, the tarantula will enter premolt. During this time, the spider may display the following signs:
1. The tarantula stops eating — This is probably the most obvious and common sign. You’ve been feeding your specimen regularly for several weeks, and suddenly it stops eating. Most species will stop feeding during their premolt period (although there are exceptions) as they prepare their bodies for the arduous process.
2. The tarantula has a fat shiny abdomen — Most tarantulas ready for premolt will sport nice, plump abdomens up to 1.5 times the size of their carapace (or even larger for an over-stuffed specimen). If your tarantula has a nice, bulbous booty, and she has stopped eating, chances are she’s in premolt. As the flesh around the area stretches, the abdomen may also appear to be shiny.
The shininess is often more evident in slings than their older, much hairier counterparts. My little G. pulchripes, G. rosea, and L. parahybana slings all get “shiny hineys” whenever they are entering premolt. My P. cancerides slings and juveniles look like little grapes ready to pop when they are in premolt.

G. rosea sling in premolt. Notice the large, shiny, and dark abdomen.
3. The tarantula’s abdomen and overall color darken — As the new exoskeleton forms under the old one, the spider will often darken up a bit. This is particularly evident on the abdomen where new hairs can be seen through the stretched skin here. Many of my slings will have a dark spot on their abdomens when in premolt, and it will continue to grow the closer they get to the actual molt.
4. The tarantula becomes slower and more lethargic — Not all of the indicators are physical; an observant keeper should notice some behavioral changes as well. Besides not eating, most of my tarantulas that are in premolt become less active and often more secretive. Keep an eye on your tarantula, and along with the physical signs listed above, look for a change in behavior. Some of my most hyper species become noticeably sluggish when they are in premolt. For example, my GBBs tend to be fast little buggers who are constantly moving around their enclosures. However, when in premolt, they often become much more sedentary, sitting in one spot and often tucking themselves away behind their cork bark. Speaking of secretive…
5. The tarantulas has buried itself in its den — Many tarantulas will retreat to their burrows and close of the entrances when entering a premolt period. My LP slings, M. balfouri slings, and G. pulchripes slings all bury themselves before a molt. Some things to consider if your T buries itself due to premolt.
They are not in danger.
They will not suffocate.
They have not been buried alive.
They do not need to be rescued.
The tarantula is just looking for some privacy and security during this vulnerable period. The tarantula will reopen its den once is has molted and hardened up. DO NOT freak out and try to dig the poor creature out; you only run the risk of distressing the animal and possibly interrupting its molt.
For a more detailed explanation of molting and its signs, check out the article How Do I Know My Tarantula is In Premolt?.
6. The tarantula has constructed a hammock-like web “mat” in its enclosure — This web is referred to as a “molt mat”, and it is where the tarantula will flip over on its back when it molts. You may catch your premolt T laying layer after layer of web in a small area, and some of the new world species will actually kick hairs on the web as a form of protection. If you see this behavior, it means that your tarantula is about to molt very soon, usually within a day. For arboreal species, they will sometime build elevated “hammocks” off the ground for their molt mats or seal themselves in their funnel webs. This behavior serves the same purpose.
When you think that your tarantula is in premolt, make sure it has a full water dish, moisten a corner (if the substrate isn’t damp already), and wait it out. If your spider is refusing food, wait a week before trying again, and don’t leave the food in overnight as a cricket can actually attack and kill a molting T.
If you ever find your spider on its back, DO NOT touch it. It is molting and needs to be left alone to finish the process in peace. Never poke, prod, spray or blow on it, and NEVER try to flip it over. Interrupting the process can injure or kill the tarantula.
Once the tarantulas completes the molt, it will need several days to harden back up. During this time, the fangs are still soft, so it will be unable to hunt and eat. Do not offer food for at least four days to a week to make sure that it is fully ready to eat.
How often do they molt?
It honestly depends on a lot of factors, including:
- The species — Some species are much faster growers than others.
- The size of the specimen — The larger tarantulas get, the more time you can expect between molts.
- The feeding schedule — Spiders fed more often will likely molt more often.
- Temperatures — Higher temps speed up the spider’s metabolism, leading to a faster growth rate.
For many slings, expect a molt every six weeks to two months or so. Again, this is just a very rough estimate; some may molt faster and some might molt much more slowly.
How long will it take my tiny sling to look like an adult?
This question comes up quite a bit as it requires a fair measure of patience to raise a tarantula from a spiderling to an adult. It is also an incredibly rewarding experience to raise one of these animals to maturity. However, for those who want a big hairy spider to show off, the wait can be difficult. Unfortunately, the only truthful answer to that question is, “It depends.”
First off, different species grow at different rates. I have a Brachypelma albopilosum sling that has grown approximately 1/2″ in almost two years time. On the other hand, I have a Theraphosa stirmi that went from a 1.5″ sling to a 7.5″ adult in roughly the same amount of time. Truth is, some species can mature in just over a year, and others can take several years to reach maturity.
There are so many other factors that can contribute to a tarantulas growth rate like the specimen’s genetics, the temperatures it’s kept at, and the feeding schedule. In reality, there are just so many variables, that it’s difficult to make generalizations. If you’re truly curious as to how long it will take for your particular specimen to mature, speak to some keepers who have raised the species and ask about their experience with it.
Finally, some behaviors you may observe
Finally, I offer a brief FAQ featuring some of the common questions new sling keepers have asked me about.
Why is my tarantula climbing the walls? Tarantulas can take some time to acclimate to their new surroundings, and many will take to exploring their new environments upon being rehoused. This can often lead to climbing or hiding up in the top corner of an enclosure. If the tarantula is terrestrial or fossorial, it should eventually come down. If it doesn’t, then there is a possibility that the substrate is too moist or, in some cases, too fluffy.
My sling is burrowing … is there something wrong with it? Easiest question to answer ever. NO. Seriously, this one gets asked all the time, as burrowing slings can really cause those new to the hobby serious anxiety. Burrowing is a very natural behavior for most species of slings as, in the wild, it behooves them to stay out of sight. Burrows can also protect them from inclement weather conditions. Many slings will spend several molts underground, only to eventually emerge after they’ve put on some size.
Tip: If your tarantula burrows, don’t dig it up or shove prey down the den opening; drop the prey on the surface and let the spider find it. You don’t have to worry about the tarantula not knowing the cricket is up there; they are adept at sensing the slightest vibrations from above. If they are hungry, they will come up and eat. If you’re still concerned that your T might have missed the meal, leave a pre-killed item at the mouth of the den.
My sling has covered up/webbed up its burrow … is it okay? When a tarantula webs up or buries the opening of its burrow, it is not in any danger. In fact, that is your spider’s way of basically saying “do not disturb.” For many species, this means they are entering the premolt stage and want security and privacy for their molt. For some, like Aphonopelma species, it may mean that they are secreting themselves away for the cold winter months. This is natural behavior and unless it has been a very extended period of time (I’m talking a month or more here for slings), keepers should never dig them up.
Why is my tarantula hanging out over the water dish? Most likely because it’s too dry. When a tarantula camps out over its water dish, it’s a sign that it’s craving moisture. Whether it be because the animal is in premolt or the humidity is dangerously low your home, action is needed. Your best bet is to moisten down a portion of the substrate with water to give your T more moisture and humidity.
What are these strange white dots on the walls and/or in the water dish? If they are hard and smear when wet, then congrats…you’ve just seen your first spider poop! This is a common question, as most of us probably didn’t give much thought to what tarantulas turds would look like. When they deposit them into a water dish, they can look like tiny little white stones, which can really be disconcerting to some folks.
My sling isn’t webbing … is there something wrong with it? Some species will blanket their enclosures with thick white webbing. Others will produce barely any. If you have what is considered a heavy-webbing species (P. murinus, GBB, A. versicolor, etc.) that isn’t webbing, it just might not be settled in yet. Some species take longer than others to get started, and it can take a spider several weeks or more to lay down the thick webbing that you see in photos. And, there’s always the oddball who may never web. It usually doesn’t meant that there is anything wrong with the animal.

Reblogged this on Casey's Overnight Cafe and commented:
Outstanding and in-depth. Great article on care of Tarantula slings.
LikeLike
This was a fantastic peice to read especially after my daughters Red knee died, she now has a new one a B smithi and its eatting really well and due to molt soon I now know even more after reading this post. Thank you so much for all your helps with Webs, in the shop they never mentioned the temp that they needed, my daughters room gets cold in the winter do I need to get a heat source of some kind for her sling? Oh she also wants another one a curly hair one for her birthday
LikeLiked by 1 person
I’m so glad this was helpful (and I’m very sorry to hear about her Red knee). What temperature does her room get down to in the winter? Curly hairs are ADORABLE. I have three. Hahaha
LikeLike
This is very nice Bud! Another GREAT Article! 🙂 Cheers!!!
LikeLike
Thanks, Mac! 🙂
LikeLike
Great article. Probably one of the most important recent tarantula keeping resources I have seen recently. Thank you for your dedication to safe keeping.
LikeLiked by 1 person
Did I mention recent enough in that sentence. Learn to proofread before post 😛
LikeLike
No joke, I accidentally published this before I was ready. I was still going through it! I saw this comment and first thought, “Oh, no…it’s a mess!” Hahaha No worries!
LikeLiked by 1 person
Was it you that suggested I write this? I’ve been mulling it over for months and FINALLY sat down to get it done. Hopefully, it helps some folks out! And thanks so much!
LikeLike
Yes it was me. I thought it would be helpful to new hobbyists especially that have never purchased a sling. With the big boxes starting to sell slings, this is more important than ever.
LikeLike
Now I don’t have to write one. 😀 This goes in my ‘quicklist’ to post in response to the non-stop questions on Faffbook that this answers.
p.s. thanks for the shoutout. I just pushed my petcenterusa review when you did your posting, so my phone blew up with track backs and pings and approval requests. lmao.
LikeLike
Ha! I’ve been mulling this over for so long, I’m glad that I was finally able to get it done. I started it on Sunday, and I received over a half-dozen questions that would have been answered by this during the week. My only worry is that it is quite long, and I’m sure some folks won’t bother to read it and will just ask me instead. Hahaha
Hey, it’s a great tutorial! I’ve actually sent a few folks to read it who were asking how to make those enclosures. 🙂
LikeLiked by 1 person
Thank you for that shout out. I’d had a never ending stream of questions from faffbook about em’. I’m going to do another “build-it-yerself” update when I build out my first acrylic custom cages. Still practicing with that stupid acrylic cement which is a pain and will melt if dribbled on the pieces. (new bottle needle dispenser = lifesaver.)
FYI, if you ever decide to edit this post, the AMACs aren’t always tight. When I shop for them at the store, I test boxes, by opening and shutting them. AMAC sometimes goofs and some lots are tight and a PITA, and some aren’t. I only buy the smooth open/close lids.
I learned this by getting a set of bad enclosures from Jamie. (no knock, it wasn’t her fault.) If they are tight, they WILL crack and split sooner than later.
LikeLike
Great article. Very thorough. I enjoy your strong insights. And look forward to raising my slings. You did answer a lot of questions I had.
Thank you from south of the equator
LikeLiked by 1 person
Thanks so much! That article turned into quite the novel, but I was trying to cover every question I’d ever been asked. I’m SO glad that you found it helpful!
LikeLike
Great article! I’ve been in the hobby since November, but didn’t get my first sling until February…a 1/4in Euathlus sp. Red baby was thrown in with it’s momma as a freebie. Never has something so adorably small been so terrifying 😛 I only wish this article was around then, as your site lacks the arrogance of forum sites and is a more enjoyable learning tool.
“some folks have gotten quite creative by using things like small single block Legos and golf Ts for water dishes.”
When I’m done writing this, I’m raiding the Lego bin…I wish I would’ve thought of this myself! Living in San Diego with our ridiculous hot temps, I always get paranoid about things getting dried out. All my slings are now big enough to be rehoused with water dish-fitting enclosures, but as soon as we’re out of the 90degree temps I plan on ordering some more babies…now I can avoid the too-small-for-a-dish uncomfortable phase 🙂 So, thanks!
LikeLike
Hello!
“Your site lacks the arrogance of forum sites and is a more enjoyable learning tool…” Thank you so much; this comment just made my day! I started getting serious about Tom’s Big Spiders after noticing how many people new to the hobby were being driven from the message boards by overbearing and preachy hobbyists. I was hoping that I could give folks a place to go to find info and ask questions without being berated. So, that really means a lot.
As luck would have it, I literally JUST stepped on one of my son’s Legos. Hahaha. Yeah, the Lego idea came from a mother as we were discussing a YouTube video I did about water dishes. I thought it was brilliant!
Our summers here get hot, but they are usually quite humid as well. In the winter when my furnace kicks on, the air gets VERY dry, so I’m always worried about the cages drying out then.
Thanks so much for commenting!
Tom
LikeLike
Awesome article, so many useful informations. Thanks.
LikeLike
Awesome article. So many useful informations. Thanks!
LikeLike
Wow. I wish I had found this article some months ago, it anwered so many question I’ve had. I’ve been in the hobby a bare five months and jumped in with a 1/2 inch A. seemanni sling. Yikes. He has safely made it to juvenile status, along with the varied multitude of slings I aquired in quick succession (you can never have just one, so I’ve learned), however I do still have some slings that are of the more delicate disposition that I have been worried about; inexpirienced as I am. This article has put some of those worries to rest and pointed out areas in which I can improve in order to make my Ts more comfortable.
LikeLiked by 1 person
Hi, Lil!
Sounds like you’ve been doing just fine without it. 🙂 Nope, you can never have just one. Or 10…or 50…or 100… It never ends! lol I’m so glad that you found this useful, even has you’ve gained some experience. I wish I had written it earlier, as I know how difficult it can be to find husbandry info just for slings.
Thanks so much!
Tom
LikeLike
Something handy I found that has (nearly) the look of an amac box, but functions the same and is a lot cheaper. Many grocery stores will sell feathered toothpicks in a hard plastic display case that has a lid that pops off near the top. They are perfectly square shaped, 100% transparent, and just the right size for a sling (2.5×2.5x4in tall). It was incredibly easy to heat a sewing needle over a candle and burn vent holes into the 5-sided lid. It also provided excellent depth for graduating substrate moisture.
The only drawback is the lid is rounded at the top, so stacking them or turning them upside down for an arboreal sling is not an option. But, at less than $3 each, they’re perfect for the casual hobbyist who has just a few terrestrial slings.
I would be happy to email Tom a picture to see what I’m talking about.
LikeLike
Wonderful idea, Eric! We actually have on of those in my cabinet right now! Thanks!!!
LikeLike
hey Tom I wanted to thank you for all of the information that you shared unfortunately I learned it all on my own I wish I would have found you before hand although I did look up a lot of things you were so right with the conflict of information… I have a sling her name is Li’l t I love her to pieces!! I got her 7 months ago she was so tiny and still is and will be for a while she’s an e-compass Stratus… she’s sweet and when I am able to see her not burrowed she loves to come out and explore my arm when she first comes out she plays dead then she covers her head with her legs stretched out with her eyes peeking up at me I love those beautiful eyes!! Anyway just wanted to say thanks for all the information if I can I’ll send you pics thanks again this really meant a lot to me I know I’m doing a good job with her!! Chrissy
LikeLike
Hello, Christina! Your sling sounds absolutely adorable! 🙂 Just be careful when she puts on some size; that species is recognized as having the most potent bit of any tarantula. A bite from one won’t kill you, but you will likely require a trip to the ER and be miserable for quite some time. Just a heads up!
And thank you so very much for the kind words and for taking the time to message me! 🙂
LikeLike
Hi Tom,
i wanted to ask; Can i print this out for personal use? I’m getting my first sling soon and would like to be able to access the information without having to track down my computer or phone each time (my siblings are notorious for snatching my electronics when I’m not paying attention). I understand if you prefer i dont.
thanks
brianna
LikeLike
Hi there,
Thank you for the information you gave, although it is quite hard not to still panic even after reading
up soo much about having slings, I received my very first ever pink zebra sling today, and it’s also
my very first ever T. I have never owned one of any size before, it is probably the cutest thing I have
ever seen, but I am so worried that I do something wrong even after reading so much about them.
It was up and about in the little enclosure for a bit and then burrowed itself head first down in the sand
in one of the corners and has been in there ever since.
I know this is normal but now I know why people especially new at it like me stresses so quickly.
I just want to ask if I will be ok raising this little baby?
LikeLike
Congrats on your sling! I have two that I raised from tiny slings, and they are quite hardy. https://www.youtube.com/watch?v=2csGkA02Wv8&t=12s
As long as you did your research, you’ll be fine! 🙂 I remember how stressed I was when I got my first slings, which is why I made this guide.
LikeLike
Wow, very detailed and informative. Thank you so much! I recently got my first T, a hamorii sling. I was worried that I could be doing something wrong with the enclosure I just put it in, but now that I’ve read this I’m confident that I have the basic husbandry down pretty well.
LikeLike
Hi, Meg! I’m so glad that it was helpful!
LikeLike