C. cyaneopubescens and P. cancerides Molts – Pictures!

With the warmer summer weather, and temperatures now consistently in the mid-80s, my tarantulas’ metabolisms have kicked into high gear. This means more eating, more growing, and more molting. In the past two weeks alone, 14 of my spiders have molted, and some of Ts I picked up as .75″ slings are now creeping closer to their adult colorations.

My juvenile C. cyaneopubescens (or GBB), one of the first two slings I purchased as a .75″ sling in October of 2013 is now 2.5+” and is sporting more of the adult orange on its abdomen and more blue on its legs.

2.5" after a recent molt.

2.5″ after a recent molt.

My juvenile P. cancerides (Haitian Brown) also molted again. What once was a striking little dark blue sling is now a 3″ juvenile will beautiful bronze and pink tones. These little guys have rapidly become one of my favorite species, and I very much enjoy watching the color changes as they grow into adults.

3" P. cancerides after a recent molt.

3″ P. cancerides after a recent molt.

Both of these Ts have undergone amazing color changes as they molt toward adulthood, and I will be eagerly awaiting what metamorphosis the next molts will bring.


Monocentropus balfouri Husbandry

A cream and blue beauty!

When folks try to tell me that there there is no such thing as a “beautiful tarantula”, I have a few go-to species that I will immediately Google. Besides the P. metallica and C. cyaneopubescens, I also pull up photos of the tarantula featured in this blog, the M. balfouri. These gorgeous spiders sport creamy tan bodies, metallic blue/silver carapaces, and blue legs, and are a stunning representation of just how striking blue coloration on a T can be.

My female M. balfouri, now a young adult.

My female M. balfouri, now a young adult.

This gorgeous spider comes from a group of islands off the coast of Africa of which Socotra is the largest, hence its common name of Socotra Island Blue Baboon. Although they’ve become much more established in the hobby, they are still in demand, commanding premium prices. I got my juveniles for $60 each as part of a newsletter promotion. Expect to pay up to $100 for the same size elsewhere. I’ve seen females of this species selling for $300, so this can be a pricey pet.

This 2" juvenile is starting to show some of its blue coloration. I'm hoping to see more blue on the legs after its next molt.

This 2″ juvenile is starting to show some of its blue coloration. I’m hoping to see more blue on the legs after its next molt.

M. balfouri care

I housed my three 1,75″ juveniles in medium (5″ x 6″h x 8″l) critter keepers with about four inches of bone dry cocofiber substrate. I provided all three with small water bowls, which they usually fill up with dirt or web over. This species will burrow, creating a maze of underground tunnels with several entrances. They are also prolific webbers, and all three of mine have laid down a thick, silky carpet over much the substrate. As  this species comes from a semi-desert environment, I do not mist the enclosure or moisten the substrate; the water bowl is sufficient.

Now that my female is about 3.75″ DLS, she will be getting a rehousing very soon. The next transfer will likely be the final one, and she will be getting a 3-4 gallon Sterilite enclosure with about 6″ of substrate (60/40 mix of dry top soil and peat).

A top down view of an M. balfouri's enclosure. Notice the thick webbing.

A top down view of an M. balfouri’s enclosure. Notice the thick webbing.

The growth rate for my M. balfouris has been medium, with all three molting five times in my care over a 19-month period. Between molts, they picked up around .25 – .5″ of size or so. During their first two winters, when temps in my tarantula room were mid 70s during the day and dropped to low 70s at night, they mostly stayed in their tunnels as they fasted for a few months. During these periods, I rarely saw any of them, and I would drop a small cricket in once every two weeks and remove it if it wasn’t eaten by the next morning.

When the temps warm up (low 80s during the day, high 70s at night), and their metabolisms are more active and they eat great. I have noticed that they seem to prefer smaller prey, and I was feeding two small crickets or meal worms twice a week when they were juveniles. Now that they are sub-adults, they get two medium crickets a week. They refuse food when they are in premolt or during the slightly colder and drier winter months. During this time, they retreat to their tunnels and surface when the molt process has been completed or when the weather has warmed up.

Too much reading? Check out my husbandry video below!

This species is generally recognized for having a calmer, less defensive temperament, which could make it a good starter Old World species. Although they are more shy and reclusive than many their baboon cousins, they can still, in theory, deliver quite a bite.  Mine generally bolt into one of their many tunnel entrances at the slightest disturbance, and not one has shown any defensiveness. However, that can always change with age, and temperament differs from specimen to specimen. Always use care when working with old world species.

Although I’ve read of instances where this species can become a “pet hole”, spending the majority of its time in its den, mine are are actually visible quite often. Usually late afternoon, I can look forward to my three juveniles creeping out of their dens to sit on the surface for a while. They only seem to stay submerged when in promolt or during the colder winter months.

This juvenile is showing some of the gorgeous blue on its legs after a recent molt.

This juvenile is showing some of the gorgeous blue on its legs after a recent molt.

Although I’ve yet to try to breed any of my tarantulas, the M. balfouri is high on my list when I do. Unlike most other Ts, M. balfouri mothers will actually nurture their spiderlings, killing prey and dragging it into the den to feed them. A search of balfouri breeding and parenting will bring up some fascinating stories about M. balfouri mothering, and most breeders have more success when they leave the sacs in with the mother. It doesn’t get much cooler than that.

Those looking for a gorgeous old world tarantula with beautiful coloration and relatively simple husbandry requirements should look no further than the M. balfouri. Their calmer temperaments also make them a good, if pricey, introduction species for those new to old worlds.


Custom Dubia Roach Enclosure and Care

Over the past six months, my tarantula collection had grown a great deal in both the quantity of Ts kept and the size of individual specimens. I now had several adult/sub-adult Ts that required larger prey items, and I was looking for an alternative to the crickets. I decided that it was now time for me to start raising my own food source. So, a couple months ago, I purchased my first dubia roach starter colony of 125+ roaches. After doing some online research on dubia husbandry and breeding in which I discovered dozens of enclosure designs and roach-chow recipes, I was ready to set up my own colony.

What follows is what I have come up with to house and feed my roaches. This is, by no means, the only way to do it, nor can I take credit for coming up with these designs or methods. This is, however, what is currently working for me.

Start with a 7 gallon Sterilite Stacker Tote

I picked up my 7 gallon Sterilite at my local Walmart. You can definitely use a larger size of container, and many do, but I needed something that would fit comfortably on a shelf that I already used. Although these containers are offered in clear plastic, you want something that blocks most of the light out (roaches, as you may know, are NOT fond of the light).

UPDATE 11/2016: My colony grew rather quickly, so I now use a 58-quart Sterilite container.

I found this to be a great size for my roach colony enclosure.

I found this to be a great size for my roach colony enclosure.

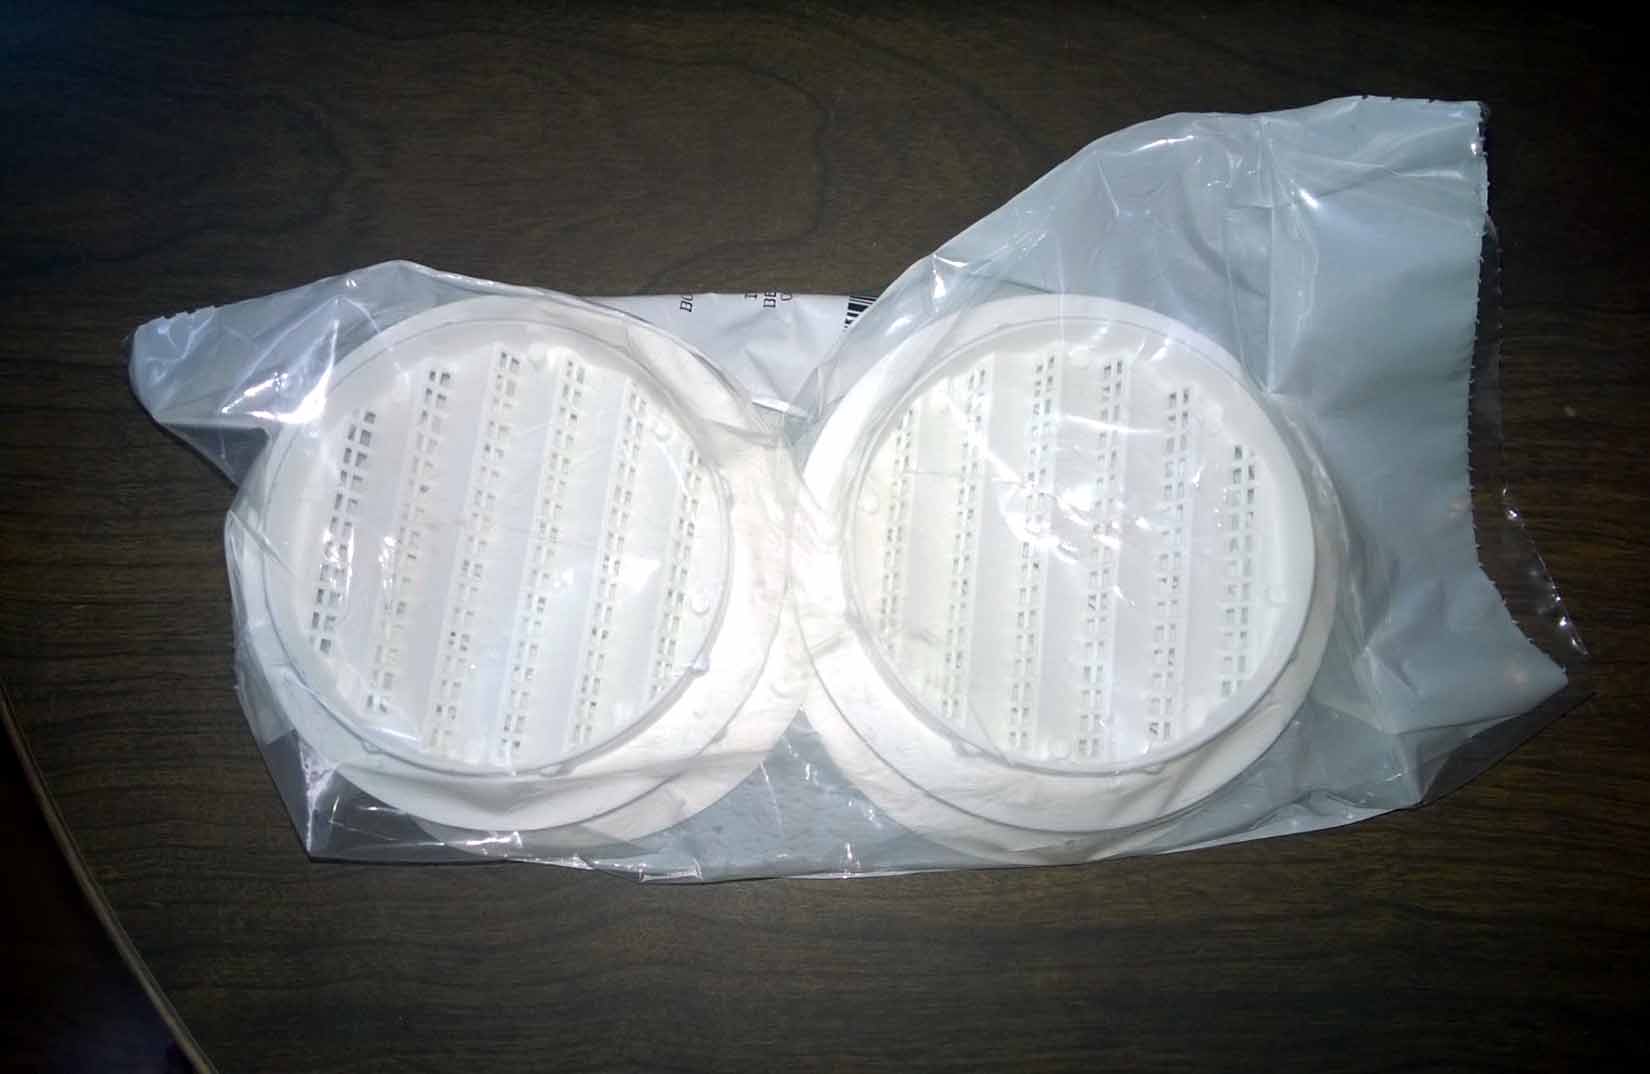
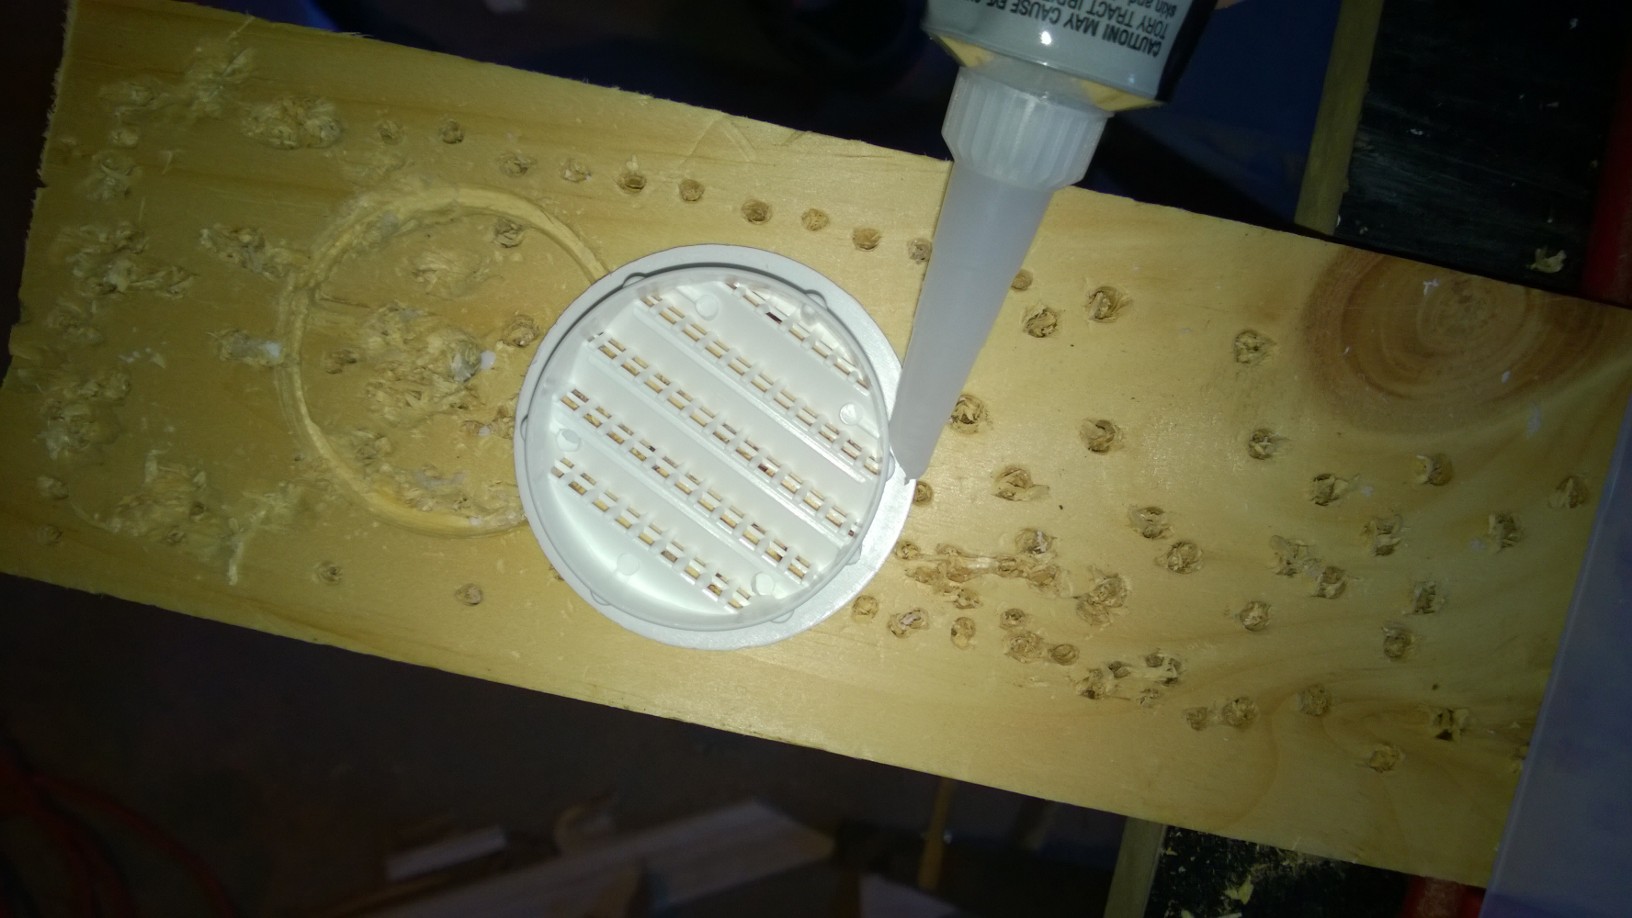
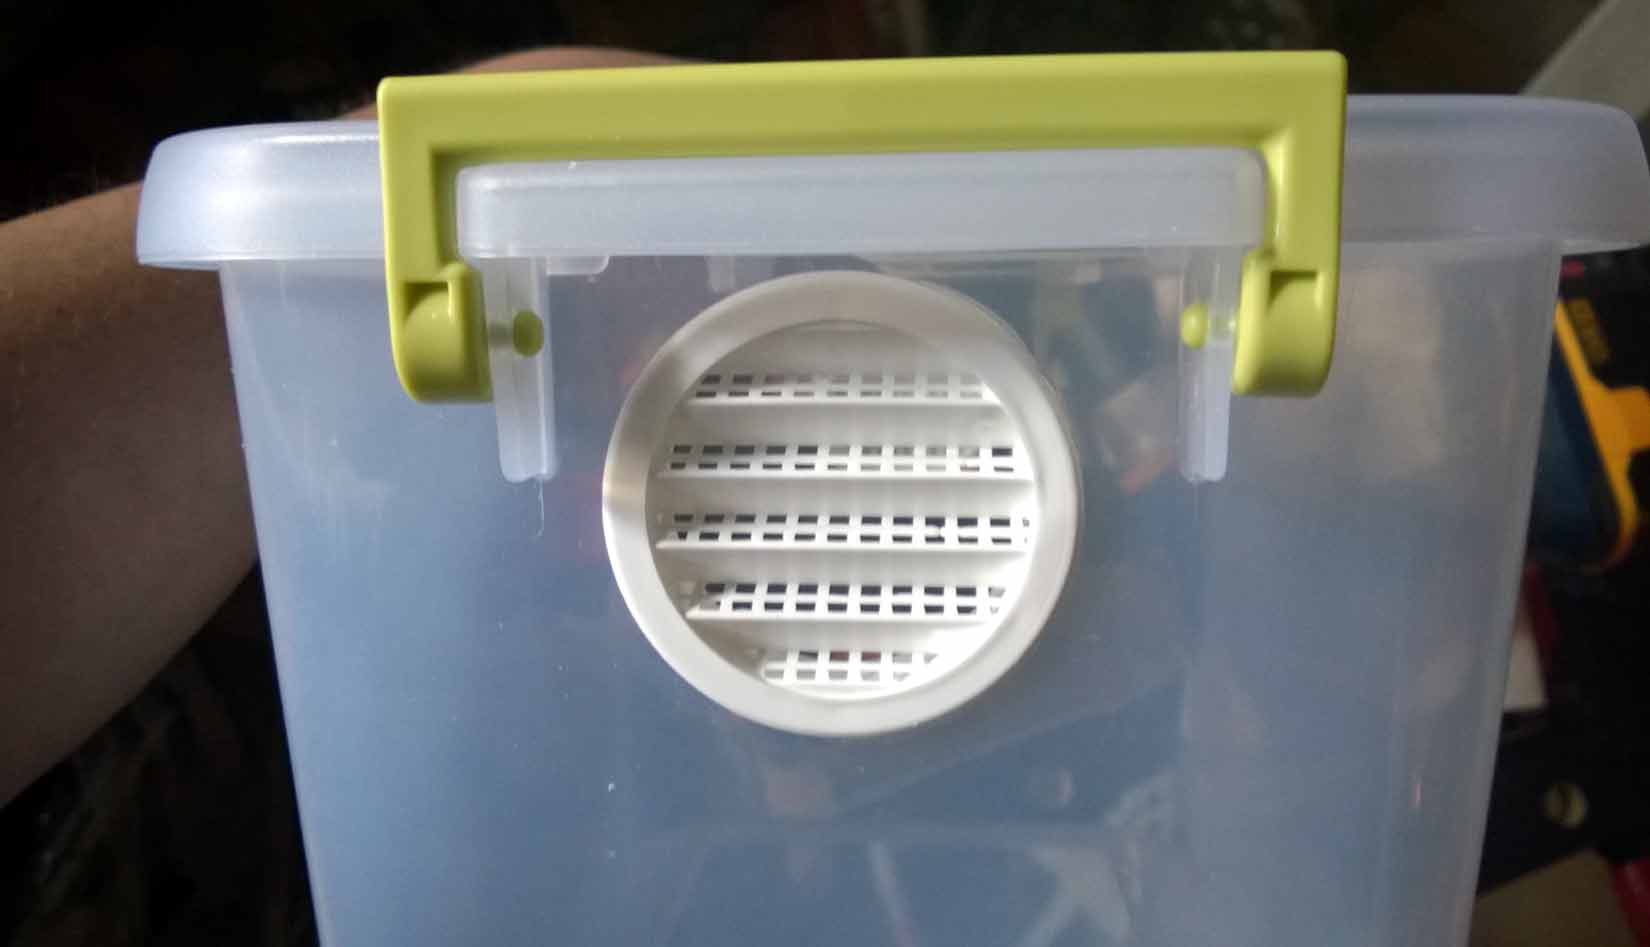
Add some ventilation.

I always have some of these convenient plastic vents on hand from Round Vents , so I used them for my enclosure. These 3″ vents only run $1.32 each, and I find cutting two holes to install the vents MUCH easier and faster than drilling dozens of air holes. However, either way would work.

3" white plastic vents from Round Vents.

3″ white plastic vents from Round Vents.

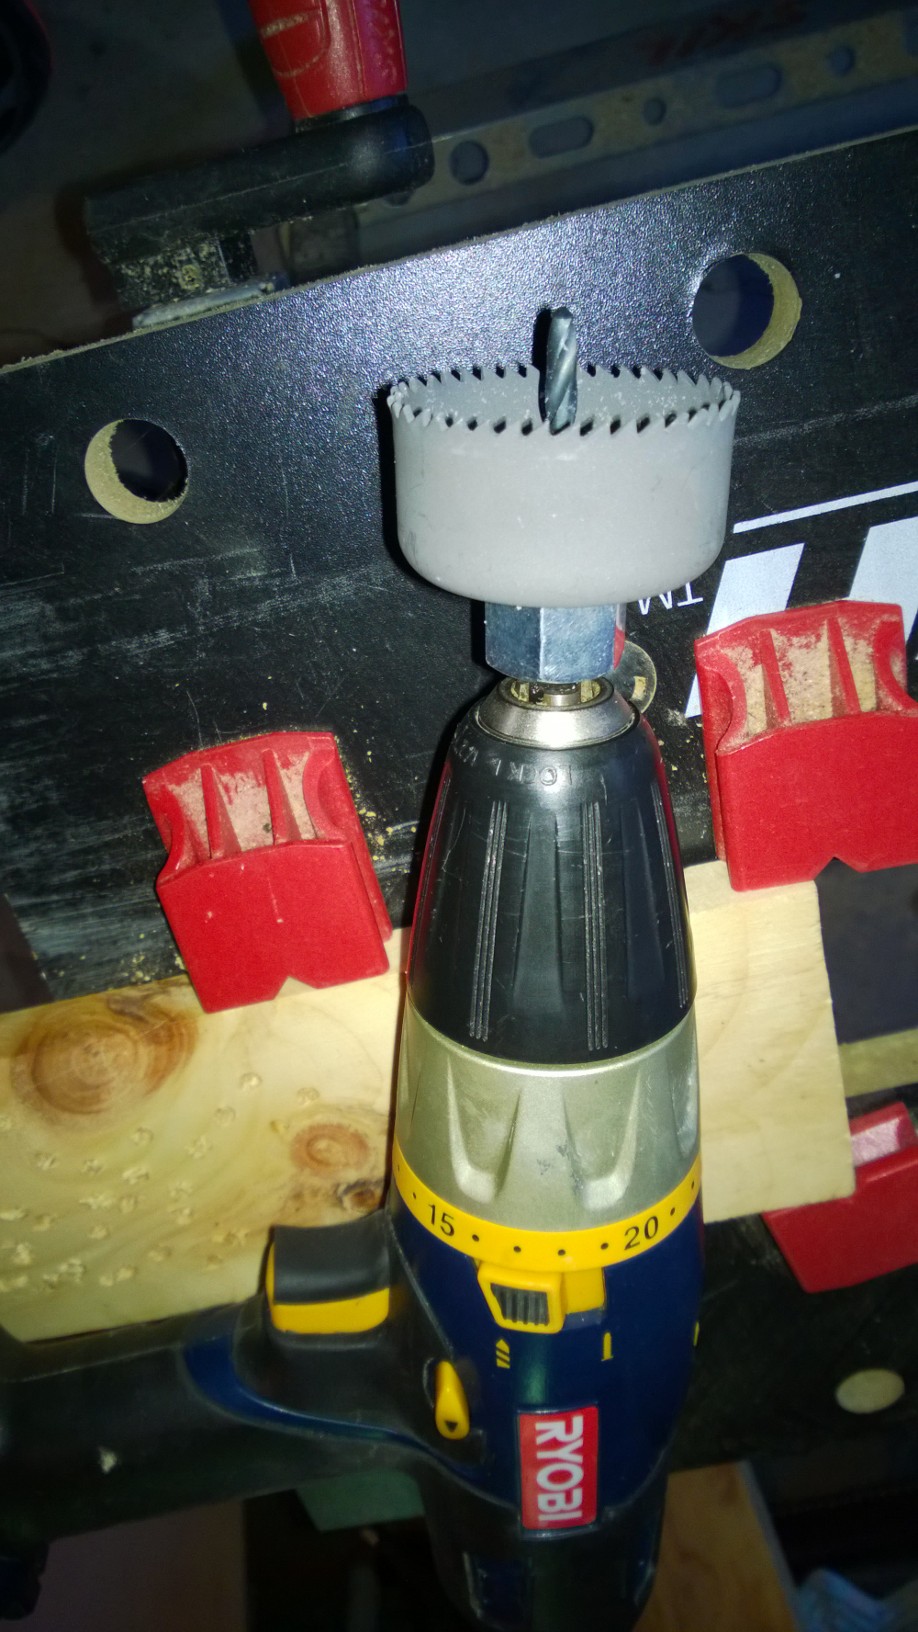
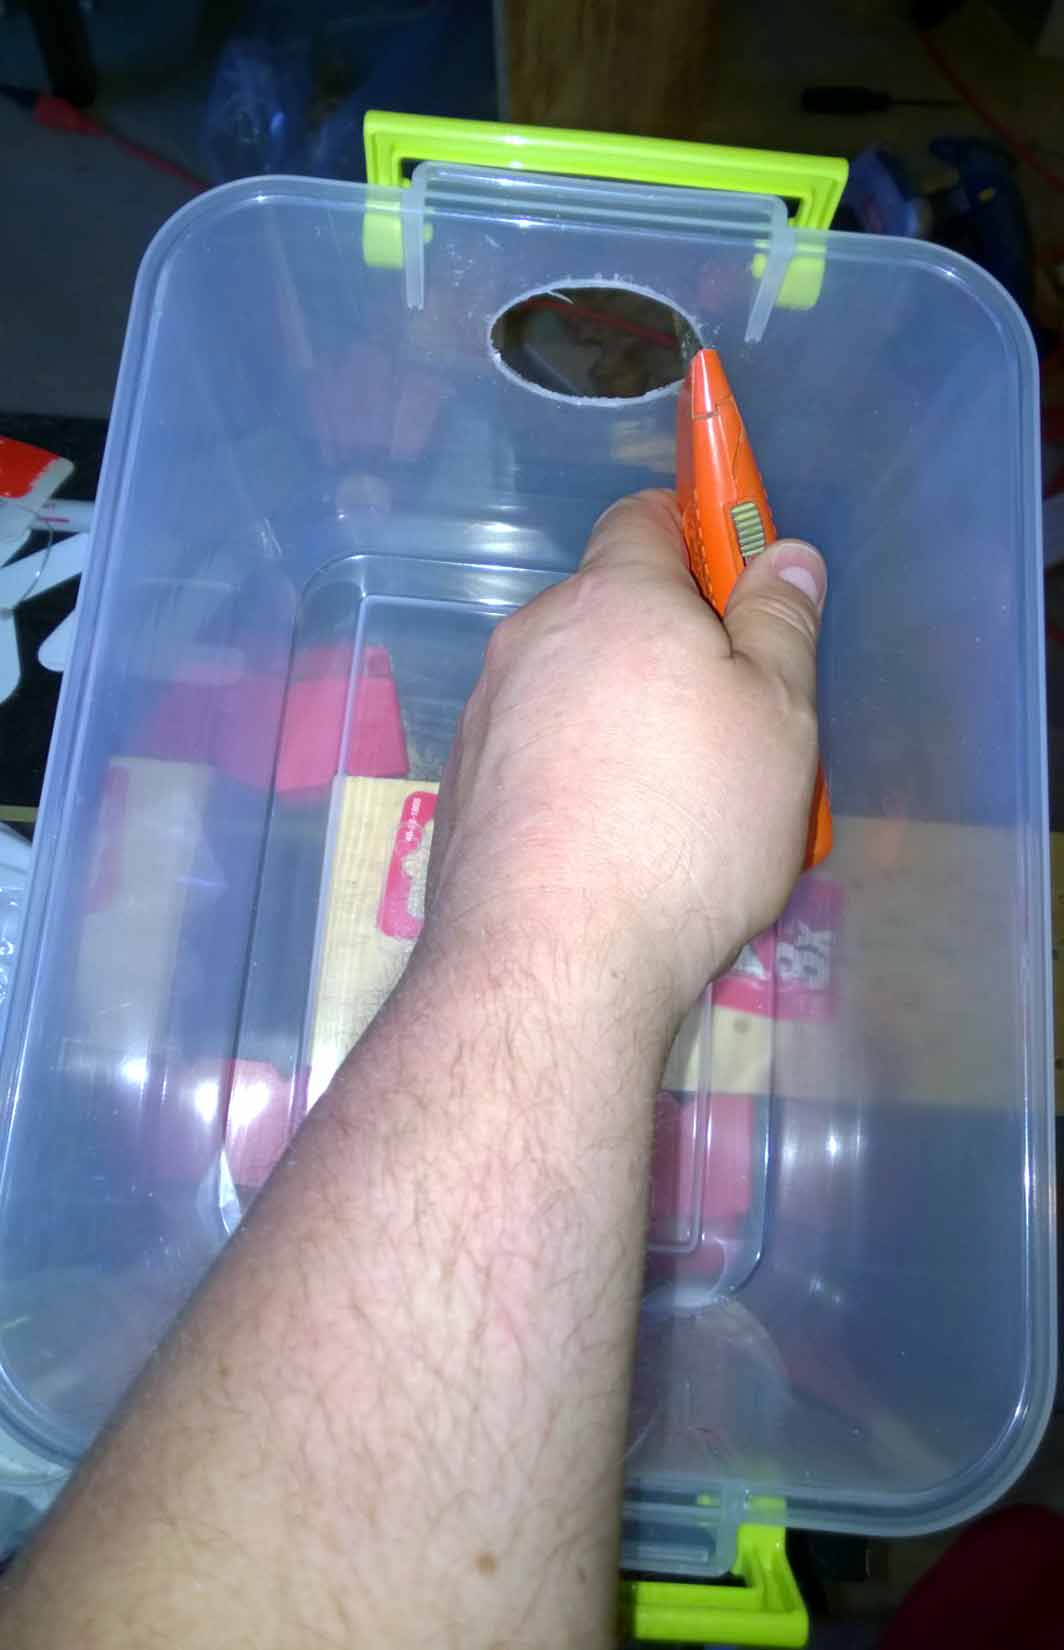
To install them, I just used a 3″ hole saw and my cordless drill to make a hole on either side of the container. I used hot glue around the edges then just popped them in. (Again, you can drill a series of holes, and it will serve the same purpose and cost a bit less).

The vents have been installed on opposite end of the Sterilite enclosure. Vents should be closer to the top.

The vents have been installed on opposite end of the Sterilite enclosure. Vents should be close to the top.

Start saving those egg cartons!

You’ll need something inside the enclosure for the roaches to climb on and hide in. Cardboard egg cartons or egg trays work perfectly. If you have the forethought (and you eat a lot of eggs) save some of the ones you get when you buy eggs from your local grocer. You can also find them at tractor or farming supply stores. I bought mine at a local Agway. Many use the 6 x 6 egg trays, but for my smaller enclosure, the regular 2 x 6 egg cartons fit better. The larger trays can be purchased in bulk online.

Put these inside your enclosure for the roaches to climb on and hide in.

Put these inside your enclosure for the roaches to climb on and hide in.

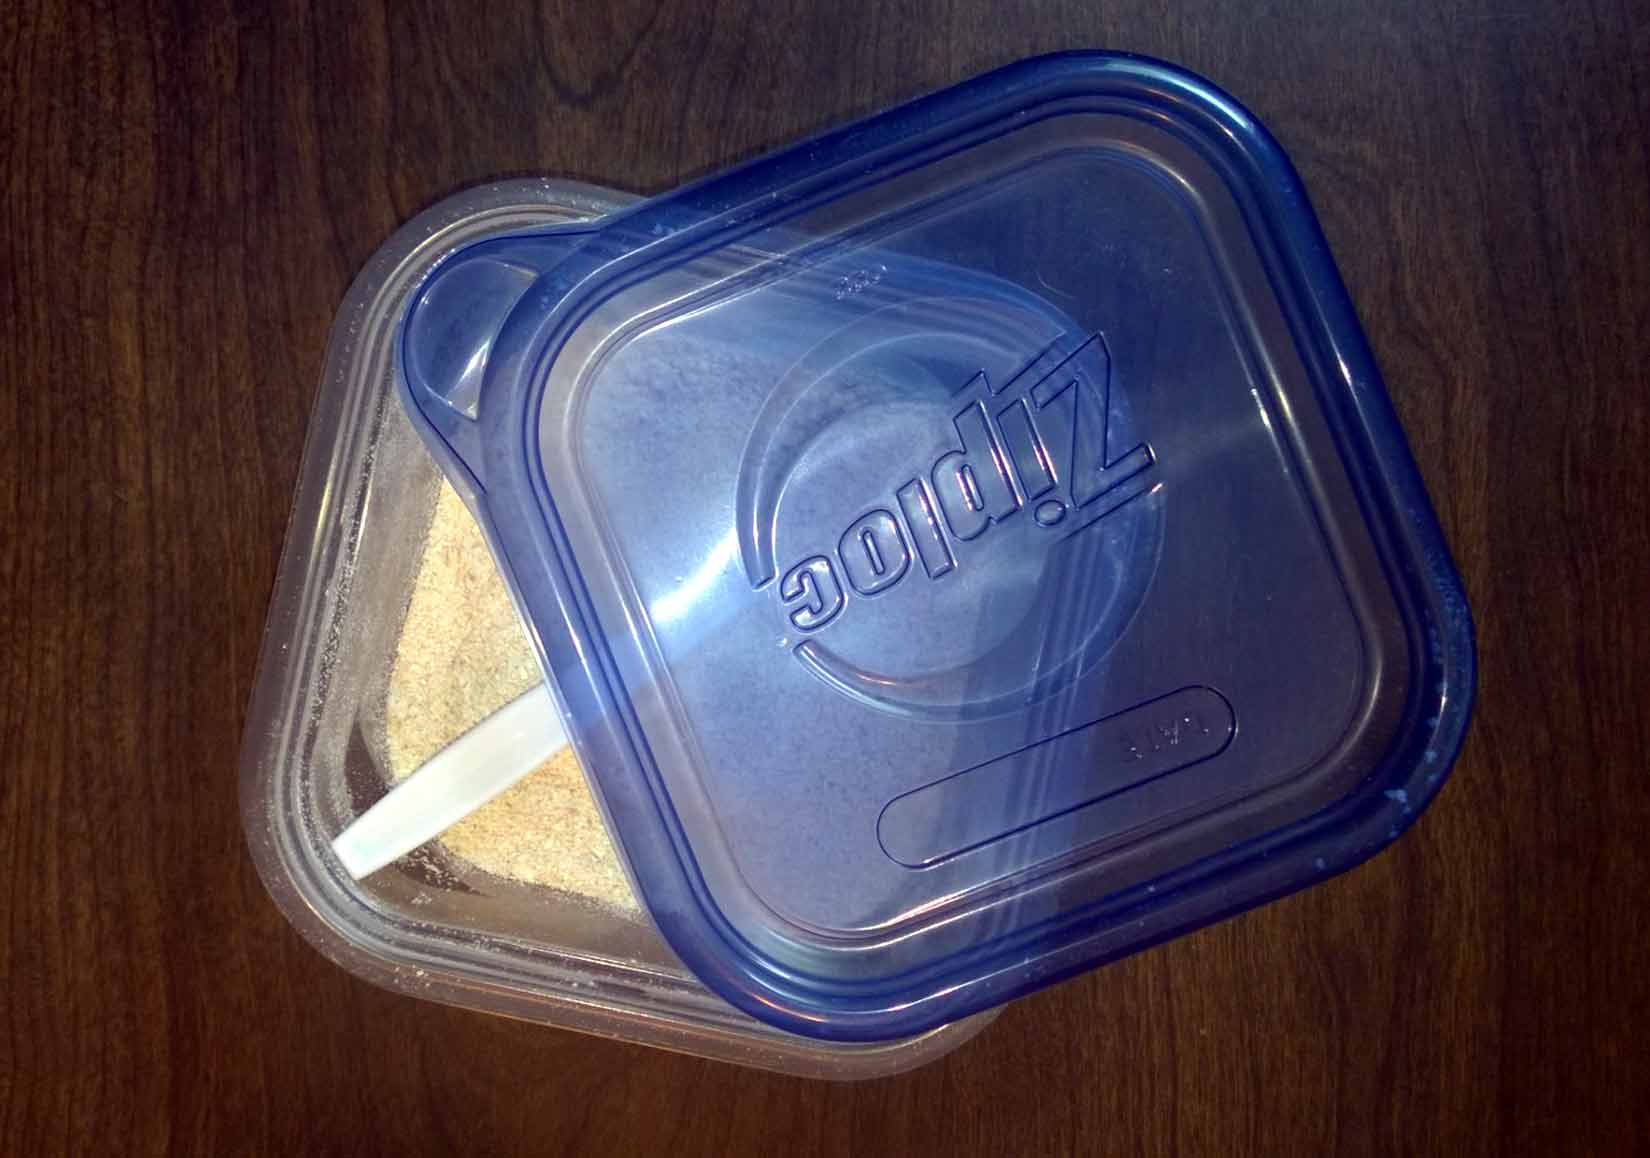
 Roaches need food bowls, too.

It makes it MUCH easier to clean and feed your roaches if you supply food bowls. For mine, I used two Ziploc small square containers (5″x 5″), which I trimmed down with a pair of scissors to fit better and to add an entrance for the smaller roaches. One of these I fill with fresh organic fruit (nectarines, oranges, peaches, strawberries, grapes, apples, etc.). The other I fill with my homemade “roach chow”.

Two of these are supplied: one for fresh fruit and the other for the dry roach chow.

Two of these are supplied: one for fresh fruit and the other for the dry roach chow.

 Carefully fit everything into the enclosure.

On one end, stand up the egg cartons. I have two rows of five in mine, and the roaches seem to do fine. At the other end, place the two food bowls with the openings facing the egg cartons. When you get your roaches, carefully dump them on the egg cartons; they will quickly scramble down between them to hide.

The roaches will climb and hide in the egg cartons. The two food bowls contain fruit and roach chow.

The roaches will climb and hide in the egg cartons. The two food bowls contain fruit and roach chow.

A word about roach food.

It’s a fact: roaches will eat just about anything. As a result, there is no set, scientific diet for your feeder roaches. Do a quick search online, and you’ll find dozens, if not hundreds, of possible food choices. Moistened dog food, chicken mash, crushed cereal, organic tabbouleh…all are on the menu. While researching, I stumbled upon this cheap, simple recipe for “roach chow”, and so far it’s worked great. There are only two ingredients.

Flaked fish food.

Whole Oats

Goldfish flakes and whole oats combined and blended make great roach food.

Goldfish flakes and whole oats combined and blended make great roach food.

Just drop the oats and flakes in a blender (I do about 60/40 oats to flakes), blend to a powdery mash. Simple. I purchase large canisters of both, then blend up extra so that I always have it on hand. As both the flakes and oats can be purchased at Walmart for a few dollars, you can make enough food for months without hurting your wallet. I supplement the roach chow with fresh fruit to provide a more balanced diet. For water, I spray down one side of the enclosure just above the fruit dish every night, which has been fine and keeps things from getting too moist.

UPDATE 11/2016:  I have altered my roach chow recipe a bit. I now use oats, corn meal, and fish flakes in a 40/40/20 ratio or so. I drop these in a blender, grind them up good, then store them in an airtight container.

I also don’t offer fruit as often anymore, as it spoils very quickly (especially during the summer) and attracts fruit flies. I’ve switched to mostly carrots, potatoes, and some apples.

My container of "roach chow" (blended oats and fish flakes).

My container of “roach chow” (blended oats and fish flakes).

The hotter, the better.

If you want happy roaches and an ever-growing supply of feeders, you’d better be prepared to jack up those temperatures. Dubia thrive in warm environments. and you’ll need to keep them in the mid 80s to mid 90s if you’d like them to mate and reproduce. As these temps are too high for many T species, you will likely have to keep your feeders in a separate room. During the dog days of summer, I keep mine in my attic, where temps are almost always around 88-90 degrees.

UPDATE 11/2016: They do not need temps in the high 80s to low 90s to reproduce. Mine are kept much of the year in the 70s, and they still have young. That said, you get more offspring the warmer you keep them. If you can’t get your room temperatures up high enough to stimulate faster reproduction, you can use a heat mat on one side of the enclosure to raise temps inside. If you’re using a Sterilite bin, try mounting the heat mat on a wall, then position the cage next to it.

Keep in mind that high temperatures will cause fresh fruit to rot very quickly, so be sure to change the fruit bowl often to avoid fruit flies and decomposition.

In the winter months, they should really be kept 65-70 minimum. However, although this will be high enough to keep them alive, they will not be reproducing.

Cleaning is breeze.

My wife and I clean our colony every week, and we’ve found that it’s quite simple. Just lift out the egg cartons and place them in an empty cardboard box while you work. Remove the food dishes and any stragglers, then just dump the feces (which is tiny and dry) into the garbage. Use a damp cloth to clean up the bottom, dry it, then put everything back in. They are actually quite clean overall, and produce no real odor.

Simple and cheap!

So, there you have it. Again, this is not the only way to keep roaches, but this is how I’m currently keeping mine. It is also quite inexpensive to put together, costing around $20 for everything.  However, feel free to experiment or do whatever works for you. Dubia, generally speaking, are quite hardy and will adapt to other food sources or set ups.


Brachypelma Boehmei Molt

It’s been Tarantula Molt Central here, with 14 of my Ts molting in the past week (and several more in premolt). The 80º+ temps in my tarantula room have even my slowest growers sporting new skins, and it’s been amazing getting to watch several go though the long, exhausting process of molting.

Since getting my Brachypelma boehmei  (Mexican Fire Leg) in January of this year, I’ve been eagerly awaiting the first molt. The collector I bought it from admitted that the poor girl had taken a fall a few months before I purchased her, and although there was no visible damage, I worried that there might be something wrong internally. Still, for months, she ate like a champ, relentless chasing prey across her enclosure and quickly devouring her meals. When her pre-molt fasting began, I kept an eager eye out for the result.

My B. boehmei on her back as she prepares for a molt. Many inexperienced keepers have thought their pets dead when they see them like this.

My B. boehmei on her back as she prepares for a molt. Many inexperienced keepers have thought their pets dead when they see them like this.

A week ago, I watched as she laid down a molting mat and flipped over to start the long process. Six hours later, she sported a new, much more vibrant skin suit…

…and a nasty-looking bald spot on her abdomen. Apparently my fears about her fall having internal consequences weren’t unfounded (although it could be a coincidence). The spot is a pale orange in color and about 6mm across. It definitely looks as if there was some damage in this area, as the edges are uneven and a bit crusty, leading to the imperfect molt.

My B. boehmei in the act of molting (the exuvia is on the left, the T on the right)

My B. boehmei in the act of molting (the exuvia is on the left, the T on the right)

My B. boehmei sporting a new suit.

My B. boehmei sporting a new suit.

I held my breath as I waited to see if she would pull through, or if this defect would prove life-threatening. So far, so good. Although the spot looks nasty, she is moving around fine and seems to be hardening up nicely. I will be careful when feeding her to be sure that she doesn’t get too distended, which could put too much pressure on this potentially weak spot in her abdomen.

The bald spot on the abdomen, I'm guessing, is from an internal injury caused by a fall.

The bald spot on the abdomen, I’m guessing, is from an internal injury caused by a fall.

Hopefully, my girl’s next molt, which I suspect wont come for several months, will go smoothly and she’ll lose this nasty patch. I plan on trying to feed her soon, and I will post how it goes.

Fingers crossed…

Peekaboo…My O. philippinus Makes a Cameo!

Well, look who popped out to say hello!

Okay, I know I already posted a short video featuring this same O. philippinus (Philippine Tangerine) in the process of dragging a cricket into its den, but this time I caught the entire “hunt.” Even better, my juvenile O. philippinus actually completely emerged from its den for a few seconds.

Now, I’m fortunate in that my other O. philippinus constructed a den down the side of its enclosure, so I get to see him all of the time. Still, for this other specimen who usually comes out only at night when I’m in bed, this was pretty special.

Note: This species requires moist substrate, so I periodically moisten the coco fiber to keep it comfortable. The majority of of the water percolates through the substrate, keeping the lower levels (where its den is) moist. The water on the side evaporates before morning. I had applied water shortly before this video was shot.

Do-It-Yourself Sterilite Tarantula Enclosures

Part of the fun of keeping tarantulas, in my opinion, is the endless search for the perfect “found enclosure.” Sure, there are many gorgeous and professionally-designed cages to choose from, and they make lovely displays for any showcase Ts that you are particularly fond of. However, those with large collections can find housing all of their beloved spiders in these top-of-the-line terrariums much too expensive. That’s why many enthusiasts haunt their local WalMarts, Targets, craft stores, and Family Dollar’s looking for various canisters and containers that can be used “off label” as make-shift tarantula cages.

Sterilite has produced dozens of types of plastic storage containers over the years, and their products have long been used by budget-conscious T enthusiasts hoping to keep costs down as their collections expand. They offer containers in a ridiculous number of sizes, making them ideal for any larger T. And with prices often as low as $1.99 for smaller sizes, they won’t hurt the wallet as much.

I recently discovered their series of lockable and stackable storage containers, and was delighted to learn that they come in a number of convenient sizes. Instead of just drilling holes this time, which definitely works but is tedious and, in my opinion, not as attractive, I decided to use vents. The following is a little step-by-step tutorial for those interested.

NOTE: I know that some folks will argue that drilling holes is a bit cheaper (the vents I’m using her will run you an extra $1.90 or so per cage) or more attractive. Still, I like the look of these, and I find the vents less tedious to install. I also have plenty of enclosures with drilled or melted air holes, so I have NO problem with these.

MATERIALS

1. Buy the Sterilite Containers.

Here are several sizes of storage boxed (as well as a plastic canister that I will modify later). These are wonderful, as they stack quite nicely, saving space.

Here are several sizes of storage boxes (as well as a plastic canister that I will modify later). These are wonderful, as they stack quite nicely, saving space. I purchased these at WalMart, but they can also be found in Target (although their selection hasn’t been as good).

2. Get Some Aquarium-safe silicone.

Next, you will need aquarium silicone, which dries non-toxic. For those with hot glue guns, those will work as well.

Next, you will need aquarium silicone, which dries non-toxic. For those with hot glue guns, those will work as well. I allow three days for a full cure.

3. Get 2″ round plastic vents.

I purchase these at  roundvents.com. I like the plastic ones, as I worry that a large T could chew through the wire ones.

Vents of this type can be found through several online vendors. I purchased these at roundvents.com. I like the plastic ones, as I worry that a large T could chew through the wire ones.

4. Grab a 2″ Black & Decker (cheap!) hole saw.

To drill the holes, you will need a 2" hole saw. If you don't have one, Black & Decker makes a cheap set that includes the 2" saw for under $10.

To drill the holes, you will need a 2″ hole saw. If you don’t have one, Black & Decker makes a cheap set that includes the 2″ saw for under $10. I found this one at my local WalMart.

5. Clamp the container down before drilling.

Again, you can probably have someone hold while you drill, but I have the clamps handy, so I use them. Notice the piece of wood underneath, which gives you something to drill in. You can also use the circle created by earlier drillings to line up the hole.

Again, you can probably have someone hold the container while you drill, but I have the clamps handy, so I use them. Notice the piece of wood underneath, which gives you something to drill in. You can also use the circle created by earlier drillings to line up the hole.

6. Carefully drill your holes.

Mark the entry point for the guide bit with a Sharpie to keep the hole centered. When drilling, don't push too hard and allow the drill to do it's work. Be careful that the bit doesn't heat up too much, as if it does, it can melt the plastic. Use a piece of wood underneath to drill into  and for support.

Mark the entry point for the guide bit with a Sharpie to keep the hole centered. When drilling, don’t push too hard and allow the drill to do its work. Be careful that the bit doesn’t heat up too much, as if it does, it can melt the plastic. Use a piece of wood underneath to drill into and for support.

7. After drilling the holes, clean edges with a utility knife.

Unfortunately, the drilling process can leave behind some gnarly and an sharp piece of plastic around the edges. Use a utility knife to carefully trim away these scraps.

Unfortunately, the drilling process can leave behind some gnarly and an sharp pieces of plastic around the edges. Use a utility knife to carefully trim away these scraps and make for a clean fit.

8. Put a thin bead of silicone (or hot glue) around the rim of the vent.

Run a nice, thin bead of aquarium safe silicone around the lip of the the vent. Although the vents sport tabs that help "lock" them in place, the silicone seals it up and makes it permanent.

Run a nice, thin bead of aquarium safe silicone around the lip of the the vent. Although the vents sport tabs that help “lock” them in place, the silicone seals it up and makes it permanent. Hot glue can also be used, meaning the enclosure could be used sooner as you won’t have to wait for the silicone to cure.

8. Line up the vent and carefully pop it in.

Now, line up the vent and carefully pop it in. I like to do one side facing up and one side facing down. Use a moist paper towel to clean up any excess silicone.

Now, line up the vent and carefully pop it in. I like to do one side facing up and one side facing down. Use a moist paper towel to clean up any excess silicone. I put a vent in two opposite sides of the the container to allow for cross ventilation.

9. Newly vented cages stacked in a cluttered garage.

Several of the newly-vented enclosures. The large one on the bottom will be fitted with 4" vents.

Several of the newly-vented enclosures. The large one on the bottom will be fitted with 4″ vents.

 10. Modified cages in use.

A couple of my earlier enclosures, already occupied. The top enclosure does NOT have vents. For that one, I used a nail heated on a burner to melt the holes into it.

A couple of my earlier enclosures, already occupied. The top enclosure does NOT have vents. For that one, I used a nail heated on a burner to melt the holes into it.

A small note about ventilation: I find that the 2″ vents work very well with this size enclosure. However, after noticing some condensation collecting on the lid of one of my cages after moistening the substrate, I added a row of holes in the lid above the sphagnum moss to allow for a bit more airflow. The moss stays moist, but I no longer get the condensation. Still, I’ve only done this to one enclosure that housed a T that required more moisture.


H. incei gold Feeding Video

I recently acquired a trio of juvenile/sub-adult H. incei golds, and I immediately discovered what a truly beautiful and interesting species they are. These lively little dwarfs sport gorgeous gold and orange tones that make them wonderful display spiders. They also like to decorate their enclosures with copious amounts of thick webbing, making them one of the more prolific webbers of the species I keep.

One of my H. incei golds after being housed. Not the best picture, as the flash has washed out it's colors.

One of my H. incei golds after being housed. Not the best picture, as the flash has washed out it’s colors.

All three have been excellent eaters, snatching medium crickets from the mouths of their burrows with lightning speed. Although they were furnished with identical enclosures with cork barks and starter burrow holes dug into the substrate, only two of my H. incei golds adopted these as homes. Both of these two dug deep burrows before lining the opening of their dens in a liberal coating of silk.

The third built what I can best describe as a silken teepee over its cork bark hide. This specimen did not dig, but instead sits on the surface, sometimes beneath its hide, waiting for prey. It makes for a wonderful showcase animal, as it is more often than not visible. It is this T that is featured in the feeding video.

A modified Ziploc container. This H. incei dug a deep burrow; the circle marks the lower chamber.

A modified Ziploc container. This H. incei dug a deep burrow; the circle marks the lower chamber.

I keep my H. incei golds in the same temperatures as my other Ts; high 70s during the day with low 70s at night. I also keep the substrate for these guys on the moist side (not wet), by sprinkling water on the surface twice a week. They are currently eating one medium cricket every three or four days.

While feeding my surface-dwelling incei, I decided to get a bit of video with my cell phone. Below is a brief clip of my little guy snatching up a cricket. My apologies for the raucous soundtrack; it is covering up my daughter telling me a story in the background. 🙂

For lovers of dwarf tarantula species, or even just those who want a gorgeous, heavy-webbing T, the H. incei gold makes a wonderful pet.


B. hamorii (Mexican redknee) – A Tarantula Icon

NOTE: This article was published before the genus revision that revealed that the species being sold as B. smithi in the hobby was actually B. hamorii. This article refers to B. hamorii, but husbandry for both species would be identical. 

When I was about six, my father used to take me to a local pet store on occasion so that I could check out the animals for sale. Although I was certainly interested in the puppies, gerbils, guinea pigs, and snakes, the highlight of the trip was always a large Brachypelma smithi, or Mexican redknee tarantula, kept in an aquarium at the back of the store. As a boy who was terrified of spiders, I couldn’t help but to be utterly fascinated by this amazing animal. Although it should have been the stuff of nightmares for me, I couldn’t get enough of it.

Fast-forward a few decades… With my T collection growing, I decided that I had to have a B. smithi. After all, this was arguably the animal that kicked off my fascination with Ts all those years ago, and it was still widely considered to be one of the most popular tarantulas in the hoby. As this species is known for its very slow growth rate, I decided not to pick up a sling and instead searched for a juvenile to young adult female. The B. smithi is thought to be one of the tarantulas with the longest longevity, with some folks suspecting  female could live 40 years or more. I’ll admit, it’s a little mind-blowing to think that a pet could outlive me!

My Brachypelma smithi female shortly after I acquired her in December of 2013.

My Brachypelma smithi female shortly after I acquired her in December of 2013.

I finally located my girl when my favorite tarantula dealer, Jamie’s Tarantulas, had her cyber-Monday sale last year. My 3″ B. smithi female arrived in early December, and she was gorgeous. For her temporary housing, I used a Sterilite 12 quart plastic storage box, filling it with about 2″ of dry coco fiber. Although I normally use cork bark for a hide, this time I bought a much more fancy resin cast log. A small ceramic water dish was supplied for fresh water. This is a tarantula that thrives in a dry environment, so I do not mist or moisten the substrate.

Check out my female B. smithi below!

B. smithis are generally known for being calm and docile (although there are always exceptions to these “rules”), so I was surprised to discover that my new acquisition was actually very skittish and very fast. My first time opening her enclosure, she nearly bolted out; this is why you can never let your guard down with any T. For the first two months I owned her, she was quite reclusive, rarely venturing out from beneath her log. When she did emerge, the slightest disturbance would send her scurrying for cover.

The first cricket offered was still alive and kicking the next morning, and I actually saw her bolt from it at one point. It was obvious she was not yet completely comfortable in her new surroundings. I waited a couple of days, then offered her a dubia roach with its head crushed (Yup… gross, but it keeps them from burrowing and playing dead). I placed on its back in front of the opening to her den in hopes that she would sense it when she ventured out. It was gone the next morning. Although I continued this process for a few months, she now readily takes live and kicking large crickets.

B. Smithis are New World tarantulas and, as such, use urticating hairs for defense. When stressed, they can kick these irritating bristles from their abdomens, causing itching, burning, and discomfort to any potential predator (or well-meaning keeper) mucking with them. I’m fortunate in that my girl doesn’t seem to be prone to kick yet. She also calmed down a great deal from when I first acquired her. Now when her cage is disturbed, she will usually just scurry to her den and perch herself on top of it. She spends the majority of the time out in the open now, which is great, as she really is a beautiful T.

Like my other Ts, my B. smithi is kept at high 70s during the day and low 70s during the night. She generally eats two 1″ dubia or three large crickets a week. By late February, her abdomen was quite plump, and I cut back on the feeding in hopes that premolt would be coming soon. Finally, in mid-April, she molted.

My 3-4" B. smithi female after a molt. The white patches on her abdomen hint that she might have experienced a little trouble.

My 3-4″ B. smithi female after a molt. The white patches on her abdomen hint that she might have experienced a little trouble.

The discarded molt (exuvia) from my female B. smithi.

The discarded molt (exuvia) from my female B. smithi.

As she molted inside of her den, I unfortunately did not get to witness the process. I did, however, notice that when she emerged, she had two shiny white spots on her abdomen that probably signified that she experienced a bit of trouble with the molt. I waited a couple weeks  before offering her a prey item, and was relieved when she snatched up the first cricket I dropped in. Although she seems to be fine, I will definitely be paying extra attention when it comes time for her next premolt.

My 3.5'-4" B. smithi perched atop its log hide after a recent meal.

My 3.5′-4″ B. smithi perched atop its log hide after a recent meal.

It might have taken dozens of years, but I finally have my B. smithi. With their ease of husbandry, generally even dispositions, and undeniable beauty, there is a reason this species has been the face of tarantula keeping for decades.

The Poecilotheria metallica – Yes, Tarantulas Can Be Beautiful

When  I first started researching the different species of tarantulas currently available in the hobby, I stumbled across a photo of a Poecilotheria metallica (common name “Gooty sapphire ornamental”). This stunning tarantula sported an amazing metallic blue coloration with a gorgeous fractal pattern on its abdomen and vibrant yellow marking on its legs. The tarantula in the photo was so mind-blowingly beautiful, that I immediately assumed that it was just a clever photoshop job. After all, there was no way a tarantula could be this blue; the picture had to be a fraud.

My 1.75

My 1.75″ P. metallica sling a week after its last molt. It is finally displaying some of those gorgeous blues it will sport as an adult.

It was close to a week later when I encountered another amazing photo of this species, and this time, I decided to do some investigating. Not only did I learn that this was, indeed, a real animal, but also that it was one of the most coveted species in the hobby. Despite being quite readily available, this species still commanded prices as high as $100 for a small sling. Also, although captive breeding efforts provided for healthy numbers in the hobby, this incredible animal is critically endangered in the wild. Limited to a 100 square kilometer region in India, its habitat is being threatened by deforestation.

Although these tarantulas are undeniably pretty, they are still members of the Poecilotheria genus. As such, they possess blinding speed and, though usually reluctant to bite, very potent venom. At the time, I decided that that I needed some more experience with faster species before trying my hand at keeping a P. metallica, so I moved on to other species.

Several months later, my wife took me to a semi-local exotic pet store called Cold Blooded Pets & Supplies for my birthday so that I could peruse their stock of Ts and choose a few for my gift. It just so happened that they had several P. metallica slings among their rather diverse stock. Needless to say, we left with one that afternoon.

Gorgeous … and So Fast!

Although I’ve found most poecilotheria slings to be high-strung and skittish, my P. metallica is particularly prone to make dashes whenever disturbed. Anyone who thinks that they could possibly react in time to a fast fleeing T should watch this little bugger zip around its enclosure four or five time in the blink of an eye. I’m extra cautious when opening its enclosure for feeding or maintenance, as to lose focus could result in an escape.

Like my other pokies (nickname for Poecilotheria), my P. metallica has been growing quickly, having molted two times since late February and picking up .5″ in growth or more. For an enclosure, I use a tall Ziploc Twist ‘n Lock container modified with numerous ventilation holes allowing for good cross-ventilation. Because this is a an arboreal species, the height offered by the enclosure is more important than floor space. Although it is provided with cork bark hide with a thick faux vine for climbing, it tends to just stay at the top of the enclosure. As P. metallica’s are known to be particularly photosensitive, I keep this T in a darker corner of a shelf where it is shielded from light a bit.

The current enclosure for my 1.75-2

The current enclosure for my 1.75-2″ P. metallica sling.

Although kept at the same high 70s day/low 70s night temperatures, I do keep the humidity a bit higher for this T. I moisten, not soak, the substrate a bit once a month. To do this, I don’t spray as it would drive the little guy nuts. Instead, I dribble some water on the substrate.  Besides that, a water dish keeps the humidity inside the enclosure slightly higher.

My P. metallica is a great eater, consuming two medium sized crickets a week. The only time it refuses food is when it’s in premolt. As it does not like bright light, I usually drop a cricket in before bed, and it will grab and consume it overnight.

Ventral shot of my P. metallica sling. Despite the poor quality of the shot, you can still make out the yellow banding.

Ventral shot of my P. metallica sling. Despite the poor quality of the shot, you can still make out the yellow banding.

Update: 2/27/2016

As it’s been over a year since this post, and my P. metallica has been doing quite well. Time for an update!

The P. metallica, suspected female, has molted three times since the original post and is now about 4″ in total length. Currently, she is kept at temperatures between 80° during the day and about 74° at night. She eats two large crickets a week and has proven to be a lively and proficient hunter.

It’s worth noting that the P. metallica went through a lengthy period of almost six months in which she didn’t molt at all (previous to this, she would molt every two months or so). This period began in November and lasted until May and coincided with the winter months. It was a particularly cold and brutal winter in which the furnace was running constantly. Although the temps in the tarantula room never dipped below 70°, the humidity was in the teens for several months. The P. metallica had a water dish, and I would periodically moisten the substrate, but I’m convinced that these lower humidity levels and slightly-lower temperatures triggered some type of response in the specimen that led to the lengthy time between molts.

P.-metallica

It should be noted, however, that the P. metallica DID continue to eat during this period. However, due to the fact that its abdomen was quite large and distended, I reduced it’s feeding schedule to one cricket every week or so. Therefore, it appears that although it didn’t show any signs of distress as the humidity levels became less than ideal, it certainly slowed its growth rate a bit.

When it did finally molt, it was time for a rehousing. For its next home, I used a repurposed Sterilite “Showoff” container (15 1/4″ L x 9 3/4 W x 11 1/2″ H), which I ventilated with several holes in the sides for cross-ventilation. After packing in about 3″ of coco fiber, peat moss, and vermiculite substrate, I added a water dish, a cork bark flat, and some plastic plants. I also added some long fiber sphagnum moss to hold moisture. When winter approaches, this new enclosure will make it much easier to maintain a micro climate with higher humidity.

Enclosure-top-down

Temperament wise, I think that I got lucky with this one. Once very skittish and photosensitive, she now sits mostly out in the open and tends to crouch down rather than bolt when disturbed. That’s not to say that she doesn’t have frantic speed bursts left in her; she can still run when startled.

Poecilotheria metallica

Poecilotheria metallica

A Stunning Species for the More Experienced Keeper

When someone gives me that incredulous look after I say a tarantula can be beautiful, I usually show them photos of P. metallicas. Even to folks who don’t “get” tarantulas, they are undeniably pretty. Many keepers count them as the most beautiful species available. Still, they are Poecilotheria, and as such, are not a beginner species. This T has slightly more involved husbandry requirements, and its blinding speed and potent venom make it a potentially dangerous pet for an unwary keeper. For those experienced with fast-moving arboreal Ts, the P. metallica is a must for the collection.

For more information on this gorgeous species, please visit Arachnoboards and search for P. metallica care. 

L. parahybana Feeding Video and Husbandry Notes

After 17+ years of keeping a G. porteri, and with no idea that the tarantula hobby had exploded over the past two decades, I decided that I wanted to see what kinds of species were currently available. To say the number of animals available in the trade was overwhelming would be an understatement, and I soon found myself compiling lengthy lists of potential candidates. After several months of research, I decided on two slings; a Chromatopelma cyaneopubescens (GBB) and a Lasiodora parahybana (LP).

I purchased my LP sling in October of 2013 at a size of about 3/4″ or so. This species has a reputation for being a very fast grower with some keepers reporting their LPs reaching 4″ in a year. Mine has molted five times in the time I’ve kept it, and in that time, it has grown to about 1.75″.  I wouldn’t say this is the fastest-growing T I keep, but it molts like clockwork every two months, and puts on a little size each time.

Besides their awesome adult size (8″ is the norm with 10″ possible), it was their rather simple husbandry that attracted me to this species. I keep mine fairly dry and only moisten the substrate in the corner once a week, letting it dry out in between. I’ve provided my 3″ female with a water dish, which I overflow to provide a moist spot. Usually, it quickly ends up filled with dirt. The substrate is a 50/50 mix of coco fiber and sphagnum peat moss, and for the slings, I give them several inches of depth as they like to dig.

For the first five months I kept my LP, I rarely saw it. The little guy had dug an extensive burrow beneath the surface, and he would only pop out to snatch a prey item. There was a two-month period where I never saw it at all. When entering premolt, it would often close off  the entrance of its burrow for weeks at a time. Eventually, the hole would reopen, and I would catch a glimpse of my slightly-larger LP.

I keep my LPs at the same temps as my other Ts; high 70s during the day and low 70’s at night. They are great eaters, only refusing a meal if in premolt. Like my P. cancerides, they usually attack their prey with gusto, often rushing at it from across the enclosure.

As slings, LPs are quite skittish, and will quickly bolt or dash down into their hides with the slightest disturbance. My female is a bit more brave, often sitting right out in the open instead of using her hide.

I know keep three LPs; two slings and the gorgeous female my wife gave me for my birthday. I look forward to the day that these beasties mature into an 8″+ behemoths.

Below is a recent feeding video featuring my 1.75″ juvenile.