I currently keep three Phormictopus sp. purple slings, and to date, they’ve been aggressive eaters but well-behaved little buggers overall. Well, while performing maintenance on another T the other night, I brushed up against one of the purple’s enclosures. When I looked back up, I was confused for a moment, as this is what I saw.
My sassy little 1.5″ Phormictopus sp. purple giving me the threat pose.
Apparently, my little guy took exception to me nudging his home, as he was vertical in a rather impressive threat posture. The only other T I’ve seen go this vertical in a threat was my female OBT (and she’s a bit high-strung if caught out in the open). Even after I ran to get my phone to get a picture, he remained in this position, and it took about 15 minutes for him to settle back down.
As this species can get to be 7-8″ as an adult, I’m in for an exciting time when he gets a little size on him. Still, I couldn’t help but to find the display to be quite cute and endearing.
Let’s see if I still feel that way if he continues to do this when full grown…
When I first began researching what type of tarantulas I might get to start my collection, I encountered a photo of a spider so colorful and beautiful, that I was at first convinced that it was a clever Photoshop creation. With its shimmering blue legs, metallic aqua carapace, and stunningly vibrant orange abdomen, this animal looked too striking to be real. A quick search revealed this amazing specimen to be the Chromatopelma cyaneopubscens, common name Greenbottle Blue or GBB for short.
Immediately interested, I began researching the GBB to learn care requirements, temperament, and cost. Surely this unique tarantula commanded high prices like the equally beautiful P. metallica? Or, being new to the hobby, would I be overwhelmed by this spider’s temperament or husbandry requirements? I was delighted to learn that, despite being a bit skittish and faster than many recommended “beginner species”, the GBB’s heartiness and ease of care made it approachable for someone relatively new to the hobby. And with .75″ slings costing around $35-$40, they were definitely affordable.
Home Sweet Home
GBBs originate from an arid, tropical desert region in Venezuela, where they live in heavily-webbed burrows under local foliage. When researching, I discovered many older accounts by keepers who said that GBBs were a fragile species that was difficult to keep alive in captivity. For years, many kept this spider in moist enclosures with damp substrate and constant misting. As GBBs hail from an arid region, these wet, stuffy enclosures often proved fatal. GBBs should be kept on dry substrate in well-ventilated enclosures. As slings are more vulnerable to dehydration, you can moisten the edge of the enclosure and a corner of the substrate once a week (Do not spray; several drops from an eyedropper will suffice). For juveniles an adults, a water dish will provide any water they may need. You can also dribble water on the webbing at night before bed so that the spider can come out and have a drink.
Although slings may dig a bit, most GBBs will construct elaborately-webbed dens using any supplied cork bark hides or furnishings for anchors. Although this species has been referred to as a semi-arboreal, this not true— this is a terrestrial species. However, if provided with an enclosure with some height and taller furnishings (cork bark, vines, plants, etc), many GBBs will web up these and choose to perch themselves above the ground. The two juveniles I keep are often in their webs just an inch or two above the substrate.
My young adult female’s enclosure. Notice the copious amounts of webbing.
Some keepers see this behavior as a sign that this is an arboreal species, when instead it’s likely an animal making the best of the surroundings it has been provided. As a terrestrial species, a fall from too high up could injure this T, and care has to be taken to insure that distance between the substrate and the top of the enclosure is not too high. This species should not be set up as an arboreal due to their skittishness and increased chance of injury from a fall. That said, giving them a bit of extra height above the substrate will allow the spider to web up a bit.
My two juvenile GBBs are kept on dry coco fiber substrate with cork bark slabs and water dishes provided. They do not use the cork bark as hides, but instead as anchors for their copious webbing. Even as slings, these two liked to fill their enclosures with thick layers of web. Despite the webbing, both usually sit right out in the open, remaining highly visible and making for fantastic display animals.
Like most of my Ts, my GBB is kept at normal room temperatures. During the summer months, temps range from the low 70s at night to low 80s during the day. In winter, it’s low 70s at night, mid 70s during the day. They seem to eat well all year round, unlike other species I keep that slow down during the winter.
My 2.75″ GBB
Beautiful and deadly…to crickets.
Part of a GBB’s hardiness comes from its excellent prey response and appetite. My two GBBs are, by far, two of my most vicious hunters. Because of the extensive webbing, they generally feel the vibration of the cricket or roach the moment it is dropped into the enclosure. I’ve had several instances when a cricket was snatched up the second it hit the substrate. They are fast and deadly, tackling and subduing prey items ferociously and efficiently. Out of all the species I keep, the GBB is in my top three of Ts I most enjoy watching hunt.
When slings, I would feed my specimens one small cricket every three or four days. As juveniles, I offered one medium/large cricket twice a week. The only time either has ever refused a meal is when in pre-molt. Their growth rate was medium to fast, with frequent molts bringing moderate changes in size. During its first year with me, my oldest GBB molted six times and in that time it went from .75″ to 2.75″. Molts usually came about every two months during this period.
As young adults, their molt schedules slowed down to about once every four months or so. Behaviorally, the young adults are a bit more skittish and prone to kicking hair at the slightest disturbance. Now that they are both around 4″, I feed them two large crickets once a week.
Young adult female C. cyaneopubscens (GBB)
A good “beginner species”?
The GBB’s hardiness, ease of care, and affordability might make one think that it’s a great starter species, and in some respect that is true. However, this is a tarantula with some speed that also has a reputation for being skittish. I have never seen a threat posture or any type of defensive display from my specimens, and they have never been aggressive. As adults, however, they do like to kick hairs and will eventually bolt if disturbed. A keeper used to slower, calmer species may not be ready for a spider that may be out of its cage in the time it takes them to blink. Rehousings can be particularly fun, as the GBB is prone to bolting unpredictably in any direction BUT the one you want it to go in. That being said, a keeper new to the hobby who practices caution and care should have little problem with this beautiful species.
Since getting into the hobby, I’ve spent a lot of time (more than I’d like to admit) experimenting with various substrates. When I bought my first T about 18 years ago, the popular choice for spider bedding was dry vermiculite. A lot has changed since then, however, and better (and more appropriate) options are now recommended.
Ask any group of tarantula keepers what material they choose to keep their prized pets on, and you are likely to get a variety of responses. A recent poll on the Arachnoboards forum did reveal that there are a handful of popular choices that tarantula keepers mix and match to get the properties they desire. Much is up to personal choice, and I actually find it quite fun to experiment with different combinations. What follows is a list of some of the more popular choices as well as some pros and cons of each.
COCO FIBER (Eco Earth)
Made from ground up coconut husks, and sold loose in bags or in compressed bricks, coco fiber substrate has become one of the most popular substrate choices for those who keep tarantulas. Although the bags save you the effort of having to re-hydrate the compressed bricks, they are much more pricey. Zoo Med’s Eco Earth is probably the most popular brand, but other companies also produce the bricks (and some are less expensive).
PROS:
Fairly inexpensive if you purchase it in bricks. Buying bricks in three packs makes it even more affordable. ($7.99-$9.99 for about 21 liters)
Absorbs water well for species that need some moisture.
Great when used dry for arid enclosures.
Seems to resist mold.
CONS:
Can become expensive when filling larger enclosures.
Re-hydrating the bricks can be a bit time consuming and messy.
Re-hydrated coco fiber has to be dried out before being used in an arid enclosure (I put mine in a large foil turkey pan, then slowly bake in in an oven at about 250°, watching it at all times)
When dry, it can be “fluffy” and more difficult for burrowing species to create homes.
Dries out quickly (could be a positive with arid species)
TOPSOIL
Regular old run-of-the-mill topsoil can be a great and inexpensive substrate choice. It can be purchased at any Walmart, Home Depot, or Lowe’s in large bags for only a couple dollars. If using topsoil, it’s important to make sure that it’s organic with no fertilizers added (this includes animal waste). I have found myself using top soil mixes more and more due to the cost-effectiveness, availability, and water retaining qualities. It should also be noted that many European hobbyist have been using regular topsoil from their yards for years with no ill effects.
PROS:
Very inexpensive (a .75 cubic foot bag runs about $2.25).
Easily procured.
Mixes well with other substrates to get desired properties.
Packs down well; good for burrowing species.
CONS:
Inconsistent quality. Often comes with jagged chunks of branches and wood chips that must be filtered out
Very heavy when used to fill larger enclosures.
If used straight up, spraying/moistening of the substrate can create puddles or mud. It does not absorb water as well as other substrates.
PEAT MOSS
Peat moss is another readily available and inexpensive substrate alternative. Again, it can be purchased in a variety of places, and the large bags are very convenient for filling up large enclosures. As with the top soil, you want to go with a product that is organic and contains no fertilizers.
PROS:
Very inexpensive and comes in large quantities (a 3 cubic foot bag is only $9.99)
Packs and forms very well for burrowing species
Absorbent when wet down for species requiring moisture.
Mixes well with other substrates.
CONS:
Can be a bit dusty if used dry
Like top soil, the quality from bag to bag can vary. Large chunks or sticks must be filtered out.
Can be prone to growing mold or fungus.
As stated earlier, these three are the top choices among enthusiasts, and each can be used alone, or they can be mixed and matched to create a substrate to fit any need. For the majority of my enclosures, I’ve been using a 50/50 mix of coco fiber and peat moss. This has become my “all-purpose” substrate for many of my specimens.
VERMICULITE (As an additive)
Although the days of using vermiculite as a substrate for my Ts are long over, that is not to say that it can’t be very useful. For species requiring more moisture, I put a 1/2″ thick layer of vermiculite on the very bottom of the enclosure, then mix some in with the 50/50 coco/peat combination and use that to fill the rest of it. I find that the vermiculite retains water better than coco or peat alone, and allows for better water percolation. This enables any water I pour in to filter down to the bottom, keeping the lower levels humid and moist like the tarantula’s burrow in the wild. For Ts requiring more humidity, this also allows the water to evaporate more slowly, elevating the humidity inside the enclosure as it does.
The trick is to not add too much, as overdoing it keeps the soil “fluffy” and prevents it from being packed down well. Vermiculite is relatively inexpensive (an 8 quart bag costs about $3.99), and I always keep some on hand.
SPHAGNUM MOSS
Sphagnum moss is another useful additive when you are trying to maintain humidity in an enclosure. Moss absorbs water like a sponge and holds onto it quite well. When used inside an enclosure, it can be wet down to provide a source of humidity. I like to place some around water bowls to soak up the overflow. Although various mosses are produced by reptile supply companies, clean organic horticultural moss can also be purchased at Walmart, Home Depot, Lowe’s, and gardening supply stores.
Some things to avoid when experimenting with substrates:
Anything with jagged sticks or pieces. These could be harmful to the tarantula, as a falling T could rupture its abdomen on something sharp. If you buy substrate with jagged pieces, they must be removed before use.
Substrates with with fertilizers or additives. Make sure to check the labels before you buy. Even some “organic” soils have natural fertilizers added, including animal waste.
Pine chips or products made from cedar. Compounds in conifers and cedar are suspected to be harmful to Ts (Note: it is widely believed that mulches or peat mixes containing pine or cedar products are safe)
Aquarium Gravel. Although used for years, its use as a substrate is now generally frowned upon. Besides holding water too well (it tends to puddle and stagnate beneath the surface), it can trap a tarantulas leg or prove hazardous in a fall.
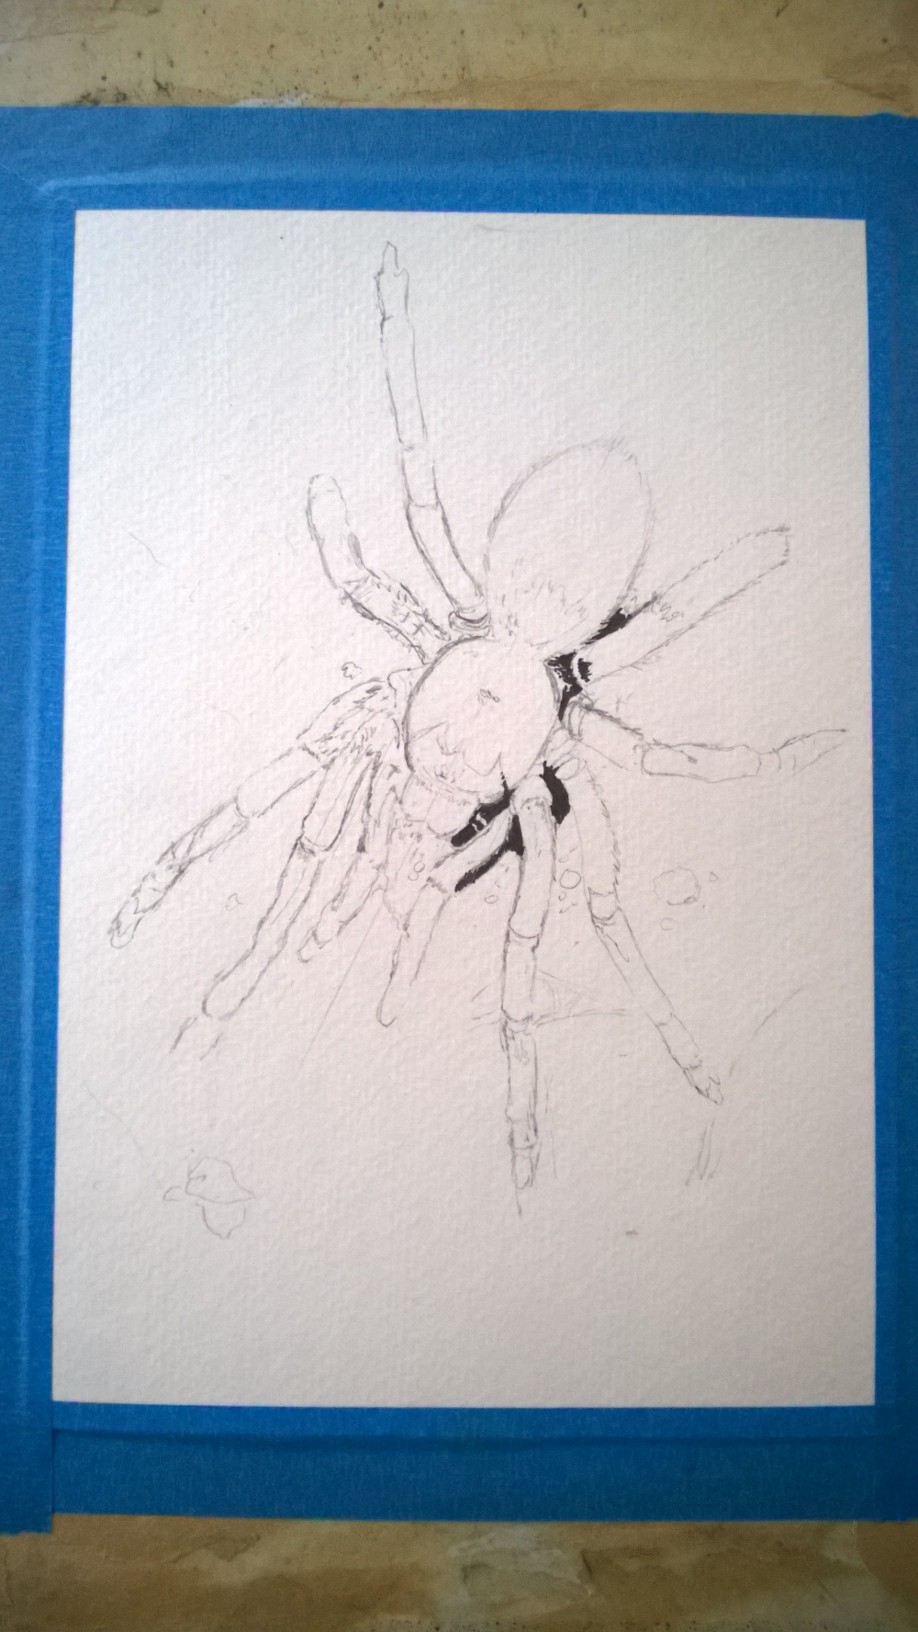
In my free time, I do illustration for work for magazines and small press book companies. Most of my work falls in the horror/dark fiction genres, which I enjoy, but I’m always looking for an opportunity to work outside of my comfort zone. Since getting into the tarantula hobby, I’ve toyed with the idea of painting one of the more colorful species. Well, today I gave it a shot.
I decided that my first attempt should be a C. cyaneopubescens, or Greenbottle Blue (GBB for short). This tarantula sports such beautiful blues and oranges that it almost looks photoshopped. I figured this would make for an interesting color palette. For a medium, I used watercolors with some ink to bring out the details.
I actually had a blast doing this, and I will definitely be trying some more. If I get enough drawn, I may even make a calendar. Hmmmm…
After taping my paper to the drawing board, I used pencil to sketch out the general shape of the tarantula.
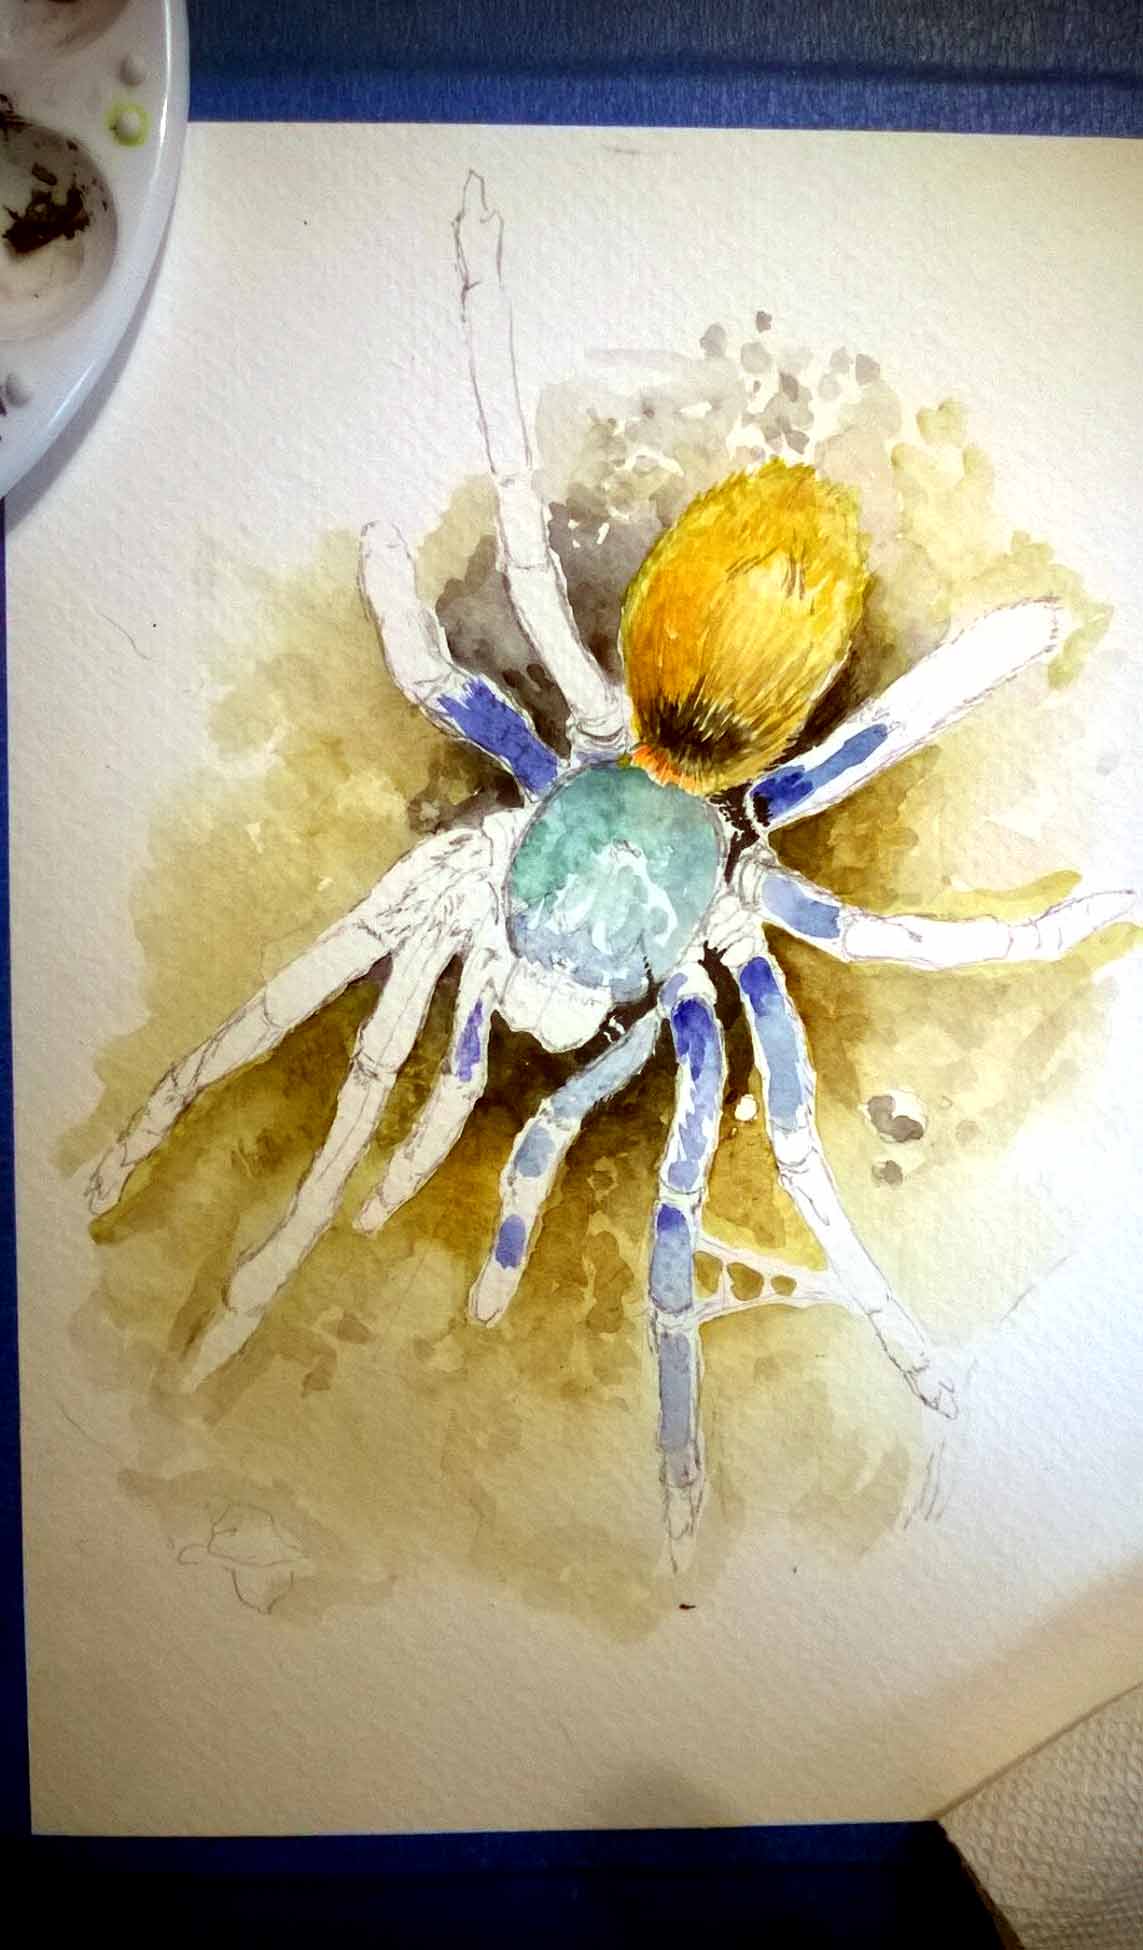
Building up the layers of watercolor to give the painting more depth.
Getting closer to completion. The layered colors are started to look richer and deeper.
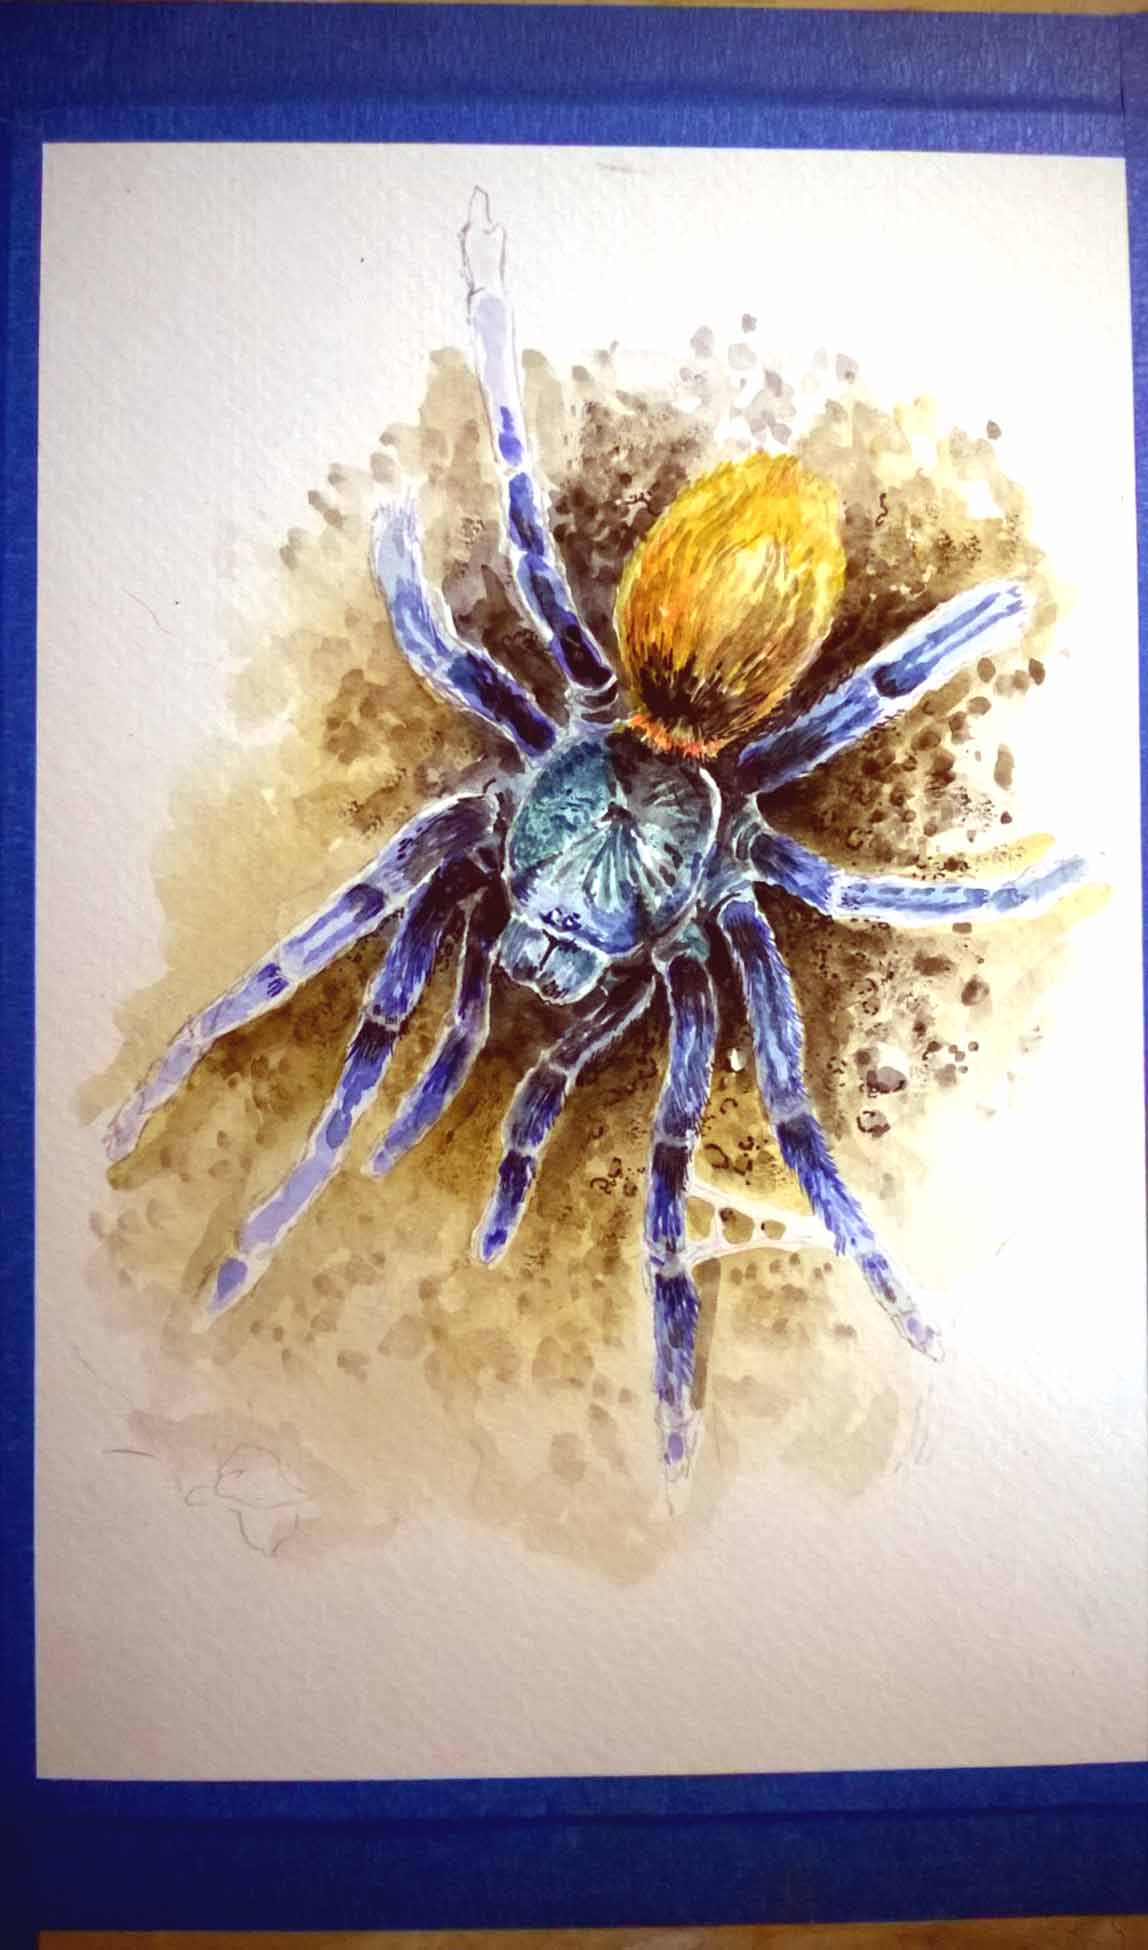
Although I’m still tweaking it (I tend to be obsessive), the painting is pretty much done.
The Poecilotheria regalis originates from India, hence its common name of “Indian Ornamental”, and it is probably the most commonly kept of the Poecilotheria genus of tarantulas. This is an arboreal species that, in its natural habitat, lives in tall trees where it catches flying insects as its prey. In captivity, they are a hearty and gorgeous display tarantula for any keeper experienced with fast arboreal species.
My 3″ juvenile P. regalis male.
A word of caution…
Although the regalis is recognized as being one of the “calmer” members of this genus, it is still blindingly fast and possesses “medically significant” venom. This is not an animal to be trifled with or underestimated. I have seen my juveniles run several laps around their enclosures in blink of an eye. This is definitely an animal that can move faster than human reflexes can react.
In the case of the P. regalis, when disturbed it would much rather hide or escape than attack. Their fractile-like patterns serve as amazingly-effective camouflage, so standing still can likely help them to avoid detection in the wild. When approaching any of my Poecilotheria for feeding or maintenance , I tap the enclosures a couple times until I see them either hunker down or scramble to a hiding spot. This hopefully prevents me from spooking or surprising the Ts, which could cause them to bolt frantically around the cage (or, even worse, onto me).
Keeping my guy comfy (while keeping my fingers safe).
To reduce the risk of bite, I keep my P. regalis juvenile in a Sterilite Large Nesting Showoff plastic storage bin modified with cross-ventilation holes for airflow. The container is a bit larger than what I would normally use for a specimen this size, but I like to give myself plenty of room to work when feeding or performing maintenance on my large, fast arboreals.
The enclosure is deep as well as long, as this species requires more height than floor space. I provide it with a cork bark slab, which is put at about a 45 degree angle, as well as some plastic plants and rocks for hiding places. A water bowl is also supplied.
With a max diagonal leg span of 7″, the P. regalis is a good-sized T. This guy will likely end up in a 5-10 gallon-sized enclosure as an adult. Again, I will use something that gives me plenty of room to work for when it comes time for cleaning or maintenance.
Custom enclosure set up for my 3″ P. regalis juvenile male.
For substrate, my P. regalis is kept on a coco fiber/peat moss combination with moist sphagnum moss placed around the base of the cork bark to provide extra moisture. I also moisten the substrate a couple times a week; this coupled with the water dish keeps the humidity inside the enclosure at an sufficient level. I do not obsess over exact humidity levels, and so far my Ts have been doing just fine. This species does, however, benefit from higher humidity. For temperatures, my P. regalis is kept at low 70s to mid 80s.
A fast-growing arboreal with a great feeding response.
My P. regalis has demonstrated a fast growth rate. They are good eaters, and it’s quite amazing to watch them hunt a prey item. I give my 3″ juvenile two medium/large crickets a week. This species seems to have little trouble taking down larger prey items. I procured this particular tarantula in February, and at that time it was about 2″ long. It has molted twice since then, and it’s now 3.25″ long. I also have smaller P. regalis that I purchased as a 1.25″ sling in January. After three molts, it is now 2.5″.
This is the modified Ziploc plastic container I use to house my 2.5″ P. regalis juvenile. He will likely get rehoused after his next molt.
With its beautiful coloration and patterns, impressive size, and slender and athletic build, the P. regalis makes a stunning addition to any tarantula collection. As they are very prevalent in the hobby, the slings are quite inexpensive, running anywhere from $20 to $30, and a juvenile female can usually be purchased for under $100. That being said, this is a large, fast tarantula with very potent venom and not generally a species recommended for inexperienced keepers.
Anyone who has read my bio or some of my posts knows that the first tarantula I ever acquired was my female Grammastola porteri (Common name, “Chilean Rose” or “Rosie”). Back in 1996, my future wife and I had just moved into our first apartment together, and I was was assembling a menagerie of pets I wasn’t allowed to have when I lived at home. After purchasing several snakes and a ferret, I decided it was time to fulfill a life-long dream and finally get a tarantula. Unfortunately, it was illegal for pet stores to sell tarantulas, so I took to the local classifieds to find a T. Little did I know that I was about to buy what would eventually become my longest-living pet.
My G. porteri (Chilean Rose) about a year ago.
18 years later, and “The Queen”, as we affectionately refer to her, is still going strong. When I acquired her, she was close to adult size at about 4.5″ or so, and she has molted four times while in my care. As Grammastolas are notoriously slow growers, and my female was a wild-caught specimen, we estimate that she was anywhere from 5 to 10 years old when I acquired her, meaning she is now in her 20s. Her last molt was back in 2008, and she is now a full 6″ DLS (diagonal leg span). Experts on this species estimate that, with the correct care, females could be expected to live 30+ years.
Two color forms…or two species?
For years, G. porteri and G. rosea have been staples in the tarantula hobby due to their ease of care, availability, and reputation for being particularly docile. Although this is still subject of debate, the tarantula referred to as the “Chilean Rose” is actually listed as two different species by The World Spider Catalog. For years, they have been labeled as different color forms of the same species, with G. porteri usually being referred to as NCF (normal color form) and G. rosea being called RCF (red color form). The G. porteri, the species I keep, is more of gray brown coloration with a pinkish/maroon sheen on its carapace, and the rosea is known for it more red/pink tones. However, color may not be the best way to tell these species apart, and suspected cross-breeding has likely rendered differentiation an even more muddled affair.
Just add water…and crickets!
Care for this species is very simple, and they prove to be quite hardy in captivity. I keep mine in a 5-gallon acrylic enclosure on bone dry coco fiber substrate. I supply a cork bark hide and a water bowl; this is one of the few Ts that I keep I have actually witnessed drinking. My G. porteri is a wonderful hunter, and has a great food response. I feed her 3-5 large crickets a month, easing off a bit during the winter months. Although this doesn’t sound like much, she has a plump abdomen and is in wonderful shape.
There are no special temperature requirements, as this species will do well at room temperature. Basic rule of thumb; if you’re comfortable, then your G. porteri will be fine. Temps in my tarantula room are high 60s to mid 70s in the winter, and mid 70s to low 80s in the summer. This is a species from an arid environment, so there is no need to mist or moisten the substrate. A water bowl will provide all of the moisture it will need.
Sorry, but I’m just not hungry this year.
“Rosies” are notorious for fasting. Doing a quick search on the arachnoboards forum will yield dozens of threads about G. roseas and G. porteris NOT eating for long periods of time. This is normal behavior and nothing to be concerned about. I’m very fortunate in that my G. porteri has never fasted. I do, however, have a G. rosea sling, who stopped eating for most of the winter, a period of about four months. Some report their G. porteris/roseas have fasted for over a year.
Watch those fingers…
These two species have a reputation for being very docile and handle-able, and they are therefore recommended as “beginner Ts” to those entering the hobby. Although I agree that they are great beginner tarantulas due to their ease of husbandry, this species’ temperament can be VERY unpredictable. Stories of “Psycho Rosies” can be found on any tarantula message board, and more than one keeper has been bit trying to hold his “docile” pet rock.
As with any species, temperment varies from animal to animal, and care should always be exercised when performing cage maintenance or rehousings. Although my G. porteri appears very laid back, she has a great feeding response and will charge at any disturbance in her enclosure.
Pet rock? Maybe. Beautiful T? Yes.
As more colorful and active species have been introduced into the hobby, the “Rosie” has developed a negative reputation for being a blah “pet rock.” The life of a G. porteri is mostly a sedentary one, and mine will often spend days in the same exact spot. Even when I relocated her enclosure to get a good photo, she didn’t move. They also get a bad rap for basically being the quintessential “big brown hairy spider” that everyone usually pictures when one says “tarantula.”
However, most owners of these species enjoy that their T is always visible, making it great for display, and appreciate its more easy-going temperament. Also, although I find that mine will spend long periods just sitting, it’s an event when she does get the urge to moving around and explore. Despite only being gray/brown in basic coloration, she is still a handsome tarantula and more than just a giant brown spider. Leg striping and a gorgeous pink/maroon sheen on her carapace add a touch of beauty to this species.
Notice the coloration on the carapace.
Although I’ve gotten into much faster and aggressive old world tarantulas, and I enjoy some of the large and feisty South American species, I will always love the G. porteri/rosea species. The ease of care, availability, and generally docile temperaments make it a wonderful beginner tarantula as long as the new owner is patient with long fasts. Even for experienced keepers, the “Chilean Rose” makes a wonderful addition to the collection.
With the warmer summer weather, and temperatures now consistently in the mid-80s, my tarantulas’ metabolisms have kicked into high gear. This means more eating, more growing, and more molting. In the past two weeks alone, 14 of my spiders have molted, and some of Ts I picked up as .75″ slings are now creeping closer to their adult colorations.
My juvenile C. cyaneopubescens (or GBB), one of the first two slings I purchased as a .75″ sling in October of 2013 is now 2.5+” and is sporting more of the adult orange on its abdomen and more blue on its legs.
2.5″ after a recent molt.
My juvenile P. cancerides (Haitian Brown) also molted again. What once was a striking little dark blue sling is now a 3″ juvenile will beautiful bronze and pink tones. These little guys have rapidly become one of my favorite species, and I very much enjoy watching the color changes as they grow into adults.
3″ P. cancerides after a recent molt.
Both of these Ts have undergone amazing color changes as they molt toward adulthood, and I will be eagerly awaiting what metamorphosis the next molts will bring.
After being burned once on a transaction with a private party selling Ts, I’ve been a bit gun-shy to order from anyone but established and reputable dealers. However, while perusing the For Sale/Trade/Want To Buy section of arachnoboards, I stumbled on an ad for .5″ Hapalopus sp. Columbia Large (Pumpkin Patch) slings for an amazing price of $18 each.
Now, I had been pricing this species out for months, and the cheapest I had found them for was about $35 for 1/3″. I knew the vendor, Autumn, from the boards, but I wasn’t aware that she had started selling. I checked her review thread, and found glowing reviews going back several months.
Interested, I clicked on a link to a very clean website offering several types of slings and many cool sling packages. The prices were outstanding, and the shipping charges were the lowest I had seen. For $10, she was offering Priority shipping with LAG. Even better, if you spent $50, Priority shipping was FREE. Wow. For those who didn’t want to chance a two-day journey, Autumn also offered overnight shipping for a very reasonable $35.
I ordered three Hapalopus sp. Columbia large slings. Not only were the spiders VERY reasonably priced, but I got the free Priority shipping with LAG on my purchase as it was over $50. On top of that, I even got a free B. albopilosum sling. To call this transaction a bargain would be an understatement.
Autumn’s communication throughout the entire transaction was amazing; she is very pleasant and affable. Corresponding via text (phone is also an option), she kept me updated on my order and even asked which freebie I wanted. The tracking information was texted directly to me, which was very convenient.
Shipping was prompt, and the packing was EXCELLENT. The slings were first nestled safely inside straws, then the straws were wrapped in moist paper towel and enclosed in a larger dram bottle. The bottle was packed and padded in a foam-lined Priority box. These little guys were very well protected.
Packing from Autumn’s Eight-Legged Experience.
Packing from Autumn’s Eight-Legged Experience. The box is foam-lined and the slings are cushioned by bags.
A peek inside the dram bottle shows the straws containing the Ts. These are cushioned by moistened paper towel.
The straws containing my tiny slings. This was a wonderful packing job.
My new acquisitions arrived lively and in great shape; it’s obviously that they have been well cared for. Three of the slings have already taken a prey item.
I won’t hesitate to order from Autumn again, and I highly recommend her. Her prices, service, and packing are EXCELLENT. I’m glad to have discovered this new dealer. Visit Autumn’s Eight Legged Experience Now!
A 1/2″ H. sp. Columbia sling purchased from Autumn’s Eight-Legged Experience.
Anyone who has done a search for tarantula information or care sheets has likely stumbled upon links to the Arachnoboards forum. When I first started researching the hobby, I found that many of my Google searches inevitably brought me to this wonderful forum, and it wasn’t long before I decided to sign up.
If there is a place online with more useful information about tarantula keeping, I’ve yet to find it. The forum is populated by seasoned hobbyists and novices alike, and the amount of information shared and exchanged on any given day is impressive. It’s a wonderful community where posters can discuss the hobby and mingle with others who enjoy keeping tarantulas. There are discussion boards, picture threads and galleries, dealer reviews, classifieds, as well as many other useful boards and topics.
A few tips for getting the most out of the boards.
1. Sign up! This may seem obvious, but it is very easy to just lurk on the site without every signing up. Unfortunately, if you don’t sign up, you are not able to see some of the boards, including the classifieds or dealer sections. You definitely don’t want to miss out on the many deals to be found on these boards. Also, if you’re not signed up, you can’t post or look up member profiles (two thing that you might find useful later on).
2. Do your homework! Although there are a number of knowledgeable and helpful members on the boards who will happily respond to your questions, that doesn’t mean the free advice should be abused. Before posting what could be an obvious or oft-repeated question on the boards, take the time to do a quick Google search. Many care sheets and basic info can be found in less time than it would take to make a post. Or, you could always…
3. Use the forum’s SEARCH function! The amount of information on Arachnoboards it staggering. Chances are, if you have a question, it’s been answered somewhere before. Always use the search function first to see if you can quickly answer your own question. It’s easy, it’s quick, and it keeps the boards from being cluttered with questions that have been asked dozens of times before.
Use the search function in the upper right corner before posting.
4. Beware of the “hot” topics! There are a few topics that can soon turn the boards into a battleground of dissenting arguments. Should you hold your tarantula, or does it endanger the animal? Should you supply water bowls, or is that a waste of time? Should you use expensive cages, or make your own cheaper ones? Do you have the experience to safely own an old world T? These are some of the topics that divide hobbyists and send tempers flying. You’ve been warned…
5. Identify those with experience and pay attention! It doesn’t take long to figure out which members have years of experience and valuable information to share. Pay attention to what these guys and gals say, as you will likely glean plenty of useful information from their posts and responses.
6. Use thescientific names! There are just too many species of tarantulas with way too many overlapping “common” names for hobbyists to keep straight. Just look up “white knee” and see how many species this name may apply to. Scientific names provide a convenient, accurate, and common language for hobbyist to use so that species aren’t confused.
Arachnoboards is a wonderful community for anyone interested in the tarantula keeping hobby, and should be a frequent stop for the serious enthusiast. Hope to see you on the boards!
When folks try to tell me that there there is no such thing as a “beautiful tarantula”, I have a few go-to species that I will immediately Google. Besides the P. metallica and C. cyaneopubescens, I also pull up photos of the tarantula featured in this blog, the M. balfouri. These gorgeous spiders sport creamy tan bodies, metallic blue/silver carapaces, and blue legs, and are a stunning representation of just how striking blue coloration on a T can be.
My female M. balfouri, now a young adult.
This gorgeous spider comes from a group of islands off the coast of Africa of which Socotra is the largest, hence its common name of Socotra Island Blue Baboon. Although they’ve become much more established in the hobby, they are still in demand, commanding premium prices. I got my juveniles for $60 each as part of a newsletter promotion. Expect to pay up to $100 for the same size elsewhere. I’ve seen females of this species selling for $300, so this can be a pricey pet.
This 2″ juvenile is starting to show some of its blue coloration. I’m hoping to see more blue on the legs after its next molt.
M. balfouri care
I housed my three 1,75″ juveniles in medium (5″ x 6″h x 8″l) critter keepers with about four inches of bone dry cocofiber substrate. I provided all three with small water bowls, which they usually fill up with dirt or web over. This species will burrow, creating a maze of underground tunnels with several entrances. They are also prolific webbers, and all three of mine have laid down a thick, silky carpet over much the substrate. As this species comes from a semi-desert environment, I do not mist the enclosure or moisten the substrate; the water bowl is sufficient.
Now that my female is about 3.75″ DLS, she will be getting a rehousing very soon. The next transfer will likely be the final one, and she will be getting a 3-4 gallon Sterilite enclosure with about 6″ of substrate (60/40 mix of dry top soil and peat).
A top down view of an M. balfouri’s enclosure. Notice the thick webbing.
The growth rate for my M. balfouris has been medium, with all three molting five times in my care over a 19-month period. Between molts, they picked up around .25 – .5″ of size or so. During their first two winters, when temps in my tarantula room were mid 70s during the day and dropped to low 70s at night, they mostly stayed in their tunnels as they fasted for a few months. During these periods, I rarely saw any of them, and I would drop a small cricket in once every two weeks and remove it if it wasn’t eaten by the next morning.
When the temps warm up (low 80s during the day, high 70s at night), and their metabolisms are more active and they eat great. I have noticed that they seem to prefer smaller prey, and I was feeding two small crickets or meal worms twice a week when they were juveniles. Now that they are sub-adults, they get two medium crickets a week. They refuse food when they are in premolt or during the slightly colder and drier winter months. During this time, they retreat to their tunnels and surface when the molt process has been completed or when the weather has warmed up.
Too much reading? Check out my husbandry video below!
This species is generally recognized for having a calmer, less defensive temperament, which could make it a good starter Old World species. Although they are more shy and reclusive than many their baboon cousins, they can still, in theory, deliver quite a bite. Mine generally bolt into one of their many tunnel entrances at the slightest disturbance, and not one has shown any defensiveness. However, that can always change with age, and temperament differs from specimen to specimen. Always use care when working with old world species.
Although I’ve read of instances where this species can become a “pet hole”, spending the majority of its time in its den, mine are are actually visible quite often. Usually late afternoon, I can look forward to my three juveniles creeping out of their dens to sit on the surface for a while. They only seem to stay submerged when in promolt or during the colder winter months.
This juvenile is showing some of the gorgeous blue on its legs after a recent molt.
Although I’ve yet to try to breed any of my tarantulas, the M. balfouri is high on my list when I do. Unlike most other Ts, M. balfouri mothers will actually nurture their spiderlings, killing prey and dragging it into the den to feed them. A search of balfouri breeding and parenting will bring up some fascinating stories about M. balfouri mothering, and most breeders have more success when they leave the sacs in with the mother. It doesn’t get much cooler than that.
Those looking for a gorgeous old world tarantula with beautiful coloration and relatively simple husbandry requirements should look no further than the M. balfouri. Their calmer temperaments also make them a good, if pricey, introduction species for those new to old worlds.