The first of what will prove to be many purchases.
I had first discovered Steven Stamps several months ago on Arachnoboards where he had posted several tarantulas for sale on the For Sale/Trade/Want to Buy board. I was immediately impressed with his prices and the number of species he had available, and a quick look through his review thread revealed pages of glowing testimonials. It wasn’t until last month that I stumbled on his newly-launched web store with a $50 unsexed T. stirmi sub-adult for sale that I would finally make my first purchase from him.
The first, but definitely not the last.
A diverse offering of Ts at awesome prices.
The first thing that struck me about his site was the number of tarantulas he had available and the diversity of his stock. He had everything from rarer Aphonopelma, Avicularia, and Lasiodora species, to the more common Poecilotheria or Brachypelma species. There was definitely something for every type of collector. There were also several females for sale for anyone looking for breeders. His prices were fantastic overall, with many species selling for much less than I’ve seen elsewhere.
Communication was great, and all of my emails to him were answered in a matter of hours. Mr. Stamps was kind enough to hold the T. stirmi for me after paying so that I could add a few more tarantulas to the purchase in a couple weeks to get more out of my shipping costs. I though that was a fantastic gesture. He also worked with me to ship my package on a particular day so that I could be sure I would be home to receive it.
Top notch shipping and packing!
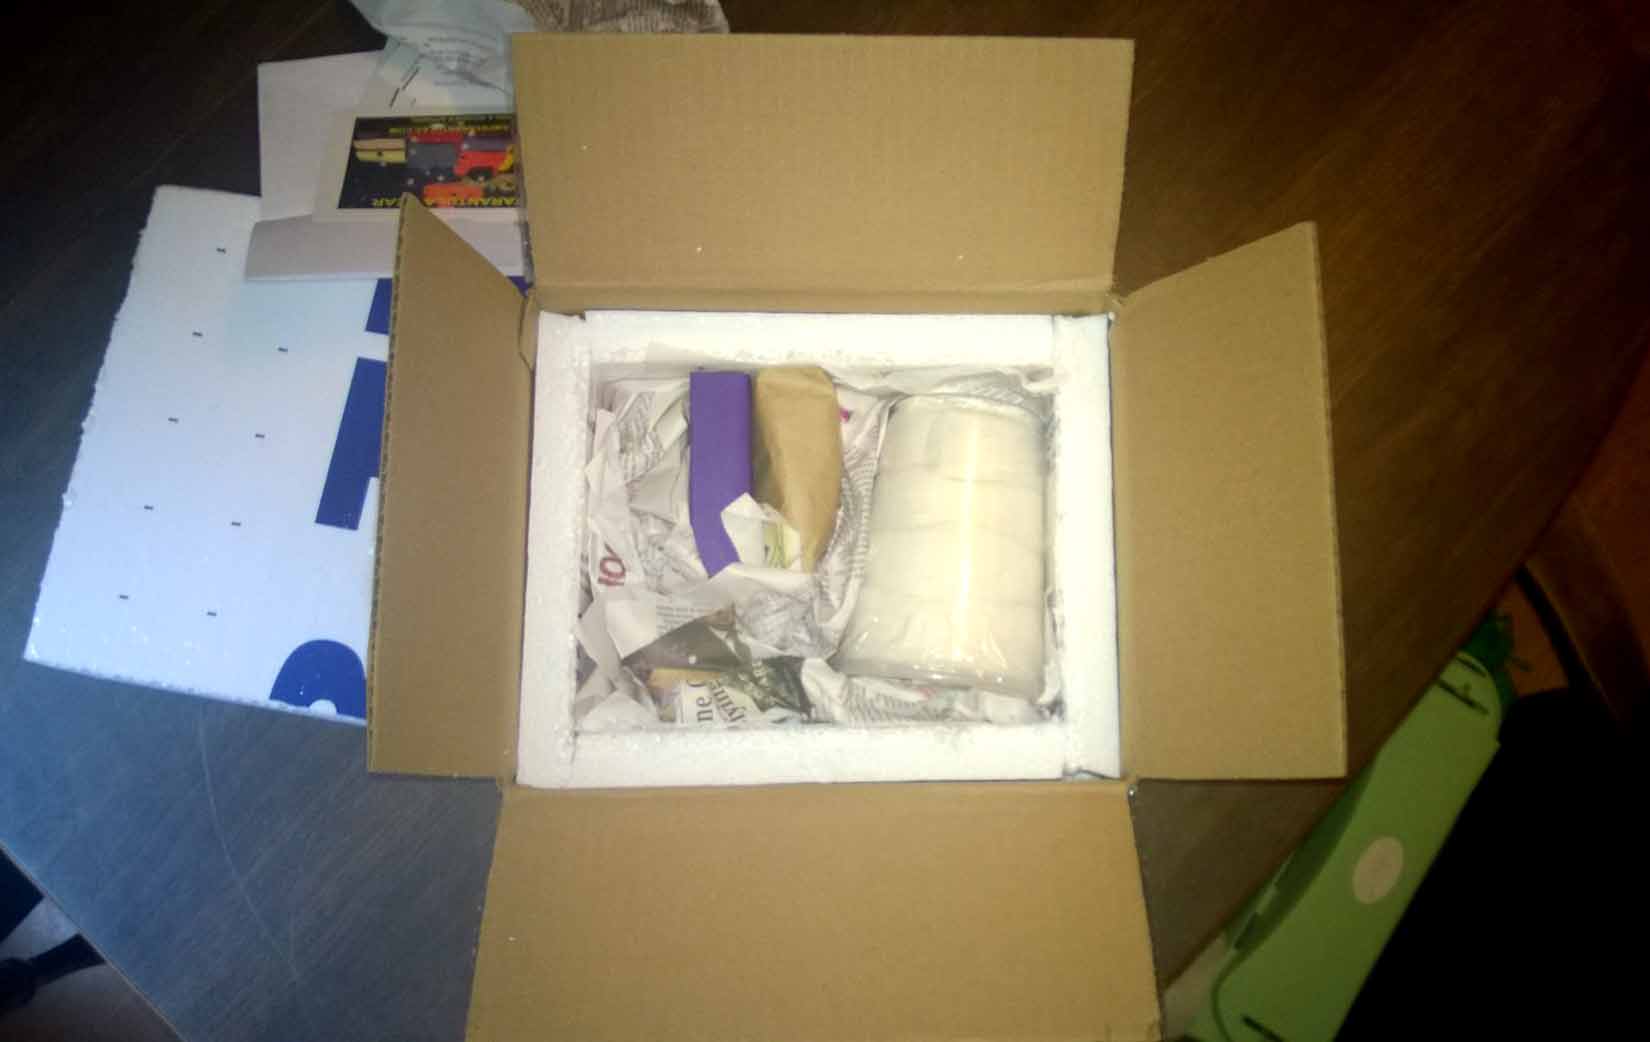
My animals were shipped next day, and the package arrived safe and sound. The Ts were expertly packed in a foam-lined box with plenty of padding and even a cold pack to protect the tarantulas from the high temperatures. The individual Ts were safely nestled away in either large deli cups (for the T. stirmi) or plastic dram bottles (for the H. lividum, L. difficilis, and G. pulchripes slings) and padded with newspaper. Stamps also included an awesome flashlight as a free gift.
Very cool.
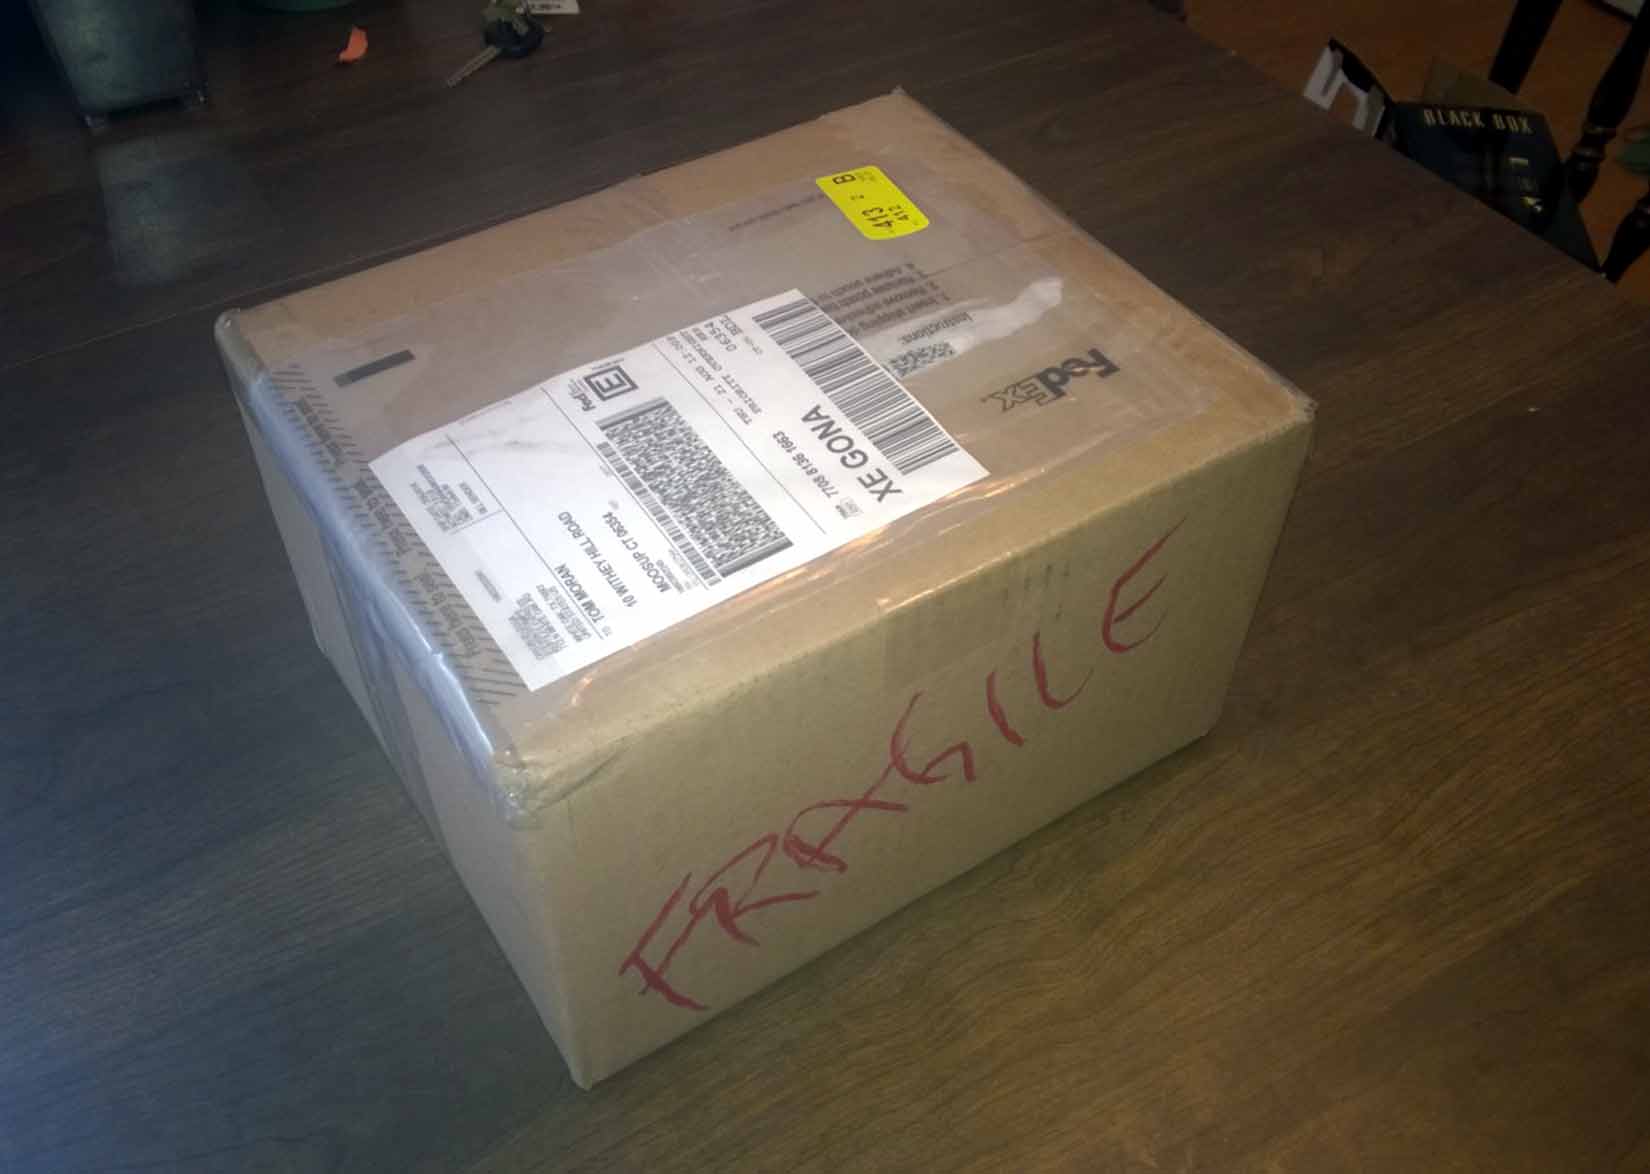
A package from Stamps Tarantulas.
The package from Stamps, obviously well padded and insulated with foam.
My package from Stamps. Notice how well-packed the specimens are.
The contents of the box removed.
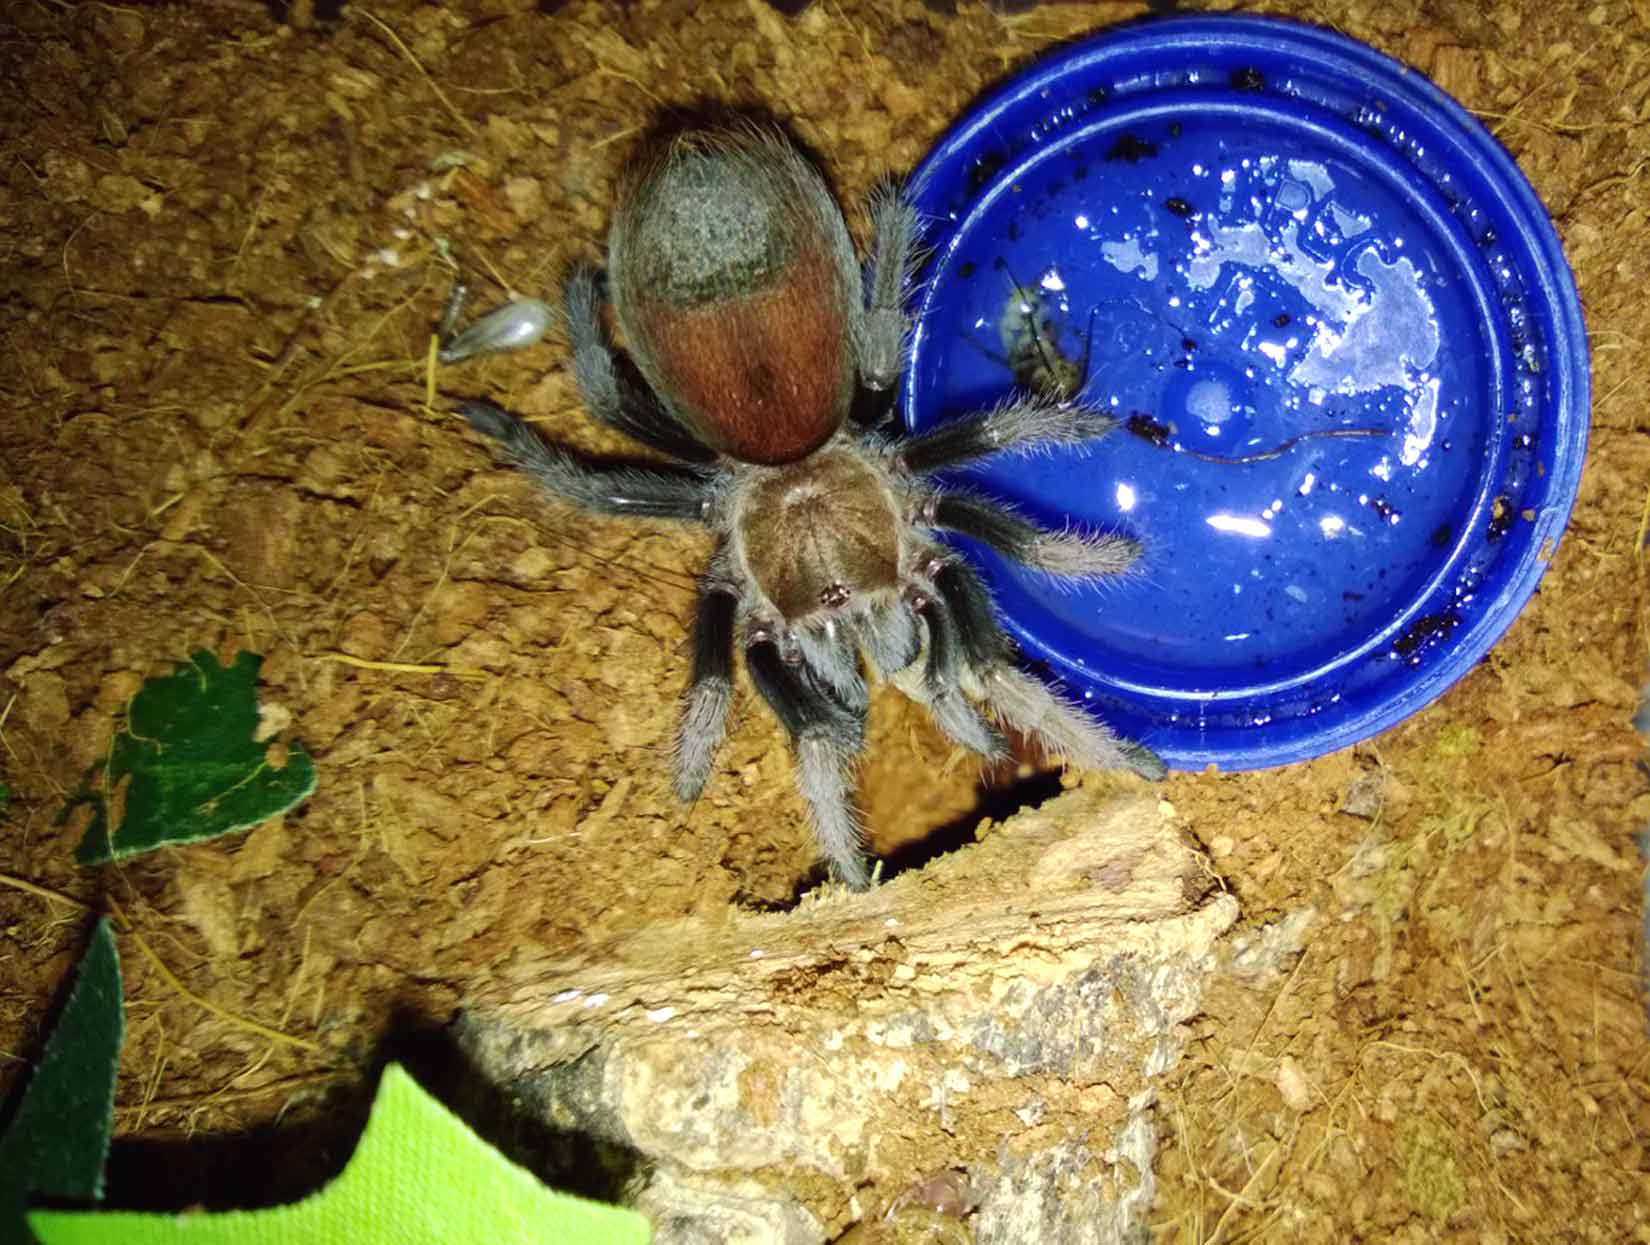
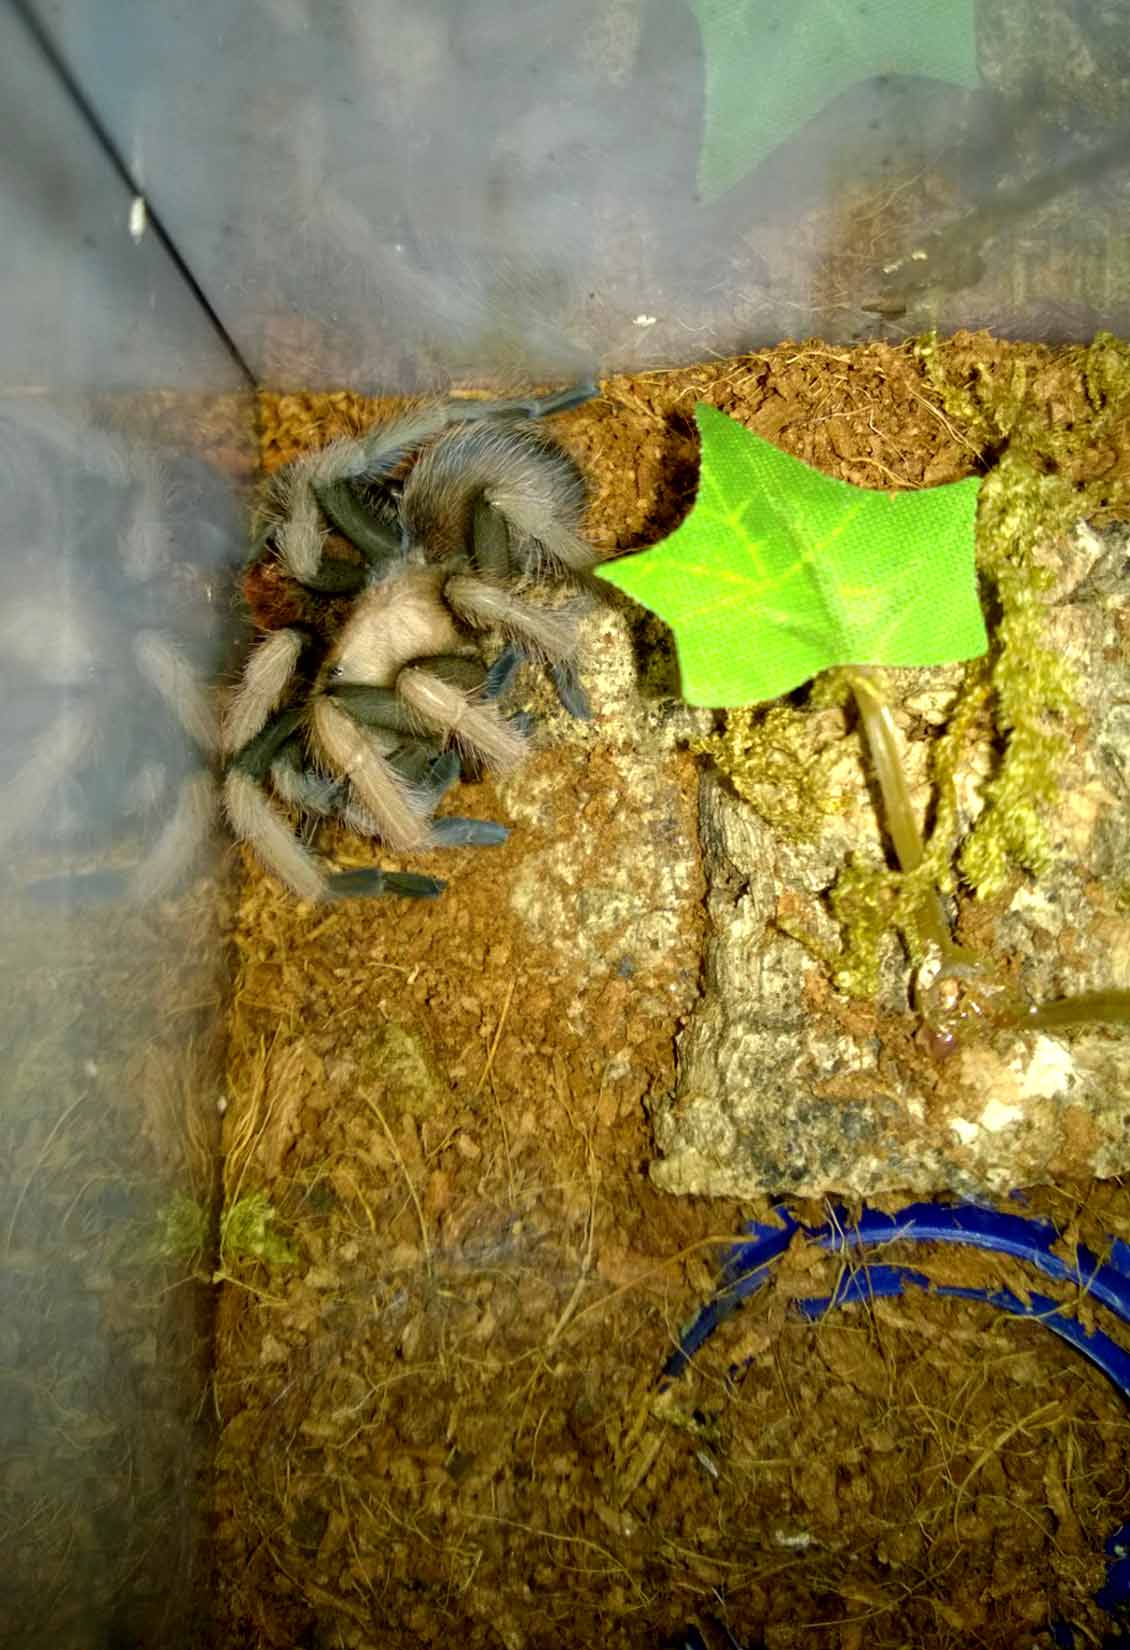
The animals themselves were in excellent shape, with all four emerging lively and sporting plump abdomens. Three of the Ts ate the first night; the fourth was in premolt, but has since molted and ate. It has been a few weeks, and all are doing fine. I was particularly impressed with the condition of the T. stirmi. I had seen many pictures of larger T. stirmi being sold that looked thin or haggard, and I worried a bit that my new acquistion might need some TLC. This beast, however, was was in AMAZING shape, and has acclimated to his new enclosure smoothly.
My new T. stirmi shortly after being housed.
A great new online dealer.
I was 100% satisfied with my first purchase from Stamps Tarantulas, and I’m already planning my next order. Mr. Stamps carries a variety of species at great prices, and his communication, packing, and shipping are all top of the line. He has also proven willing to work with customers, which is always a plus. I highly recommend this vendor!
A gorgeous little dwarf tarantula with plenty of attitude!
I was first introduced to this amazing little species by a Viper69, a member of the Arachnoboards forum. I was on the lookout for new and beautiful tarantulas to add to my growing collection, and Viper69 was kind enough to send me pics of his own Hapalopus sp. Colombia large (tarantula enthusiasts love to spread their addiction!). I was immediately floored by the appearance of this unique T. As orange is one of my favorite colors, I was enamored by the bright orange abdominal markings that lend this animal its common name of “Pumpkin Patch”. The fact that they were known to be hearty captives with huge appetites and fast growth rates made this “pygmy” species jump up to the top of my wish list.
Young adult female Hapalopus sp. Colombia large
Well, several months ago, I finally procured a trio these feisty little spiders from Autumn’s Eight-Legged Experience. I was amazed to discover that, even in the sling stage, these little guys already sported their adult coloration. I’ve been used to slings that look MUCH different from their adult counterparts, so this was definitely a unique trait and a wonderful surprise.
One of my three Hapalopus sp. Columbia large slings.
Keep that “Pumpkin Patch” moist.
As my slings started at about 3/8″ long, I housed these guys in 30 dram bottles with tiny ventilation holes poked into the top with a small needle. This is a species that requires a bit of extra moisture, so for substrate, I used a mixture of moist (not wet) coco fiber mixed with peat moss. For added moisture retention—and to supply a place to hide—I also added a pinch of sphagnum moss. Using the handle of a paintbrush, I also created little starter burrows down the side of each enclosure.
These little guys were quick to settle in, adopting the pre-dug burrows while webbing up the entrances. Within days, all three had dug extensive underground burrows, and two had begun webbing on the surface. Unlike some of my “pet hole” species, as slings these guys usually bolted out of their dens and into the open whenever their enclosures were disturbed. They are quite bold for little spiders.
Check out my husbandry video for this species below!
As young adults, all three are currently kept in ½ gallon enclosures made from repurposed Sterilite plastic storage bins. Although they were given several inches of moist substrate and cork bark burrows, they used their webbing and some sphagnum moss to create their own homes. All have water bowls, and I moisten down the substrate once a month or so by simulating rain with a make-shift watering bottle.
Hapalopus sp. Columbia Large young adult enclosure. This one is about 1/2 gallon.
All three have webbed up their enclosures heavily. They are not particularly shy, and they have no problem sitting right out in the open waiting for prey. This is particularly nice, because this is a truly unique and beautiful tarantula. Haplalopus sp. Colombia is a very fast and skittish species, though, and they will bolt to their dens when disturbed. Care should be shown every time their enclosure is opened for feeding or maintenance.
Voracious eaters with amazing appetites.
When I first acquired my slings, they were still too tiny to take down small crickets, I cut two crickets in half and dropped in the smaller pieces for them to scavenge feed on. All three greedily accepted their pre-killed meals. To date, they have proven to be voracious eaters, only refusing meals when in pre-molt. Once they reached about 1/2″ in size, they were able to easily take down a small cricket on their own.
Kept between 70-76 degrees during the winter and 75-80 degrees during the summer, and fed two times a week, they grew quite quickly. During the first six months, they molted about every month and a half. In 11 months, they’ve grown from 3/8″ to about 2.25″.
I currently feed each of my sub-adults one medium cricket twice a week. When in premolt, they will stop eating and generally become more reclusive, hiding out in their dens and staying out of sight.
Males mature quickly, with mine hooking out at about 11 months at about 2.25″. Females will live longer, reaching a max size of about 3.5-4″. There is a smaller “dwarf” version of this species that reaches a max size of about 2″, but the Colombia Large is not quite small enough to be a true dwarf.
A stunning species for the keeper used to fasts ‘n feisty Ts.
Hapalopus sp. Colombia may be a small species, but what they lack in size, they make up for in attitude and personality. H. sp. larges are generally recognized as being fast and defensive, with many keepers also branding them as escape artists that will make a mad dash for any opening. Mine have actually proven to be quite well behaved, choosing to retreat to their burrows rather than try to escape.
Although this species is a bit high-strung, none of mine have shown any aggression. I do think that a beginner with some experience could keep this species if she/he is cognizant about their speed and care. They are very hardy, and their great appetites and quick growth rate make them an ideal species to raise from sling to adult.
Of all the species I currently keep, my little M. balfouri juveniles have been some of the more quirky and reclusive. After all three buried themselves for several months during the cold of winter, they emerged in the spring with better appetites and slightly less coy dispositions. I now see all three regularly, and I’ve even been afforded the opportunity to see two of them eat. That’s a pretty big deal considering that, from November to March, I didn’t even SEE them at all.
Well, after its recent molt, one of my M. balfouri juveniles has become extra bold, often coming out of his den to hunt, and remaining in the open even when I jostle his cage while feeding him. My first attempt to catch him feeding on film proved to be an epic failure as I ended up catching only the cover of his cage. However, I fared much better with the second attempt, and managed to catch him gently grabbing a cricket I tossed in (sorry, no brutal take-downs in this one). Although it starts off a bit blurry, I do adjust the framing several seconds in.
Anyone who grew up watching Steve Irwin, AKA ‘The Crocodile Hunter”, knows that Australia is home to some of the most stunning and awe-inspiring wildlife on the planet. Heck, I still own the carpet python I bought after seeing him handle (and get bit!) by one. When I stumbled across my first photo of a species of tarantula from Phlogius genus, and discovered that it was from Australia, I knew that I would eventually keep one.
With a common name of “Eastern Tarantula” or the more colorful variations of “Queensland Whistling Spider” or “Australian Barking Spider”, this thick-legged Old World species can reach lengths of 8 inches. It earned the name “whistling” or “barking” spider because this species stridulates, or uses hairs on its body to produce a loud “hissing” sound when it’s agitated. And for those who don’t heed this warning, its large fangs can deliver a potent bite.
Deep, moist substrate = happy spider!
I purchased a 1.5″ sling from Anastasia at Net-Bug back in April of this year, and it has quickly become one of my favorite species. So far, my P. crassipes has been a fast-growing species, molting twice in my care and putting on about an inch in size. As a sling, it started off as a chocolate brown color, although as an adult it will be mature into a smoky dark brown/black coloration.
In Australia, this species lives in deep, moist burrows and enjoys a higher-humidity environment. Keeping that in mind, I gave my sling an enclosure with four inches of moist substrate so that it could create its own burrow. I set the enclosure up in much the same way I do with all of my moisture-dependent species. After laying a half inch of wet vermiculite on the bottom, I then packed down a mixture of peat moss and coco fiber with some vermiculite added for water retention and percolation. I don’t add too much vermiculite as it can make the soil difficult to pack for the burrowing species.
The soil should be moist, but not wet. A good test is to squeeze your mixture in your hand. If you can squeeze water out of it, it’s too moist. However, if it sticks together and holds its shape without water dripping from it, it’s just right.
The enclosure itself is a modified plastic Sterilite storage container. I keep a water bowl in the enclosure at all times, and I will re-moisten the substrate once a week. I do not spray, but rather use a clean water bottle with holes melted in the top to “make it rain”, so to speak. I also allow water to dribble down into the burrow. This keeps the lower levels of his den moist, and keeps the humidity in the enclosure up as it slowly evaporates.
The custom enclosure for my P. crassipes sling.
For temperatures, my P. crassipes is kept between 72 and 78º. Although I’ve read reports of people keeping them at higher temperatures (mid-80s is mentioned quite a bit), I’ve found that mine has been thriving with more moderate highs and lows.
A lightning-fast eating machine!
Within a day, my P. crassipes had dug a burrow all the way down to the bottom of the enclosure with two different entrances. It then created a “volcano” shaped structure over the top of the substrate and webbed around this. He likes to sit at the top of this construct with his legs just poking out as he waits for prey. As soon as a prey item hits the substrate, he tenses up and prepares to hunt.
This species has proven to be a fantastic eater. It receives 2-3 medium crickets a week, and so far it has yet to refuse a meal. When I once dropped in a large cricket, this amazing little predator had no problem snatching it up. Speaking of snatching up prey…
These guys are FAST.
Besides more specific moisture requirements and an Old World bite potency, keepers need to be aware of this species’ speed. I’ve been dazzled on a couple occasions by just how fast my little guy can move. I once watched him bolt out of his “volcano”, snatch up a cricket, and retreat back into his den in a blink of an eye.
The footage below was meant to be a feeding video, but he unfortunately didn’t snag the cricket here. Still, it serves as a wonderful example of just how quickly they can move. So far, my sling is more skittish than defensive, although this could change at any time. With his speed, this T could easily bolt out of his enclosure if I’m not careful.
A fantastic tarantula for those who like thick, sleek, fast species.
The P. crassipes’ potent bite, skittish and sometimes defensive nature, and tremendous speed mean that this guy probably isn’t for the novice keeper. Those use to keeping slower, more docile species might find the crassipes a bit overwhelming. However, any keeper experienced with faster Old World Ts would likely find the P. crassipes to be an amazing and rewarding animal to keep.
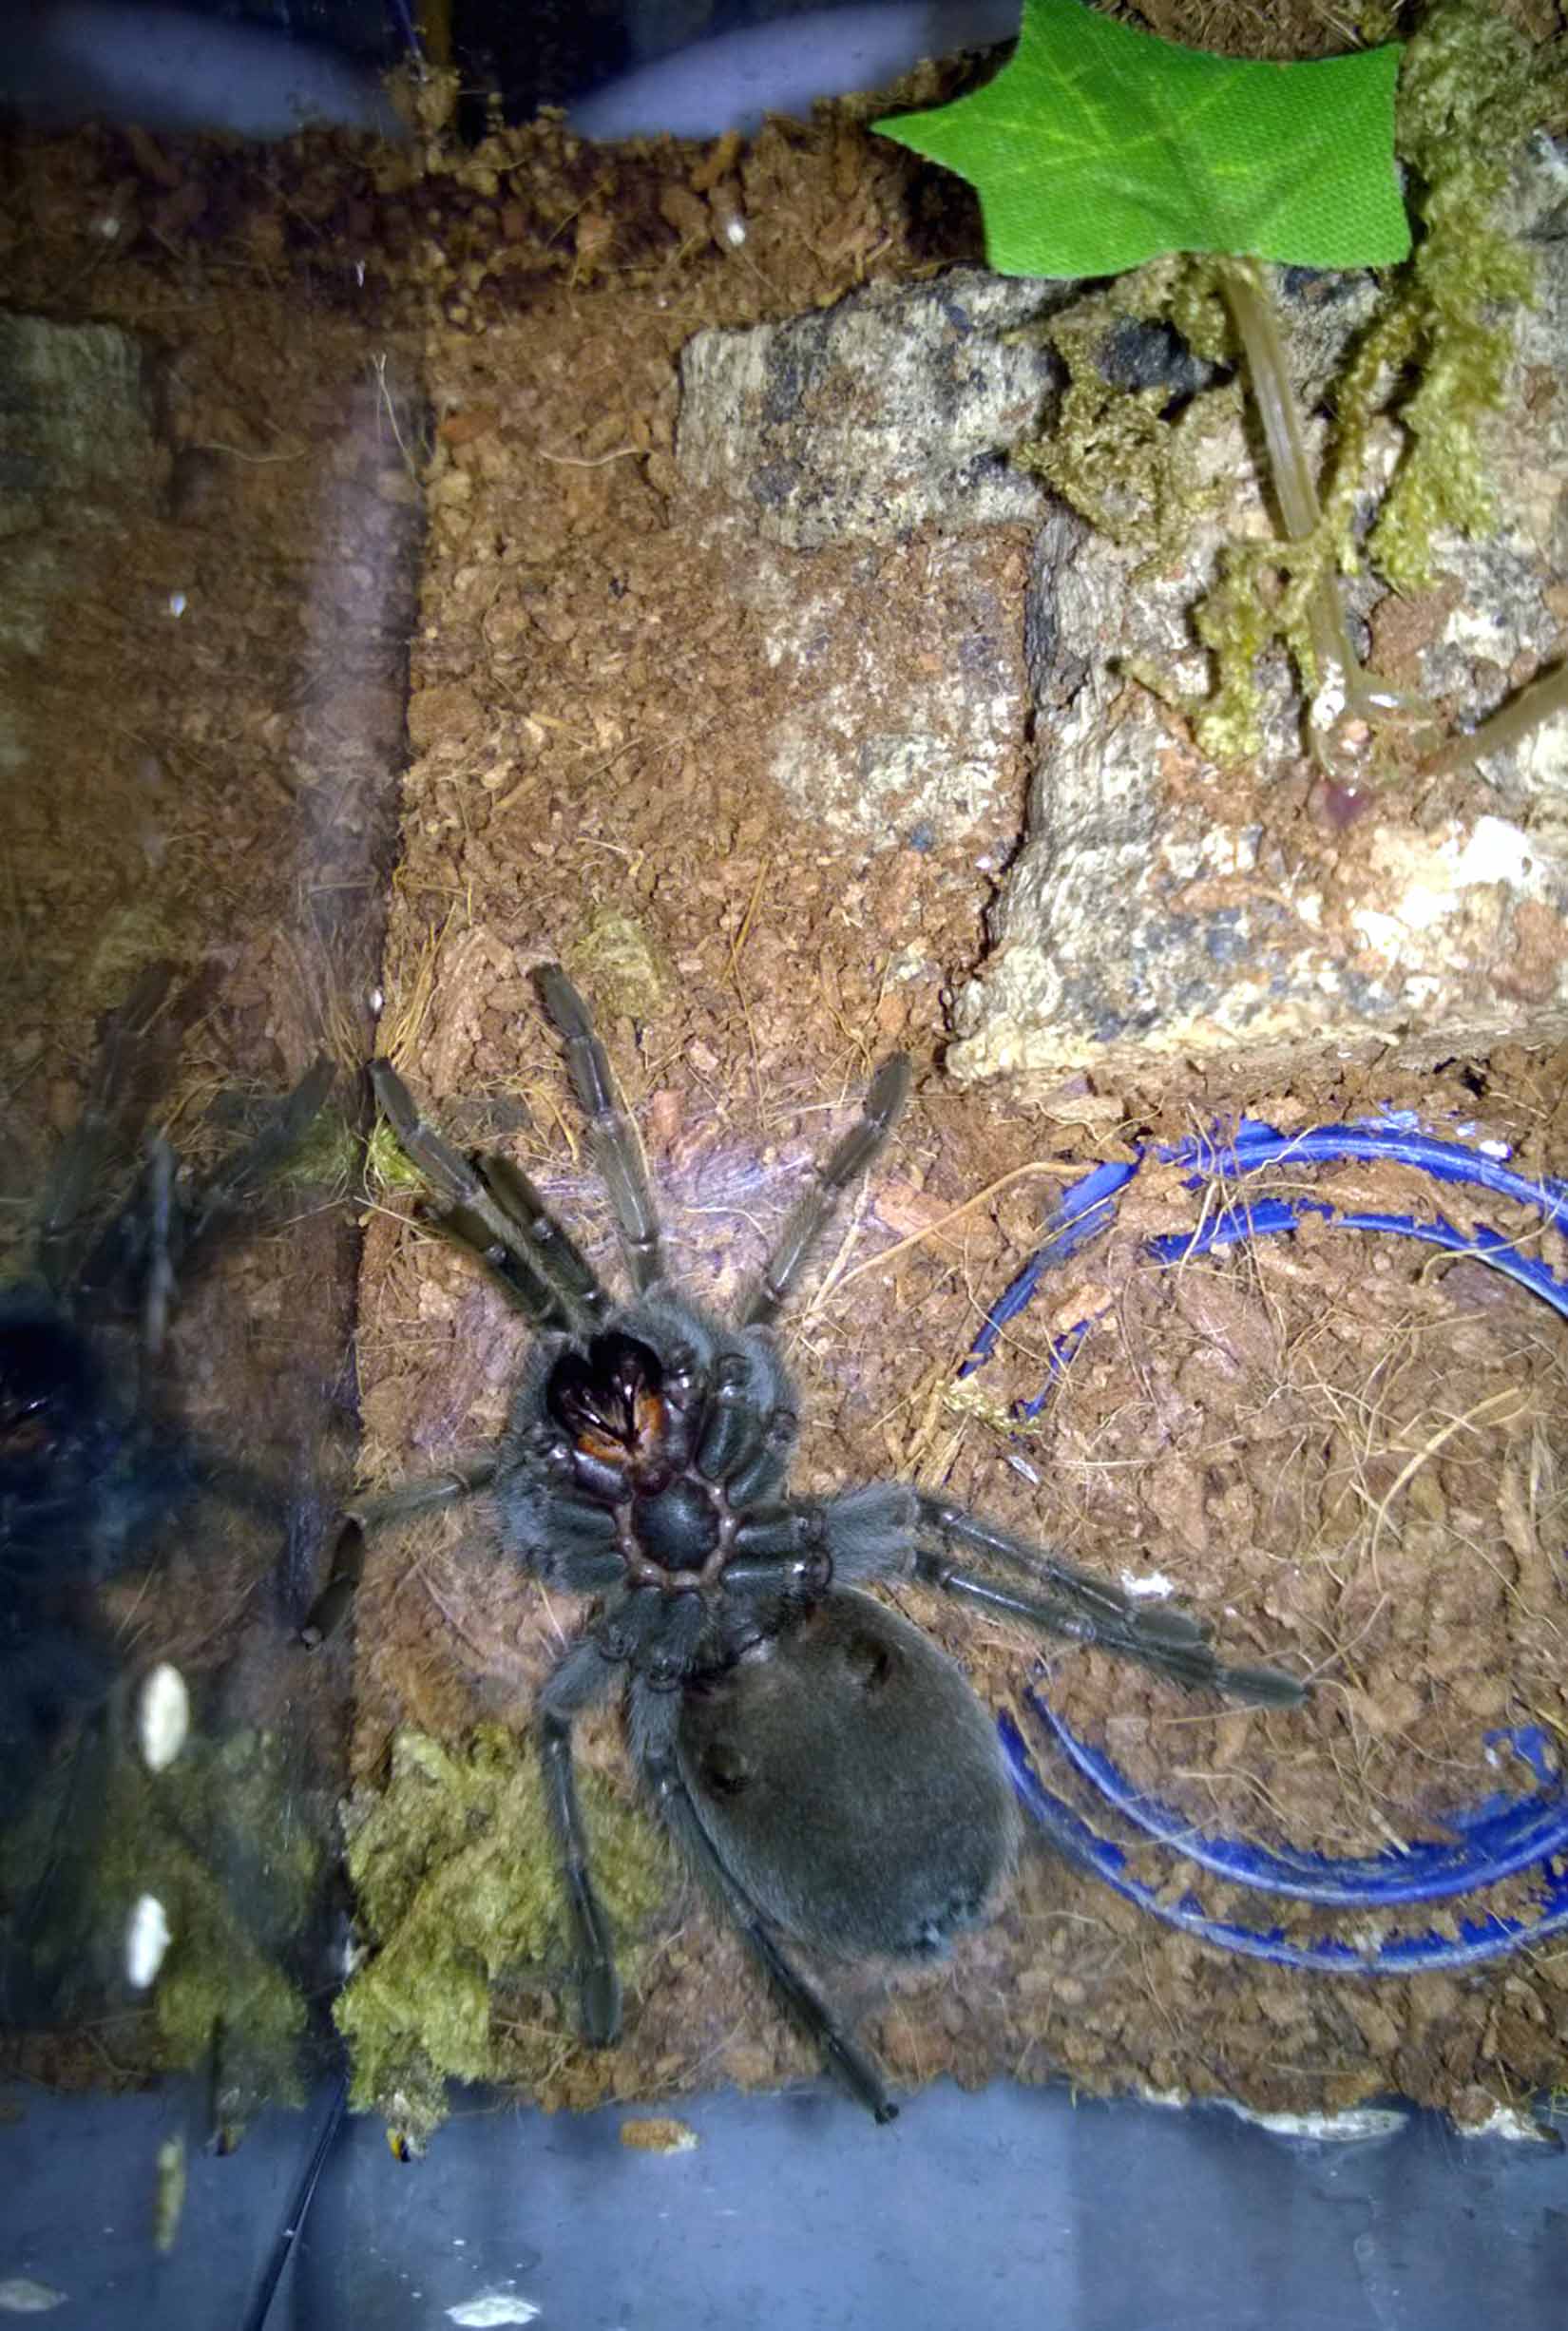
After years of admiring this amazing species, and months experimenting and building up to the care requirements that would be necessary to keep this beast, my latest acquisition arrived. The Therophosa strimi I ordered from Stamps Tarantulas (sparkling review coming tomorrow!) arrived today, and I’m floored.
I was just telling my wife that since I got really into the hobby, I’ve lost some of that “awe factor” that I used to have when seeing a tarantula. Well, upon rehousing this amazing specimen, I definitely felt that sense of amazement again. Although I expected a 4-5″ T, this guy is definitely pushing 7″ and he is very stocky and heavy.
My new T. stirmi still in its shipping container. He was a bit reluctant to leave.
Getting him out of his shipping container was an adventure. This is one big T capable of a nasty bite or a very painful hairing. As I pulled out the layers of moist, rolled paper towel used to keep him hydrated and safe during shipping, I had to be careful that he didn’t kick any hairs or burst from the container. When he suddenly turned and exploded from the opening, I made sure my hands were out of the way. The force of his “kicks” as he scrambled out was amazing, and I was immediately impressed by his power.
My T. stirmi in the shipping cup after I removed much of the moist paper towel. Shortly after this photo was taken, he burst out.
With a 4-5″ Theraposa strimi (Burgundy Bird Eater) on the way, I needed to create a custom cage that would allow me to maintain proper conditions for this animal, namely the higher humidity requirements. I’ve experimented with many smaller setups, and have had good luck maintaining the right balance of airflow circulation and humidity for my moisture-loving species.
However, this enclosure would need to be a much larger. Plus, as Theraphosa require moist soil and consistently higher humidity levels, I needed to make sure that whatever I came up with was working out before my new T arrived.
It’s been about a week since I put it together and, with some experimentation and “revisions”, it is now working great. Waiting to have the T ship until I finished proved to be an incredibly prudent move, as this cage soon became a work in progress. For those interested, here is what I did:
The Materials
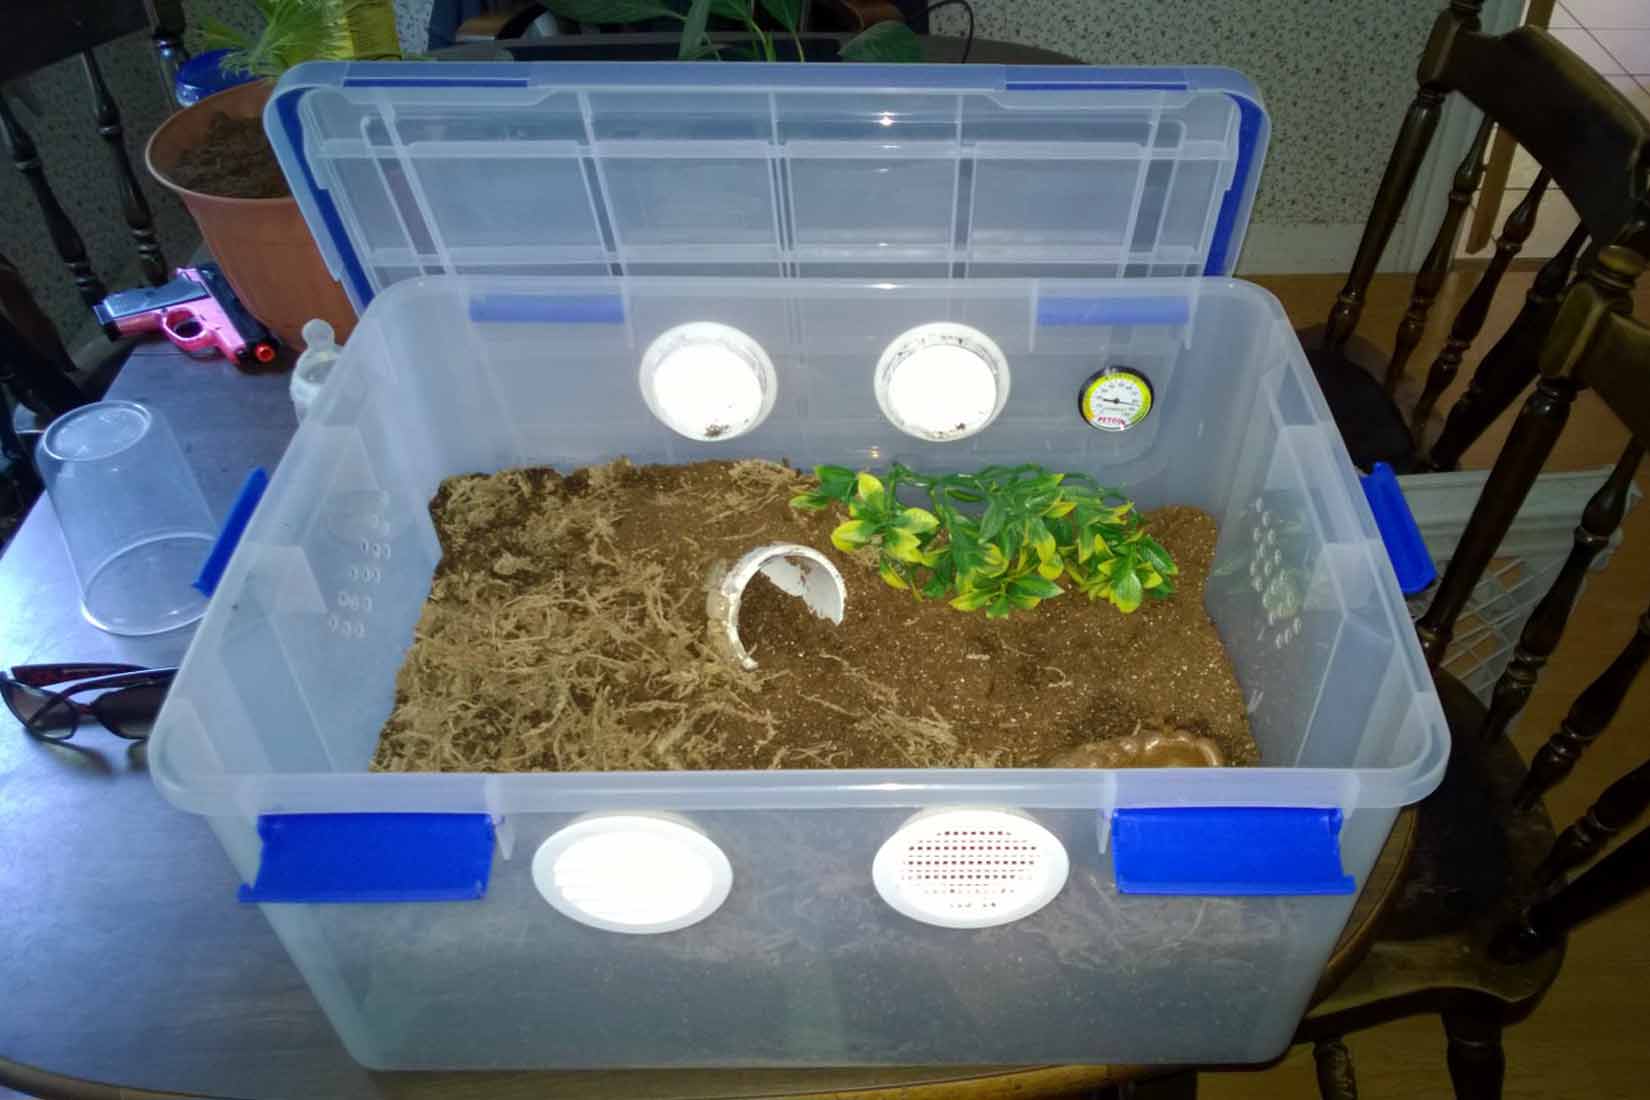
I started with a Ziploc 60-Quart Large Watertight Storage Box, which I purchased at Walmart for about $17. This container is quite spacious (23″L x 17″ W x 11″ T) and has six locking clasps around the edges. Nothing will be able to squeeze under the lid of this one. The lid also has a foam gasket in it to prevent precious moisture from escaping. This will make an excellent home until my T gains some more size.
Ziploc 60-qt Storage Bin Modified.
For the initial venting, I used four 3″ white circular plastic vents that I had purchased from roundvents.com for $1.32 each. Using a 3″ hole saw and my power drill, I cut two holes on each of the long sides of the container (Note: if you don’t have a hole saw, you can trace the vents, then use a regular bit to drill a series of holes all round the edge. Then, using a sharp utility knife, just make cuts and connect the holes). I then glued the vents in place using Aquarium Silicone. To promote cross-ventilation, I positioned the vents on opposite sides of the enclosure.
Ziploc 60-Quart plastic storage bin with two 3″ plastic vents installed on each side.
As the T. blondi will need to kept in moist soil, and I will have to add water from time to time to keep the humidity up, I experimented with soils a bit before coming up with the formula I used. I combined Scotts organic topsoil ($2.10) with organic peat moss ($9.99) mixed at about a 60/40 ratio. To this mixture, I then added several cups of vermiculite ($3.99) to help with water retention and percolation. (Note: As the topsoil comes in .75 cubic feet bags, and the peat moss comes in a huge 3 cubic foot bag, there is plenty of substrate left over for other enclosures).
I added water to this mixture until it was damp enough that it would hold its shape when squeezed, but not so wet that water would run out of it. After adding about 1/2″ of moist vermiculite on the bottom of the enclosure to hold moisture, I packed down about 5-6″ of my substrate mixture on top of it.
For a hide, I purchased a 3″ PVC elbow from Lowes for about $2.76. I wanted something that wouldn’t decompose or mold in the moist soil, hence why I didn’t use cork bark. I turned the elbow on its side, angling one end up for the entrance and pointing the other end toward the substrate. I then buried this, making sure that there was a bit of a hide, but leaving some dirt in it for the T to clear. The T. stirmi can now continue to enlarge his burrow by digging through the submerged end.
3″ diameter white PVC elbow hide.
Finally, I added a large plastic water dish which I had on hand, as well as some long-fiber organic sphagnum moss to help with moisture retention. I also mounted a humidity gauge on the side of the enclosure to give me a rough estimate of what the humidity was inside.
With all of this done, I closed up the new enclosure and set it on the shelf for two days to see if it would maintain the correct level of humidity without spawning mold. I was looking to maintain a humidty level between 70 and 80% at about a 75º temperature.
Back to the drawing board.
During this trial run, the humidity in my home was around 75%, and the humidity inside the enclosure was steady at about 88%. When I opened it up after about two days, I immediately detected the slightest smell of mold or mildew. A closer inspection revealed that there was some light molding around the long-grain sphagnum moss. I removed the moss and left the cover off of the enclosure for a day to let some excess moisture evaporate. I later added a much thinner coat of moistened moss.
Obviously, the four vents I had installed wouldn’t be enough to allow for proper ventilation. Time for adjustments…
Using a 5/16″ drill bit, I drilled about 10 holes in the ends opposite where I installed the vents. I was hoping these would supply much needed cross-ventilation and prevent the humidity from remaining so high that mold and mildew occurred.
With these changes made, I closed up the enclosure and left it to sit another day.
Revision three
After about 24 hours, I took the cage out again. During this period, the humidity inside the cage was lower but still in the mid 80s. This wasn’t bad, but if the humidity in my home went up, so would the humidity in the enclosure, leading to levels that would promote mold growth.
This time I added about 15 more holes on each side and sealed it up again to see if this would lower the humidity even further. So far, so good! The humidity is holding right around 78% (the humidity in my home is around 64%)
Holes drilled for extra ventilation during the humid summer months.
As the humidity levels here can hit 80%, I may drill a few more holes in preparation for those really humid days. In the winter, our furnace dries out the air causing the humidity to plummet to the high teens. When this happens, I will use plastic and tape to cover up some of the holes to restrict some of the airflow and to prevent the cage from drying out.
Preparation and planning was key.
Had I tried to put this cage together without allowing myself time to experiment, this could have been a nightmare. I can’t even imagine trying to clean out the cage and make alterations while a 5″ T. stirmi was lurking inside. As humidity levels can vary depending on time of year and location, I would advise anyone setting up an enclosure for one of the moisture-dependent species to allow themselves some time to monitor levels and to make adjustments as needed. I have two more days before this beauty arrives, so I will continue to keep an eye on the humidity and make more changes as needed.
Fewer facets of tarantula keeping can cause more excitement and confusion for the novice keeper than premolt. This is the point where the tarantula usually stops eating for a bit and prepares its body for the stresses of molting its exoskeleton. As part of the joy of keeping tarantulas is experiencing their growth, an impending molt should be a joyous occasion.
However, as many newer keepers aren’t familiar with what premolt entails or looks like, it can also be a confusing situation that leads to worry and stress. Couple this with the fact that premolt periods can drag on for weeks, and you have the makings of a concerned keeper.
Part of the issue is because we have all grown up keeping pets that need to be fed daily in order to stay healthy. So, when our beloved little spider suddenly stops eating for several weeks, years of experience preys on our nerves and the worrying begins. Should I try feeding again? Does she need more water? Is the enclosure too large? Is she sick? Should I dig her out of her den? These are the questions that dog the novice keeper as he watches his pet, waiting for some sign that everything is totally normal.
I went through it myself the first time my little L. parahybana sling suddenly closed off the entrance to its den and buried itself for over a month. I worried that the poor little guy was trapped by a cave-in or had died. Luckily, I chose to leave him alone instead of trying to dig him out, as when he finally reappeared it was with a new exoskeleton and an extra 1/4″ of length. Since then, I’ve learned to observe and recognize the signs of premolt.
Are you thinking that your specimen might be in premolt? Here are some telltale signs to look for…
1. The tarantula stops eating
This is probably the most obvious and common sign. You’ve been feeding your specimen regularly for several weeks, and suddenly it stops eating. Most species will stop feeding during their premolt period (although there are exceptions) as they prepare their bodies for the arduous process.
That is not to say that a tarantula might not stop feeding for other reasons. The G. rosea is known to fast for long periods of time, even when not in premolt. A stressed tarantula may also refuse food. Therefore, consider some of the other signs as well.
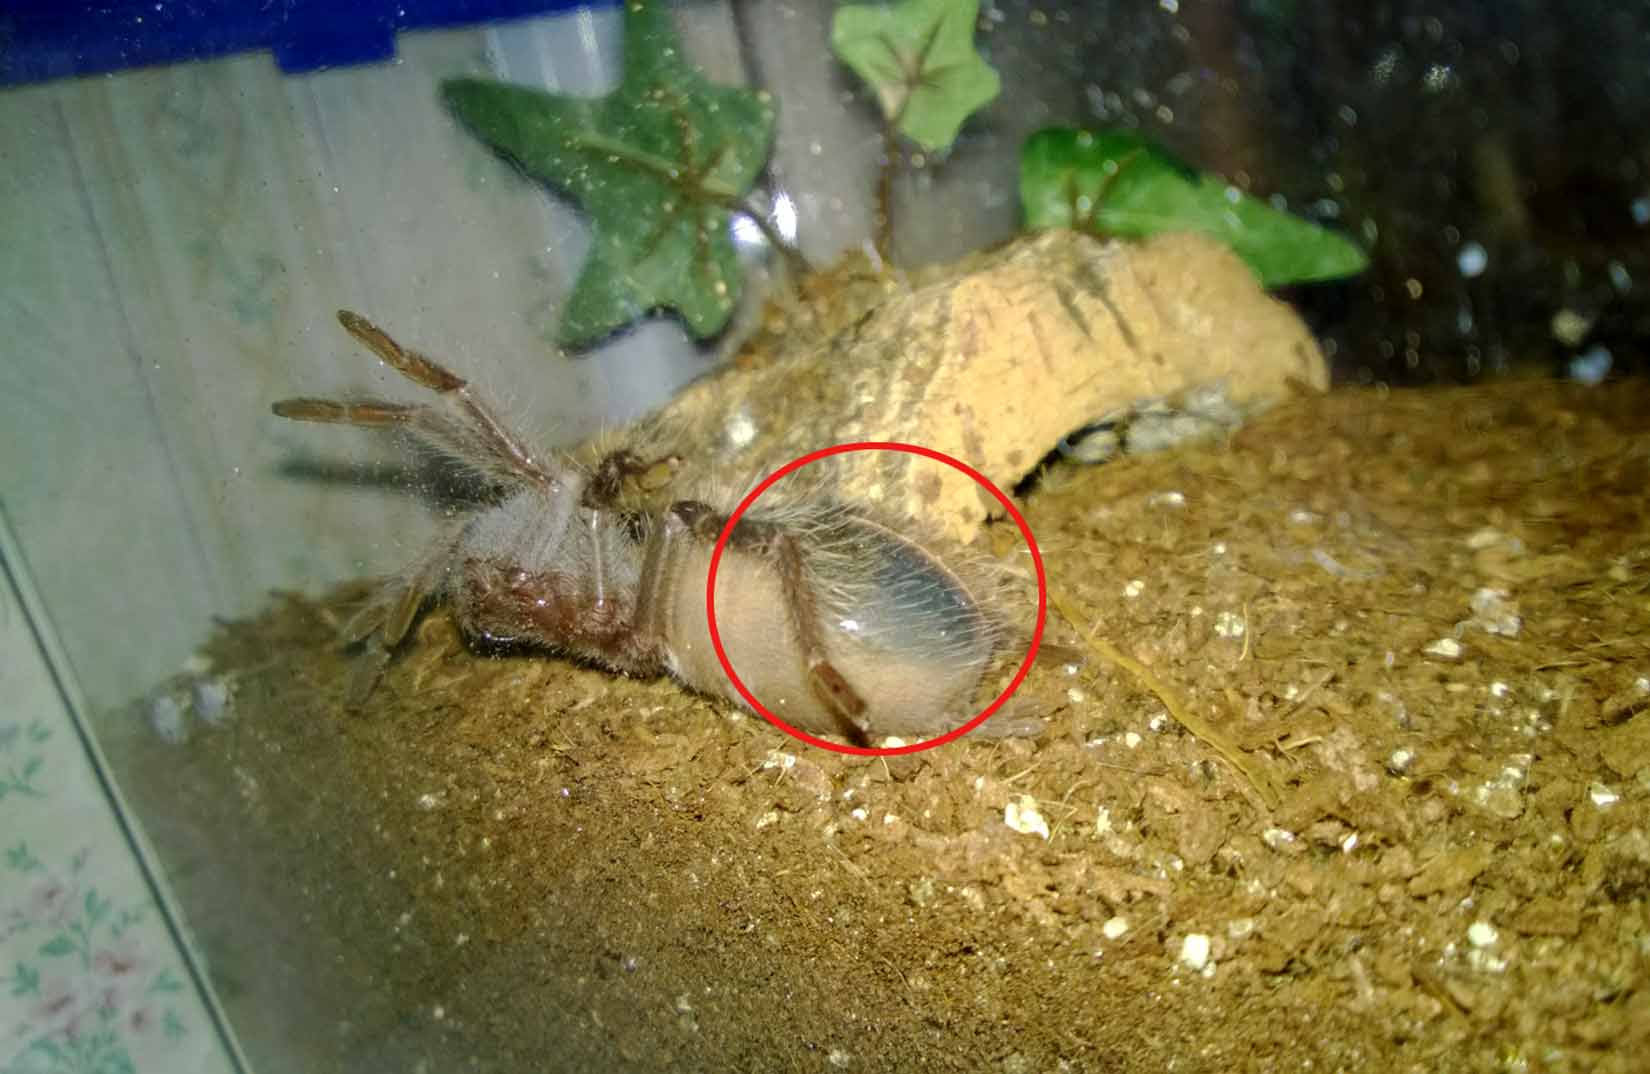
2. The tarantula has a fat, shiny abdomen
Most tarantulas ready for premolt will sport nice, plump abdomens up to 1.5 times the size of their carapace (or even larger for an over-stuffed specimen). If your tarantula has a nice, bulbous booty, and she has stopped eating, chances are she’s in premolt. As the flesh around the area stretches, the abdomen may also appear to be shiny.
The shininess is often more evident in slings than their older, much hairier counterparts. My little G. pulchripes, G. rosea, and L. parahybana slings all get “shiny hineys” whenever they are entering premolt. My P. cancerides slings and juveniles look like little grapes ready to pop when they are in premolt.
A female LP in premolt. Notice the shiny abdomen. This is particularly noticeable as she has kicked all the hair off. Also, the abdomen is very dark.
3.The tarantula’s abdomen and overall color darkens.
As the new exoskeleton forms under the old one, the spider will often darken up a bit. This is particularly evident on the abdomen where new hairs can be seen through the stretched skin here. Many of my slings will have a dark spot on their abdomens when in premolt, and it will continue to grow the closer they get to the actual molt. For species that do a lot of hair kicking and therefore have a bald spot, this darkening is especially evident.
G. rosea sling in premolt. Notice the large, shiny, and dark abdomen.
My L. itabunae in premolt. Notice the shiny abdomen and the dark patch forming .
4. The tarantula becomes slower and more lethargic.
Not all of the indicators are physical; an observant keeper should notice some behavioral changes as well. Besides not eating, most of my tarantulas that are in premolt become less active and often more secretive. Keep an eye on your tarantula, and along with the physical signs listed above, look for a change in behavior. Some of my most hyper species become noticeably sluggish when they are in premolt. For example, my GBBs tend to be fast little buggers who are constantly moving around their enclosures. However, when in premolt, they often become much more sedentary, sitting in one spot and often tucking themselves away behind their cork bark. Speaking of secretive…
5. The tarantula has buried itself in its den.
I frequent the Arachnoboards forum, and there is usually at least a post a week by a concerned keeper who wants to know if his/her buried T is okay. Heck, this is the situation that caused me alarm when my LP buried itself during a molt. Many tarantulas will retreat to their burrows and close of the entrances when entering a premolt period. My LP slings, M. balfouri juveniles, and G. pulchripes slings all bury themselves before a molt. Some things to consider if your T buries itself due to premolt.
They are not in danger.
They will not suffocate.
They have not been buried alive.
They do not need to be rescued.
The tarantula is just looking for some privacy and security during this vulnerable period. The tarantula will reopen its den once is has molted and hardened up. DO NOT freak out and try to dig the poor creature out; you only run the risk of distressing the animal and possibly interrupting its molt.
6. The tarantula has constructed a hammock-like web “mat” in its enclosure.
This web is referred to as a “molt mat”, and it is where the tarantula will flip over on its back when it molts. You may catch your premolt T laying layer after layer of web in a small area, and some of the new world species will actually kick hairs on the web as a form of protection. If you see this behavior, it means that your tarantula is about to molt very soon, usually within a day. For arboreal species, they will sometime build elevated “hammocks” off the ground for their molt mats or seal themselves in their funnel webs. This behavior serves the same purpose.
My female LP during a recent molt. Notice the molt mat on the left hand side of the photo.
One more thing to remember for those who have not witnessed a tarantula molt…
IF IT IS ON ITS BACK, IT IS NOT DEAD!
That’s right, this is normal behavior; this is the position they get in to molt.
DO NOT touch a spider in this position.
DO NOT flip over a spider in this position.
DO NOT throw away, flush, or bury a spider in this position.
DO NOT blow on it.
DO NOT spray it with water.
DO leave it alone and let it complete the exhausting task of molting in peace. Molting is a natural occurrence for a tarantula, but it is also a period where they are quite vulnerable. Any fiddling with the animal could prove deadly to the T.
Hopefully, the photos and explanations above will help other keepers recognize and enjoy their tarantulas’ premolt without worry. Keep in mind, there is no set time for how long a tarantula can be in premolt. For slings, it can take anywhere from couple weeks to a month. Adult species can often spend several months in premolt. My 3.5″ B. smithi stopped eating and secluded herself for two months before finally molting. Conversely, my 3.5″ L. parahybana female molted two weeks after her last meal. Don’t panic if your animal takes a while; it’s a very natural process, and it will molt when it is ready.
And, for anyone curious as to what a tarantula molt looks like, please check out the following video.
Watch my female L. parahybana get a new suit…in fast motion.
As I stated in an earlier post, I’ve had tarantulas molting constantly lately. The warmer weather has definitely sped up those metabolisms, and even my slower-growing species have joined in on the molting fun. It’s been amazing to discover a different T molting about every other day.
When I noticed that my female L. parahybana had turned over on her back for a molt, I decided to try to catch in on video. Having just purchased a new GoPro Hero Black video camera capable of time lapse photography, I scrambled to come up with some type of set up that would allow me to safely record the event without endangering my T. 15 minutes and quite a bit of profanity later, I had it all set up and ready to go.
The molt took approximately 4 hours from her flipping over to the molted exoskeleton being completely free. I set the interval at 60 seconds, which worked, but I will probably use 30 seconds on the next go round. This is the first time I’ve seen one of my tarantulas molt in entirety, and I’m floored.
My 11-year old, who was disappointed he was going to miss the molt due to being away for the week, is going to flip when he sees this…
The warm summer months has rendered my tarantula room “Molt Central”, and I’ve been delighted to discover that even some of my slowest-growing Ts are getting in on the action.
My female A. schmidti before a recent molt.
With my Lasiadora itabunae and my female Lasiadora parahybana both in heavy pre-molt and ready to go any day, I checked my tarantula room last night expecting to see one of them on their backs. However, neither of those two were belly-up; instead, my female Aphonopelma schmidti was in the process of turning over.
My A. schmidti on her back and ready to molt.
Since her last molt, my once skittish and picky eater had turned into a cricket chomping machine, and it didn’t take her long to put on some post-molt size. Still, as it had taken her several months to molt last time, and she had just eaten last week, I wasn’t expecting a new molt so soon. Had I been paying better attention, I might have remarked on her darkening coloration and her increasingly lethargic and sedentary behavior, two classic signs of pre-molt.
My A. schmidti female just after a molt.
Not only has my little girl picked up a bit more size (I’ll have to get a good measurement once she hardens a bit) but she is also sporting more of her adult coloration. Her legs and carapace have picked up much more of those striking blonde tones that first drew me to this species.
Once she has rested up and hardened a bit, I will get a better photo and a measurement. I can’t wait to see her up and about again.
I had so much fun painting the C. cyaneopubescens that I decided to give a B. smithi a shot. The reference photo was supplied by a member of the Arachnoboards forum, and depicts a female B. smithi that he spider-sat for, but now has to return.
This time, I went in with a new, much smaller brush and some white to drag out all of those little hairs (something I didn’t do on the earlier-posted GBB). What a difference a little white makes! The photo I took isn’t the best, and the light blue hues in the lower left corner are not present in the original.