
My young adult T. stirmi.
One of the true “bird eaters”.
Although there are hundreds of species of tarantulas currently available in the hobby, nothing seems to get folks more interested (or horrified) than talk about 12″ spiders. We’ve all seen the garish news reports and sensationalized nature shows that seek to disgust and shock rather than educate with reports of ferocious arachnids with leg spans the size of “dinner plates.” For the majority of “normal” people out there, a giant spider of this size is a thing of nightmares…
For the tarantula keeper, however, it is something to be coveted; an enormous spider that could easily become the jewel of a collection.
Years ago, the Theraphosa blondi, or the true “Goliath Bird Eating Spider” was the holy grail for many collectors. Pursued for its supposed legendary size (some folks bragged of specimens reaching 14″!), this giant spider became the Humvee of tarantula collecting. Sure, they were large, beefy, and came with certain bragging rights, but their difficult husbandry requirements made them a bit impractical. Specimens had to be kept in warm, moist conditions that made proper husbandry a nightmare. Kept too moist, the animals would die from the fetid conditions. Kept too dry, and they would perish during bad molts. For many enthusiasts, keeping this exotic T became more bother than it was worth.
With the introduction of Theraphosa stimi into the hobby, keepers were given a more practical and forgiving alternative to the T. blondi. Easier to breed than its cousin, the T. stirmi not only became more widely available, but captive-bred offspring have proven to be quite hardy in captive conditions. With a max size and appearance almost identical to a blondi, this species has eclipsed its more difficult relative in the hobby.
Several months ago, I was able to purchase a sub-adult, likely wild-caught specimen, and I was immediately in awe of its size and appetite. Since then, I’ve procured two T. stirmi slings, which have each molted once in my care. Although requiring a bit more attention to husbandry than some of my other Ts, this species is quickly becoming one of my favorites.
Moist substrate + good ventilation = Happy Stirmi
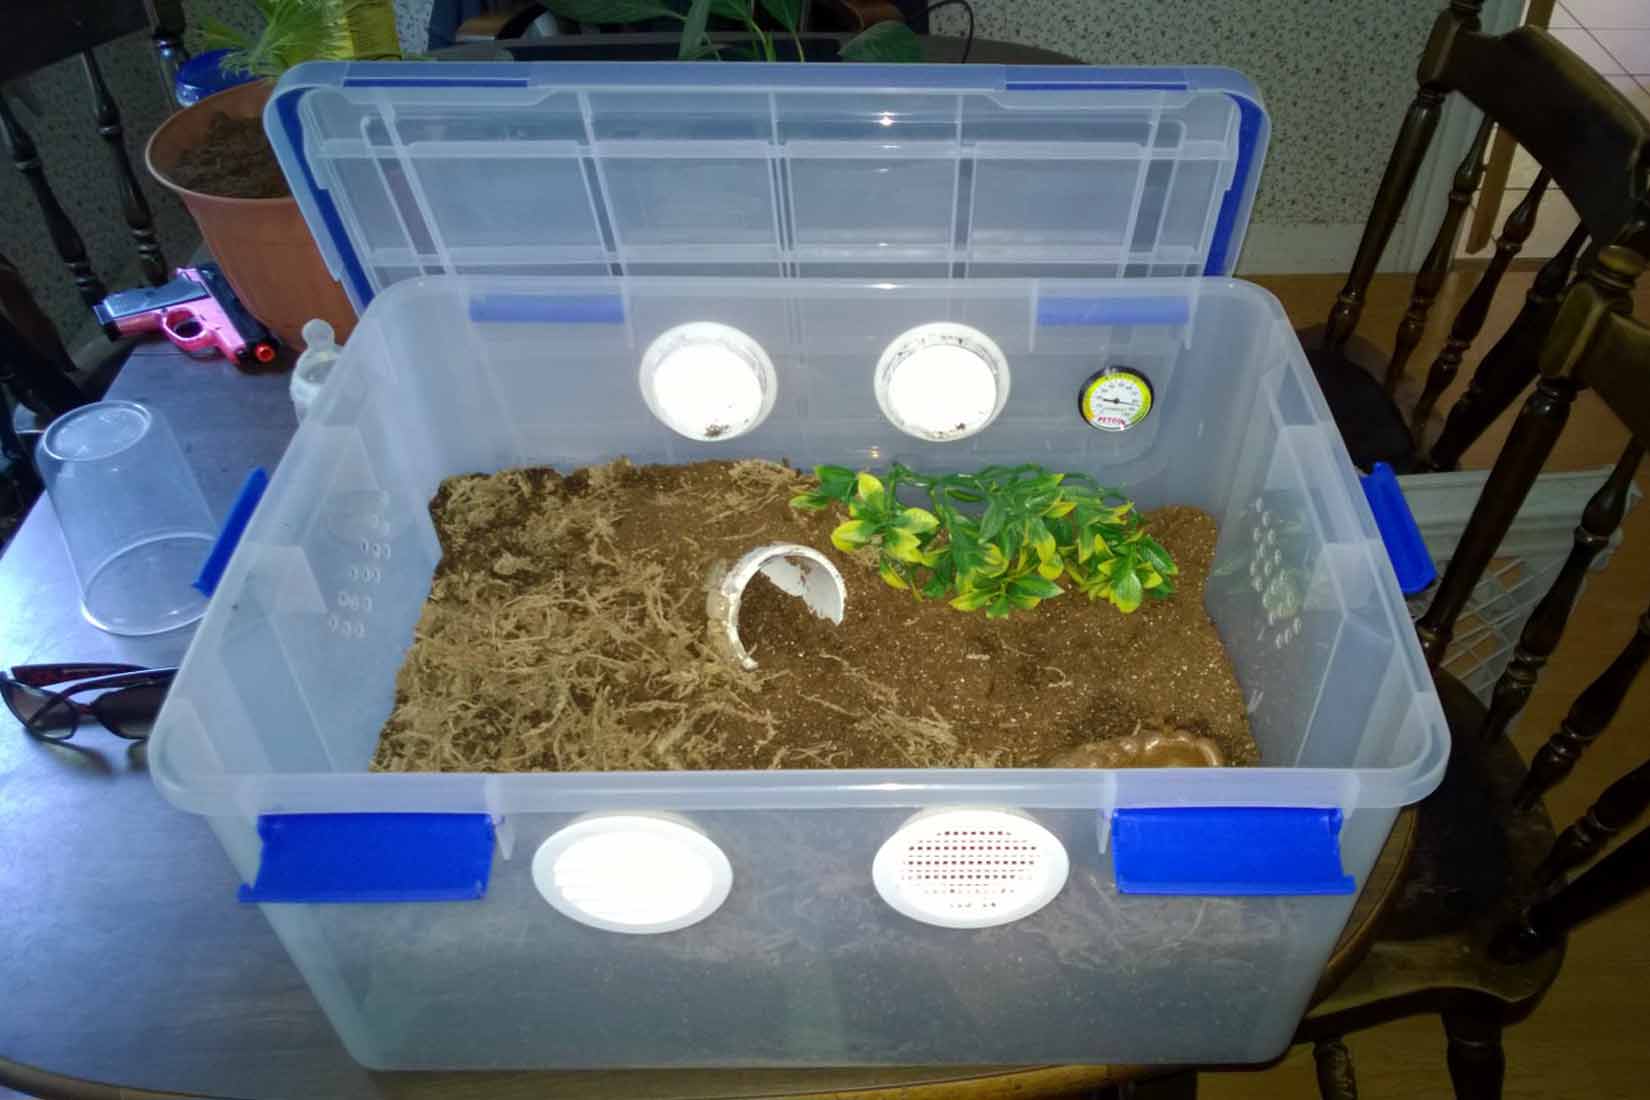
Ziploc 60-qt storage bin modified to house a T. stirmi sub-adult.
Before purchasing my T. stirmi sub-adult, I spent months reading all the notes I could find by those who have been successfully keeping this tarantula. Although most report that this species is much more hardy and less moisture and heat dependent than the T. blondi, there are still some requirements that make this giant a bit more difficult to keep. The key to keeping this spider thriving is to supply moist substrate and adequate cross-ventilation.
Check out my T. stirmi husbandry video below!
Although many use 15-20 gallon long aquariums to house their stirmis, I didn’t feel that the glass sides would provide the cross ventilation that I would need. Also, the screen tops that one might normally use on a glass aquarium would allow too much vital moisture to quickly evaporate, meaning that I would either have to cover some of the screen, or replace it with vented Plexiglas. Instead, I kept a lookout for a plastic container that I could repurpose.
A tarantula this large needs a BIG home.
For housing, I chose a 60-quart Ziploc plastic storage box. Although more shallow than a 20-gallon long aquarium, it offered about the same amount of floor space. With six locking clips, it was also wonderfully secure, even for a T this large. I modified the container using 3″ plastic vents and strategically drilled holes (to see how I made this custom enclosure, click away!)
To make sure that my substrate would retain moisture (and allow for moisture to soak in when I needed to wet it down), I used a combination of top soil, peat moss, and vermiculite in about a 60/30/10 mixture. Before adding the main substrate, I also put about 1″ layer of vermiculite on the bottom of the enclosure and soaked it down. I then packed down about 6″ of moist substrate on top of that. This helps keep the lower levels of the substrate moist as the top layers dry out. The spider than can then retreat to its den if it needs more humidity.
For a hide, I used a 3″ pvc elbow that I angled deep down into the substrate as a starter burrow (which my specimen adopted after entering pre-molt). Although I originally started with one medium water bowl, I soon added another to keep the humidity up a bit within the enclosure. Finally, I added some plastic vines for cover and some long fiber sphagnum moss to help with moisture retention.
For my slings, I used a 2-quart clear plastic canister with ventilation holes burned on all sides. Both were provided with about 4″ of substrate, as well as cork bark hides and small water dishes . When I first acquired my little ones, they were about 1.5″ long, and these containers were the perfect size for them. However, after only one molt, they’ve put on so much size that I will have to rehouse them after they next shed. Right now, my two are about 2.25″, and both are getting ready to molt again. This is a fast-growing species, so it may make sense to provide enclosures for slings and juveniles that allow room for growth.
A note about temperature and humidity.
Because it was mid-summer and temps were high when I set this cage up, and the conditions inside were a bit more moist than I usually have, I decided to monitor it for a week or so before getting my spider. Twice, I added more ventilation after I noticed tiny mold spots. I wanted the humidity to be high enough to support the animal, but not so high as to foster mold, mildew, and other undesirable conditions. The combination of heat and humidity can easily create an overly stuffy and ultimately dangerous living environment for even moisture-loving Ts.
To keep conditions favorable, I usually wet down one side of the substrate once a week or so using a bottle I modified into a watering can. This allows me to simulate a downpour and adds more water than simply spraying. Because of the vermiculite, the water percolates down into the lower levels, keeping them damp while the top eventually dries out.
I don’t really monitor the humidity inside the enclosure (I soon pulled the useless Petco hydrometer in the photo above out), but I would estimate that it stays about 65% to 75% most of the year, with the humidity being even higher in the burrow.
As for temperatures, my specimens are kept at about 72-77º during the winter, and about 75-84º during the summer. They have eaten well in both seasons, and I’ve observed no differences in behavior. However, it’s important to note that warmer temps mean faster metabolisms and faster growth.
I have read accounts of some folks raising captive-bread stirmis from sling in temps that hit as low as 68º and with mostly dry substrate with a water dish. Although I don’t know if these are ideal conditions, it’s worth noting that this species can adapt to different micro climates.
It should also be mentioned that keepers have observed that wild-caught specimens are not quite as forgiving as their captive-bred counterparts when it comes to adaptability to low temperature and humidity levels. If you suspect that you have a wild-caught spider, exercise a bit more caution when controlling the environment.
A gigantic T with a gigantic appetite!
This is a species with an amazing appetite, and it must be kept well fed. My adult is around 7-8″, and in its first month with me, it was constantly hungry. During this time, I would feed it twice a week, usually offering 5 or so large crickets one day and a 1.5″ dubia roach the next. To say its feeding response was enthusiastic would be an understatement. Once, when dropping in a roach, I could only watch in awe as this spider leaped from about 7″ away to snatch up its prey. It was an impressive display and a good reminder of just how quickly this big tarantula could move.
My slings are also voracious eaters, consuming two or three medium crickets a week. Once a prey item is dropped into their enclosures, they don’t take long to quickly snatch it up and pull it into their burrows. They definitely possess impressive speed at this size.
It’s important to remember that the stirmi has an amazing appetite, so you are going to want to make sure that you are easily and consistently able to procure larger prey items for it once it reaches its adult size. I’m already looking to procure some Madagascar hissing cockroaches to fatten it up after its upcoming molt.
As always, caution is a must!
As mentioned earlier, both sling and adult stirmis can REALLY move. Despite being a large and heavy-bodied tarantula, this species is deceptively fast. And although mine would rather retreat to their burrows when disturbed, there are many examples of feisty and defensive specimens out there that will stand their ground when they feel threatened.

Now, I’ve heard some folks ask about venom potency as if this species mild venom somehow makes a bite from this spider less threatening. That notion, of course, is just foolish. These Ts are known to sport fangs 1″ long or more. Just the mechanical damage from a stirmi bite could cause huge amounts of physical trauma. Couple that with the fact that they would be delivering deep puncture wounds with large fangs covered in bacteria and other contaminants, and the venom level becomes irrelevant. Make no mistake, a bite from this animal would be a nightmare.
Also, what it lacks in strong venom, it surely makes up for with some of the most potent and irritating urticating hairs of any species. Folks have described excruciating levels of burning and itching from T. stirmi hairs, and I’ve seen photos of the many raw, oozing blisters these hairs can cause. Several folks have found these hairs to be so bothersome, that they no longer keep this species. Getting haired by a stirmi is NO joke, and this threat should be taken very seriously.
Whenever working with your stirmi, wearing long sleeves, gloves, and eye-protection is definitely encouraged. Even if your specimen seems calm, all it takes is one good hairing to ruin your week. Some folks even wear face shields to protect their eyes and nasal passages from hairs. It’s also important to remember that tarantulas will often kick hairs around their enclosures, even if you don’t see them do it. That means you should always wear gloves when dealing with old substrate or cleaning dishes.
A gorgeous display tarantula for the conscientious keeper.
There is no denying the awe-inspiring size of this amazing T; it just has to be seen to be appreciated. However, although this is a species on many keepers’ wish lists, this is not an animal to be trifled with. Along with this Ts amazing size comes quite a bit of attitude and the potential for nasty bites and an incredibly painful hairing. Couple that with larger space requirements and trickier husbandry, and you have a spider that is definitely not a good match for an inexperienced keeper.
As always, don’t just take my word for it. If you are considering purchasing a T. stirmi, do your homework, search the forums, and read what other keepers have to say!


